^ Learn Crochet index page – Previous: Extensions and Patterns + Next: Ami Elements
In this page: ways to work in the round, starting rounds, working on both sides of a chain, adding new yarn via slip stitch, outside versus inside of the work, mesh bag pattern, granny square pattern, round beanbag pattern, patterns elsewhere.
We’ve seen some work in the round already, making single crochets into a ring formed from a chain. There are at least three other ways to begin working in the round, two of which we’ll address here, and two ways to continue: in a spiral, where you simply continue on when you get back where you started, and in joined rounds (confusing, yes), where you join the beginning and ending of each time around with a slip stitch and then chain up as though working in rows; this makes the edge very neat but gives a visible seam where the rounds are joined (though at the end, if you are changing colors, or if you don’t mind cutting your yarn in the middle you can use a needle join; I also explored various modifications to working in the round and their appearances). The spiral (which is also called “continuous rounds”) is more intuitive/easier but leads to a slightly slanted line of stitching, which may not be desirable depending on the piece and must be accommodated at the outer edge if the piece does not close back in on itself. Knit Simple Magazine has photos showing the difference, and Tamara Kelly has a video on how to work in each kind of round.
The mesh bag and granny square patterns, below, begin with a chain ring and are worked in proper rounds, with joining instructions given in the patterns. The beanbag is worked in a spiral, and begun with the other most common (non-amigurumi) method of beginning work in the round: work all stitches into the same initial chain. In this case everything is sc, so to begin you ch 2 and work all sc into the first ch, the other being your turning chain. It does not matter how you insert your hook into the chain in this case because it will be completely hidden by your stitches. For Dummies has diagrams of these two starting methods.
To work into the first chain for taller stitches, you begin by chaining 1 more than the turning chain for those stitches; i.e., 3 for hdc and 4 for dc. Taller stitches are rarely worked in spirals because getting the spiral started, by going from working into the initial chain or ring to working in stitches made in that chain or ring, causes obvious deformation of the stitches. This could be accommodated in the mesh bag, since it is so open, but not in a more solid piece like the granny square.
The disadvantage to both of these starting methods is that they leave a gap. In the first-chain method, you can alleviate this by making your slip knot with the two ends of the yarn swapped, so the cut end controls the tightness of the loop. After you’ve stitched the first round, you can tighten the first chain down by pulling the cut end. You’ll have to secure the yarn well to keep it from pulling open again, however. If you want to get serious about making objects to be stuffed, it will be worth your time to learn the amigurumi magic ring and double magic ring in the next section.
A method of working in the round that cannot be replaced by the magic ring is working along both sides of a chain. This begins identically to making a standard crochet swatch (turning chains and all), but when you get to the end of the chain you make one or more additional stitches, rotate the piece so the bottom of the chain faces up, and stitch back the way you came using the remaining strands of the chain. You may stitch into one loop on each side, leaving the back bump of the chain unused, if the look is preferred; it may make a good central vein in a leaf, for instance.
The granny square also introduces a new way of changing yarn. Instead of switching in the midst of a stitch, you finish one yarn at the end of a round. Then make a slipknot with the new yarn, snug the loop around your hook, insert your hook into a chain space (or previous round’s stitch) and make a slip stitch. This anchors the new yarn to the old. Here is a video about this from The Art of Crochet by Teresa (it’s a little odd because it seems to be a compilation of when this happens in other videos, but shows the stitch well), and a lefty version also from Art of Crochet.
One loose end: which side is the outside? The front of a stitch is the side that faces you when you make it. Working back and forth, every other row faces an opposite direction – you will see “right side” denoting the front of the finished work and “wrong side” for the back, since they do not consistently match the stitch sides. In the round, however, all the stitches face the same direction, and the right side shows the front of every stitch. When you begin something cup-shaped, the fabric will want to curve toward you, but that is inside-out from how it ought to be. After a couple of rounds, turn it right-side-out. While it is ultimately a matter of preference, the fronts of the stitches are smoother and give cleaner color changes, and the amigurumi invisible decrease is only invisible from the front. The only exception is when working with hairy or fringed yarn. The fluff will want to stick out the back of the stitch, so the back side should be the outside then.
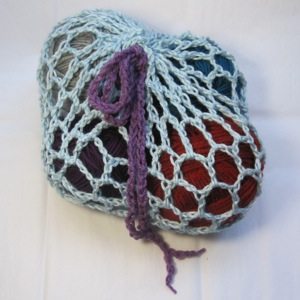
Mesh bag (below left):
This bag is best made with sturdy cotton yarn and an I/J/K hook. Round 1-6 make the foot of the bag; skip to round 7 early if you want a smaller bag.
Ch 9; join with sl st into ring.
1. Ch 6 (your pretend first dc plus a ch-3 gap). Into ring: *dc, ch 3* 4 times. Sl st into 3rd ch of initial ch-6 (5 ch sps made).
2. Sl st into first ch sp. Ch 6 and dc in same ch sp. Ch 3. In each ch sp starting with the next: (dc, ch 3, dc, ch 3). Sl st into 3rd ch of initial ch-6 (10 ch sps made).
3. Sl st into first ch sp. Ch 6 and dc in same ch sp. Ch 3. *In next ch sp, dc, ch 3. In next ch sp, (dc, ch 3, dc, ch 3).* Repeat *…* around. Sl st into 3rd ch of initial ch-6 (15 ch sps made).
4. Sl st into first ch sp. Ch 6 and dc in same ch sp. Ch 3. *In each of next two ch sps, dc, ch 3. In next ch sp, (dc, ch 3, dc, ch 3).* Repeat *…* around. Sl st into 3rd ch of initial ch-6 (20 ch sps made).
5. Sl st into first ch sp. Ch 6 and dc in same ch sp. Ch 3. *In each of next three ch sps, dc, ch 3. In next ch sp, (dc, ch 3, dc, ch 3).* Repeat *…* around. Sl st into 3rd ch of initial ch-6 (25 ch sps made).
6. Sl st into first ch sp. Ch 6 and dc in same ch sp. Ch 3. *In each of next four ch sps, dc, ch 3. In next ch sp, (dc, ch 3, dc, ch 3).* Repeat *…* around. Sl st into 3rd ch of initial ch-6 (30 ch sps made).
7. Sl st into first ch sp. Ch 6, dc into next ch sp, ch 3. In each ch sp around, dc, ch 3. Sl st into 3rd ch of initial ch 6 (35 ch sps made).
Repeat round 7 until bag is desired height. FO.
For drawstring, make a chain that goes around the bag plus a few inches. Weave it through the last round of double crochets, over-under-over-under, and tie the ends of the chain together in an overhand knot.

One-color granny square (above right):
The granny square is the one pattern in this I can take zero credit for (while many of these patterns are too simple to require much credit, I did make their patterns out of my brain rather than from a reference). It is a very old pattern, first published in the middle or late 19th century by Weldon and Company of London. Every crocheter should make at least one!
Ch 4 and join into ring with sl st.
- All into ring: ch 3 (counts as first dc), dc 2, ch 2, *dc 3, ch 2* 3 times. Sl st into 3rd ch of original ch 3 (12 dc, 4 ch sp made).
- Sl st into next 2 dc and into next ch sp. Ch 3, dc 2 in same ch sp, ch 2, dc 3 in same ch sp, ch 1. *In next ch sp, dc 3, ch 2, dc 3, ch 1* 3 times. Sl st into 3rd ch of original ch 3 (24 dc, 8 ch sp made).
- Sl st into next 2 dc and into next ch sp. Ch 3, dc 2 in same ch sp, ch 2, dc 3 in same ch sp, ch 1. *In next ch-1 sp, dc 3, ch 1. In next ch-2 sp, dc 3, ch 2, dc 3, ch 1* 3 times. In last ch-1 sp, dc 3, ch 1. Sl st into 3rd ch of original ch 3 (36 dc, 12 ch sp made). FO.
Round 3 gives you the pattern for a larger granny square: each ch-2 sp is a corner, and gets 6 dc cut in half by 2 ch. Each ch-1 space is on a side, and gets 3 dc. The dc in different spaces are separated by a ch 1, which results in one additional ch-1 space per side, per round. Sl st to join each time and then sl st to get into the next ch-2 sp without adding height.
Three-color granny square (below left):
In first color: Ch 4 and join into ring with sl st.
- All into ring: ch 3 (counts as first dc), dc 2, ch 2, *dc 3, ch 2* 3 times. Sl st into 3rd ch of original ch 3 (12 dc, 4 ch sp made).
- Tie sl kn in second color and place on hk. Sl st to join new yarn to any ch-2 sp. Ch 3, dc 2 in same ch sp, ch 2, dc 3 in same ch sp, ch 1. *In next ch sp, dc 3, ch 2, dc 3, ch 1* 3 times. Sl st into 3rd ch of original ch 3 (24 dc, 8 ch sp made).
- Tie sl kn in third color and place on hk. Sl st to join new yarn to any ch-2 sp. Ch 3, dc 2 in same ch sp, ch 2, dc 3 in same ch sp, ch 1. *In next ch-1 sp, dc 3, ch 1. In next ch-2 sp, dc 3, ch 2, dc 3, ch 1* 3 times. In last ch-1 sp, dc 3, ch 1. Sl st into 3rd ch of original ch 3 (36 dc, 12 ch sp made). FO.
As before, round 3 can be continued to make a granny square as large as you like – even full afghan size!

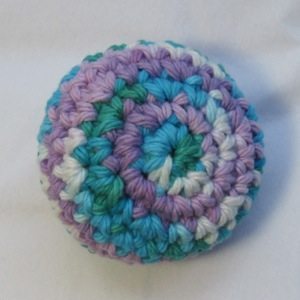
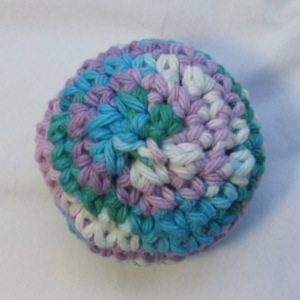
Round beanbag (above right; more pictures below):
This beanbag will be approximately 2.25″ in diameter when worked with an F, G, or H hook, the size of a standard hacky sack. Crocheted footbags are usually worked with finer yarn and a smaller hook, however, so the stitches can be tight but the fabric still fairly thin and flexible. Mark your rounds so you know when you’ve finished them! Joined rounds have an obvious height change between them, but nothing distinguishes the first stitch of a round in a spiral from the last stitch of the previous round. The first three pictures below show how I do it, with a 2″ to 3″ length of embroidery floss or yarn laid over the work. The stitch just completed ends a round, and the stitch formed next, enclosing the marker, is the first of a new round. Craftastica has a post about marking with one long piece of yarn that illustrates the positioning of my markers as well as giving this modification to the method.
1. Ch 2, work 6 sc into 1st ch.
2. Sc inc in each sc (12 sc).
3. *Sc inc, sc* around (18 sc).
4. *Sc inc, sc, sc* around (24 sc).
5-8. Sc around (4 rounds).
9. *Sc dec, sc, sc* around (18 sc).
10. *Sc dec, sc* around (12 sc). Stuff!
11. Sc dec around (6 sc).
Note that using actual beans for stuffing is discouraged because they could get wet and mold. Pony beads ought to make a decent substitute in both coarseness and weight, though I haven’t tested them.
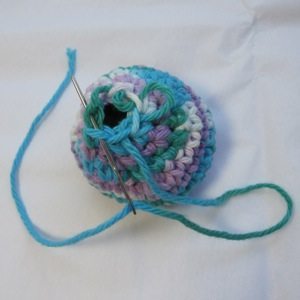
Use any method you like to sew the end closed. The fourth picture below shows weaving the end through the outer loop of each of the final stitches; it is also good to whipstitch the outer loops, running your needle from the top center of each stitch outward, under the front loop.
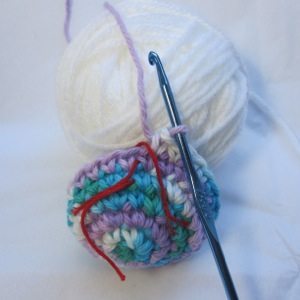
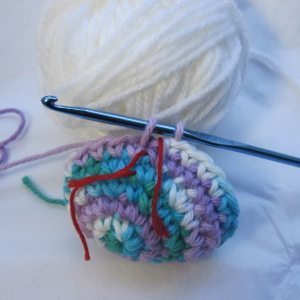
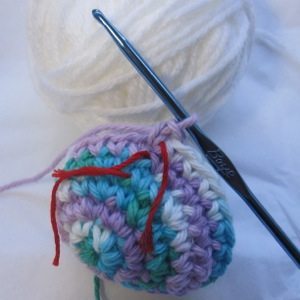
Three pictures above: Using stitch markers in three steps. 1. Placement after last stitch of a round. 2. First stitch of new round begun. 3. First stitch of new round completed.
Two pictures below: 1. Stitching to drawstring the end closed (may help to click and view larger version). 2. The closed-up end.
Patterns Elsewhere:
A few more simple rounds patterns in spirals: fortune cookies, cupcakes, goldfish, eggs, little pumpkins (uses magic ring to start but beginning could be changed to “ch 2, sc 5 in 2nd ch from hk”).
I have a whole page on granny squares, along with variations, joining methods, and borders. More on borders and edgings may be found in a lovely article on Crochet Cabana.
A more complicated pattern but fun as well: spiral crochet in three colors. I remember finding this in a forum somewhere without its photos and tracking it down on the Wayback Machine. I was very excited to find it in a new home while looking for something else!
One pattern working along both sides of a chain: goldfish applique.
^ Learn Crochet index page – Previous: Extensions and Patterns + Next: Ami Elements