^ Learn Crochet index page – Previous: Choose Your Weapon + Next: Loop the Loop
In this page: single crochet color change, taller stitches color change, managing the unused strands, Greek key bookmark, snaky bracelet, patterns elsewhere.
There are two reasons you might want to change yarn: to change type or color of yarn, or because you’re making something large enough to use more than one skein of the same yarn. If you are replacing one strand of yarn with another of the same, it’s not too crucial how you do it. It is crucial, however, when changing colors, so that’s the only method I will discuss.
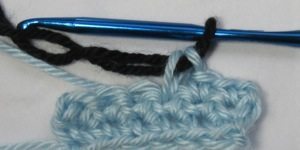
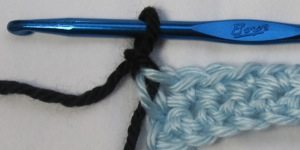
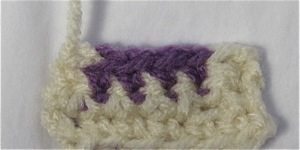
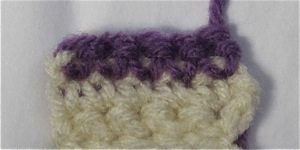
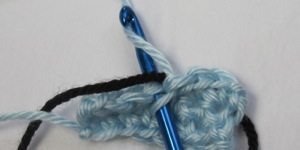
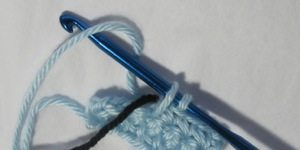
To change colors you have to think ahead. When you complete a stitch it puts a loop on the hook, but that loop belongs to the next stitch. Just as it has to be as tall as that stitch (whence turning chains), it also has to be the same color. For example, if you have an 8-sc row and you want it half red and half blue, you will make 3 sc in red, pull up a red loop in the next stitch, and then pull a blue loop through the two loops on the hook. Then you will make 4 sc in blue. In the next row, presuming the pattern continues this way, you’ll make 3 sc in blue, pull up a blue loop, and finish that (4th blue) sc with red, finally making 4 more sc in red. At the end of the row it is the same; complete the last sc of the previous row with a loop of the new color. The first two pictures below show a color change in the middle of a row, and the third a color change anticipating the next row.

Tamara Kelly has lovely videos of color change at the end of a row and color change in the middle of a row.
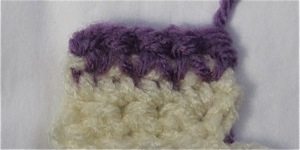
The reason for changing “in advance,” to reiterate, is that the last loop pulled through a single crochet becomes either the “roof” loop of the next sc or the first turning chain, so it needs to be the appropriate color for the next sc or row, not the current one. The pictures below show the results of a correct color change on the left and a change delayed by one yarn-over on the right, first in the middle of a row and then at the end.

Similarly, to change color in hdc and dc you perform all but the final yarn-over/pull-through of the last stitch in color A, and use color B for that final loop. Annie’s Attic has two pages about color change for double crochet, one with a video and drawing and the other with a video and photos.
If you are making chunky stripes, or other patterns where colors are only reused at some distance from their previous use, you’ll probably want to cut the yarn of colors you’ve just finished. Any time you don’t cut yarn, be warned that there are some practical difficulties due to switching between yarn strands and turning the work at the ends of rows: the strands of yarn will wind together. Pause every third row or so to untwist them by moving the skeins around appropriately.
If you are keeping your yarn attached, which is quicker and uses less yarn in the case that colors are reused in close proximity, you have the question of what to do with it while it is not in use. This is solved on a case-by-case basis. With some patterns you can just let it dangle behind the work and pick it up again when you need it, but that works only when there is a side of the work that won’t be seen (such as in a stuffed toy).
In a few cases, you may pick up a color at the same spot you left off with it, except one row up. This is not common, but when you do encounter it, managing the unused yarn is simple. When you finish with one color, pass the working end to the front of the work so that it sticks through the piece between the last stitch of its color, the first stitch of the next color, and the previous row. It will be waiting at the correct place in the back of the work when you return in the next row. Craftastica has a post about stitch marking; the stitch marker emerges at the same spot that the yarn does after being dropped to the front of the work.
In general, though, you will need to carry your unused color yarn inside the stitches of your current color yarn. This is simple in theory: lay the strand of unused yarn along the top loops of the previous row so that the loop pulled up through the previous stitch is below it and the loop pulled through the two loops on the hook to finish the stitch is above it, as pictured below.
Tug the carried yarn as needed so no loops of it are sticking out between or through stitches, but be careful not to pull it too tight – it will compress the row if you do. I have found that for me the key is leaving things looser than I think they ought to be. The For Dummies site has an extensive article about yarn management in multi-color pieces. PlanetJune has a post about yarn management for amigurumi, which would apply to any piece with a side that won’t show.
Here are two two-color patterns for practice. The first allows you to pass your unused yarn to the front of the work and pick it up in the next row, where it will be on the back. The second requires carrying the unused yarn inside your stitches.
Greek key bookmark (2 colors):
This pattern is designed so you can throw your unused yarn over to the front of the work before making the first stitch in the new color, and pick it up in the correct place in the next row. It works fine in any hook size.
1. Ch 5. Sc in 2nd ch from hk and across (4).
2-4. Ch 1, turn, sc across.
5. Ch 1, turn. Sc 2, changing to other color at end of 2nd sc. Drop previous color to front; sc 2.
6-8. Repeat row 5.
9-12. Ch 1, turn, sc across.
To increase the size of this project, add pairs of stitches or rows. The single-color rows may be added to one row at a time, but to end up with the correct color at the end, there must be an even number of color-changing rows. Alternatively, repeat all of rows 1-12, changing color on last sc of row 12.
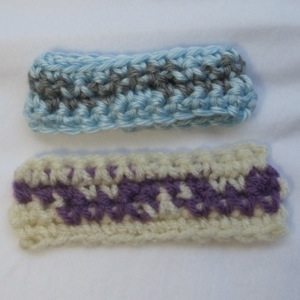
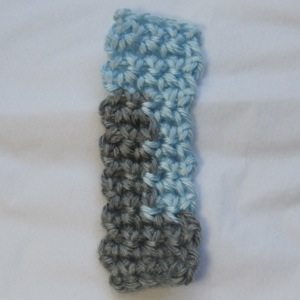
Snaky bracelet (2 colors):
In this pattern you will need to carry the unused yarn inside your stitches. Because of this, it works better with a smaller hook such as F or G (3.75-4.25mm). The pattern is given so you could make it a bookmark instead. The initial chain, for a bracelet, goes around your wrist; you will probably want to chain 25 or 31.
1. With main color, ch (multiple of 6) + 1. Sc in 2nd ch from hk and every ch across.
2. Ch 1 and turn. *Sc 2 and change color at end of 2nd st, sc 4 and change color at end of 4th st* across, except do not change color at last sc.
3. You should be in your contrast color. Ch 1 and turn. Sc 1 and change color at end of st. *Sc 2 and change color at end of 2nd sc, sc 4 and change color at end of 4th sc* across, except last repeat will be only sc 3; still change color at end of 3rd st.
4. You should be in the main color again. Ch 1 and sc across.
FO with long tail and sew into bracelet.
Patterns elsewhere:
Here is a lovely resource for making an irregular stripe pattern (random within bounds you set): the Random Stripe Generator.
Simple cross stitch patterns in – or simplified to – two or three colors (including the background) translate well to single crochet color work. You might try better-cross-stitch-patterns.com, HobbyLoco, or the About.com index of free cross-stitch patterns.
^ Learn Crochet index page – Previous: Choose Your Weapon + Next: Loop the Loop