^ Learn Crochet index page – Previous: The Main Stitch + Next: Growing Up
In this page: single crochet increases, single crochet decreases, zig-zag bracelet pattern, earwarmer band recipe.
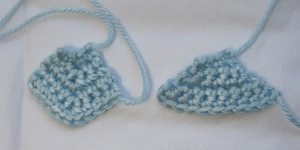
There are multiple ways to increase or decrease the number of stitches in a row. Increasing is more straightforward, so we’ll begin with it. The easiest increase is simply to make two single crochets into the same stitch of the previous row, as shown on a chain at For Dummies. The only subtlety is in designing, when you have to spread out your increases to achieve the finished shape you want. For example, in the two swatches below, I started with a ch-4, sc 3, and then added two sc in each row. In the left-hand piece I added them both in the middle (3 sc in the center stitch), and in the right-hand piece I added one to each end.
The other methods increase in a stairstep fashion, and there is one for each end of a row. To increase at the beginning of a row is a bit fiddly but not conceptually hard. Chain out at the end of the row previous to the desired increase by the number of additional stitches you want plus 1 for the turning chain. Crochet into each chain starting with the second from the hook and then continue across the row. The best method to stitch into the chain in this case, to avoid twisting, is under the teardrop (method 3 of inserting your hook). In this case you are pretending the chains are tops of previous stitches, so you want to stitch into them in the same way you stitch into previous stitches. This method, the method of stitching twice into a single stitch of the previous row, and a method to extend at the end of a row (a bit more advanced, and hence not covered here) are shown at Knit Simple Magazine.
The simplest ways to decrease are to skip stitches, either in the midst of a row (only one at a time, or the piece may distort), or at the end by stopping short, as shown in this link from For Dummies (using double crochet, which is why there are three chains – turning chains – between the work and the hook). That link also shows how to get a nearly-identical effect at the beginning of a row with slip stitches. This won’t be exactly the same as skipping, but slip stitches are very short and have a tendency to roll to the front of the work instead of staying on top, so the difference is small. You may need this to shape garments, such as in narrowing the back of a sweater to create the armholes. Patterns may refer to “binding off” a certain number of stitches on each end, and if there is no explanation they likely mean to slip stitch over that number of stitches at the start and stop with that number of stitches unworked at the end.
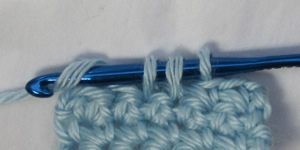
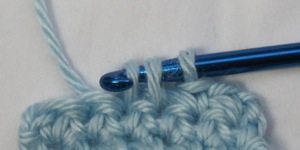
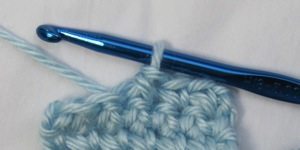
When skipping a stitch would be aesthetically or practically undesirable (it can leave crimps or gaps), you crochet two stitches together. The standard decrease (photos below, diagrams at For Dummies) is to pull up a loop in each of the next two stitches (3 loops on hook) and then yarn over and pull through all three loops (i.e., perform all but the final yarn-over/pull-through of each of two single crochets, and then join them together with that last YO/pull). There are righty videos from The Art of Crochet by Teresa and Tamara Kelly, the latter of which also covers double crochet decrease, and a lefty version also from The Art of Crochet by Teresa.
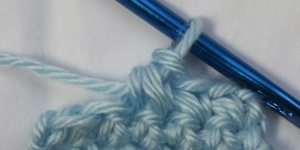
There are other decreases that have been developed to try to make the event less noticeable, such as the invisible decrease for amigurumi (to be covered on the amigurumi page) and a decrease by Lily Chin I call the slip stitch decrease (below), wherein you start by pulling up a loop in each of the next two stitches and then pull that second loop through the two loops on the hook, like a slip stitch.
Pattern abbreviations: traditionally, decreases are noted by “sc dec” or “sc2tog” (single crochet two stitches together) and increases by either “sc inc” or “sc 2 in next st” (since more than one extra stitch may be made, and this generalizes). In my patterns I denote increases by 2sc, 3sc, and so forth for more stitches, for brevity.
Here is a pattern contrived to let you practice single crochet increases and decreases. In it, they are simply denoted “inc” and “dec”, with “sc” and “2” understood.
Zig-zag bracelet:
1. Ch 5. Sc in 2nd ch from hk and across (4 sc).
2. Ch 1, turn. Dec, dec.
3. Ch 1, turn. Dec.
4. Ch 1, turn. Sc.
5. Ch 1, turn. Inc.
6. Ch 1, turn. Inc, inc.
7. Ch 1, turn. Sc across.
Start over at row 2 three times for an I/J/K hook, four for an F/G/H hook, but on the last one (the fourth or fifth “bead”) stop after row 6.
FO, sew into bracelet.
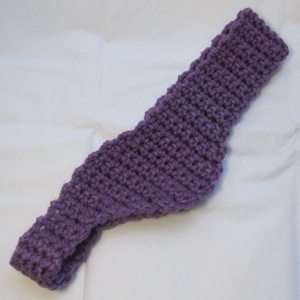
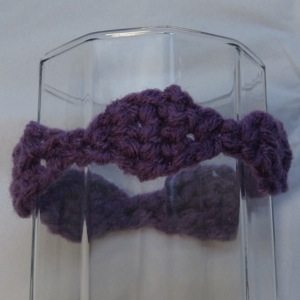
Earwarmer band (adult size):
This is partially a pattern and partially a recipe to work out the details yourself. In the photo above, the upper right is the forehead and the lower left is the nape of the neck. As written, it will fit a fairly large head. To fix it for a smaller head, remove rows from the row 24-48 sc across section – that is the part that goes over the top of your head. Make sure to remove them in pairs so what is currently row 49 is still an odd row. Remember that the band will stretch – and needs to, or it will flop all over the place – so when you are halfway through the 24-48 section you shouldn’t quite be at the top center of your head. For a smaller head you can also remove some pairs of rows from the beginning and end, but that is less crucial because the final step is to overlap those ends as needed to fit the band to your head.
With I/J/K hook, ch 5.
1. Sc in 2nd ch from hk and across (4 sc).
2-6. Ch 1, turn; sc across (4 sc; 5 rows).
7. Ch 1, turn; inc, sc 3 (5 sc).
8. Ch 1, turn; sc 4, inc (6 sc).
9. Ch 1, turn; inc, sc 5 (7 sc).
10. Ch 1, turn; sc 6, inc (8 sc).
11. Ch 1, turn; inc, sc 7 (9 sc).
12. Ch 1, turn; sc 8, inc (10 sc).
13. Ch 1, turn; inc, sc 9 (11 sc).
14. Ch 1, turn; dec, sc 9 (10 sc).
15. Ch 1, turn; sc across.
16. Ch 1, turn; dec, sc 8 (9 sc).
17-18. Ch 1, turn; sc across.
19. Ch 1, turn; dec, sc 7 (8 sc).
20. Ch 1, turn; sc across.
21. Ch 1, turn; dec, sc 6 (7 sc).
22. Ch 1, turn; sc across.
23. Ch 1, turn; dec, sc 5 (6 sc).
24-48. Ch 1, turn; sc across (6 sc; 25 rows – remove pairs of rows as necessary).
49. Ch 1, turn; inc, sc 5 (7 sc).
50. Ch 1, turn; sc across.
51. Ch 1, turn; inc, sc 6 (8 sc).
52. Ch 1, turn; sc across.
53. Ch 1, turn; inc, sc 7 (9 sc).
54-55. Ch 1, turn; sc across.
56. Ch 1, turn; inc, sc 8 (10 sc).
57. Ch 1, turn; sc across.
58. Ch 1, turn; inc, sc 9 (11 sc).
59. Ch 1, turn; dec, sc 9 (10 sc).
60. Ch 1, turn; sc 8, dec (9 sc).
61. Ch 1, turn; dec, sc 7 (8 sc).
62. Ch 1, turn; sc 6, dec (7 sc).
63. Ch 1, turn; dec, sc 5 (6 sc).
64. Ch 1, turn; sc 4, dec (5 sc).
65. Ch 1, turn; dec, sc 3 (4 sc).
66-71. Ch 1, turn; sc across (4 sc; 6 rows).
Try on and overlap as needed at back of head. Use starting and ending yarn tails to sew ends together.
At this point, if you really only want to make amigurumi, skip ahead to section 6 (Loop the Loop), ignoring the parts that aren’t single crochet, and then proceed to section 7 (Ami Elements). Come back to the remaining topics as they come up in the patterns you want to try.
^ Learn Crochet index page – Previous: The Main Stitch + Next: Growing Up