Potholders

My mother made a request for crochet potholders for Christmas, as I have mentioned. I made her four, two single layered and two double layered. I pulled four patterns from Crochet Pattern Central, but only made two of them after all.

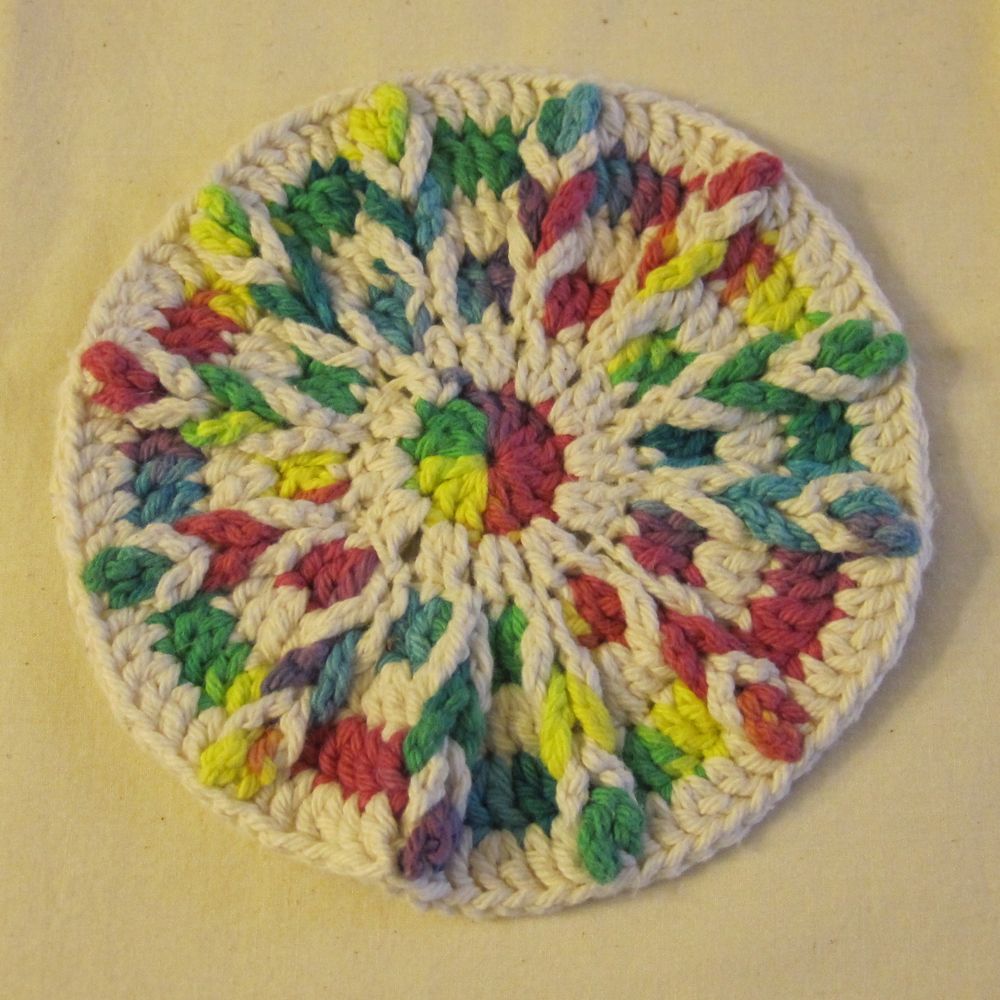
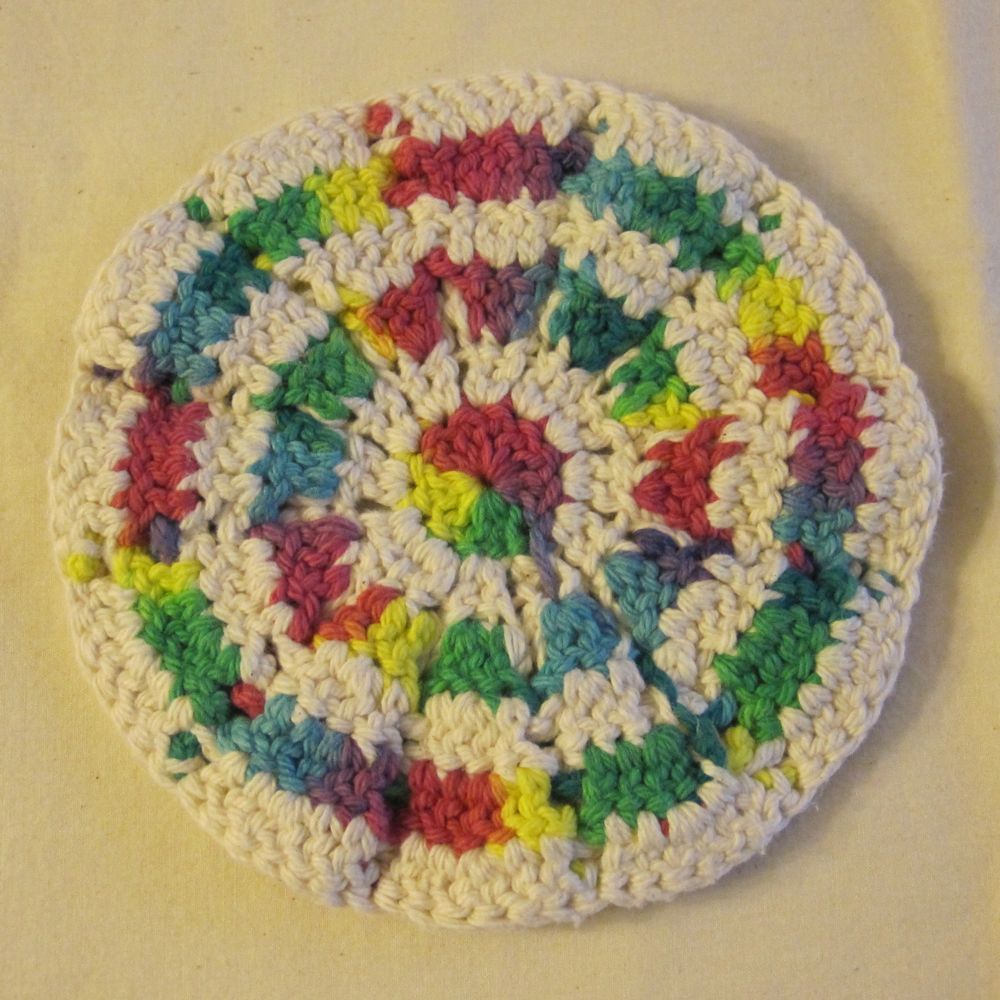
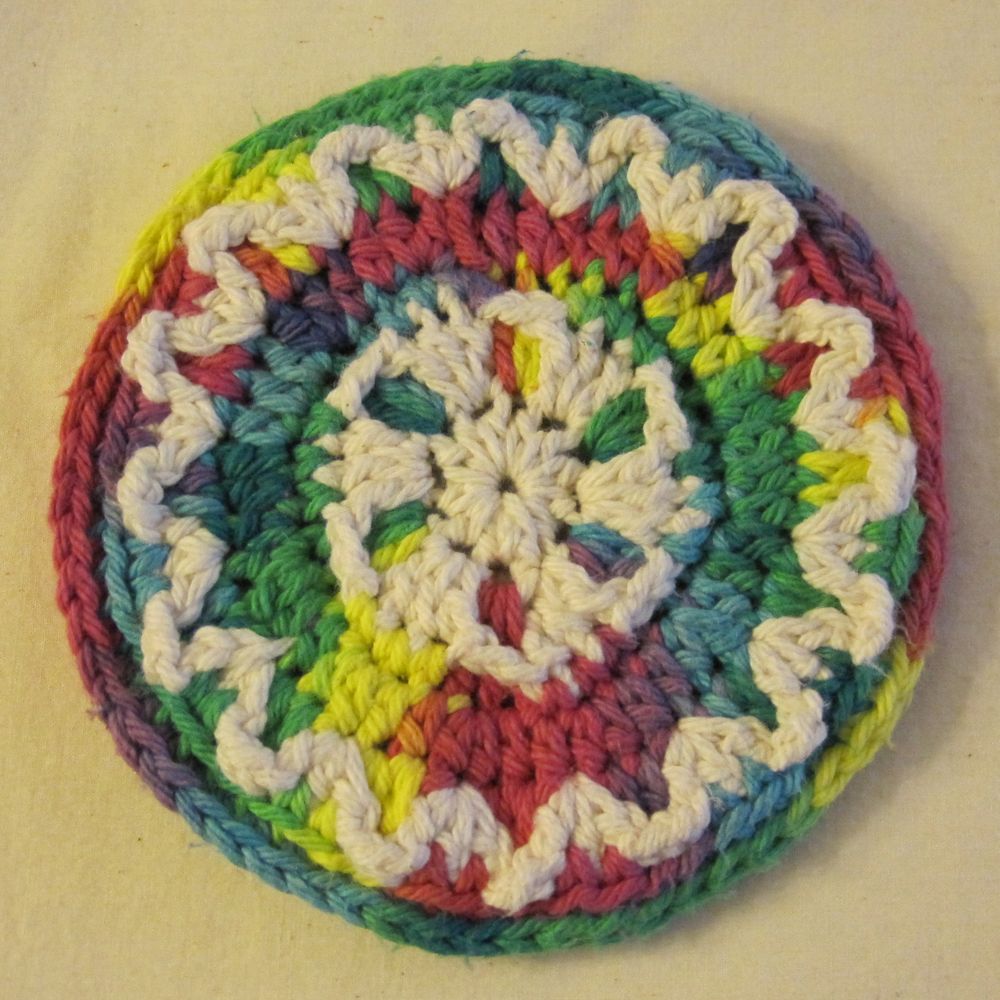
The first potholder I made was a kaleidoscope hot pad. This pattern was very mysterious, because until you get to the last round there are just a billion big loops sticking out everywhere. Then, you weave them through each other, and it all makes sense. One modification I made was to go back afterward and stitch around between rounds 2 and 3, because until the weaving gets going, the potholder is very full of holes.

kaleidoscope hot pad kaleidoscope hot pad

The second was the double-sided ric rac potholder. If you make it yourself, note that mine didn’t look quite like rickrack until I washed it.

ric rac potholder

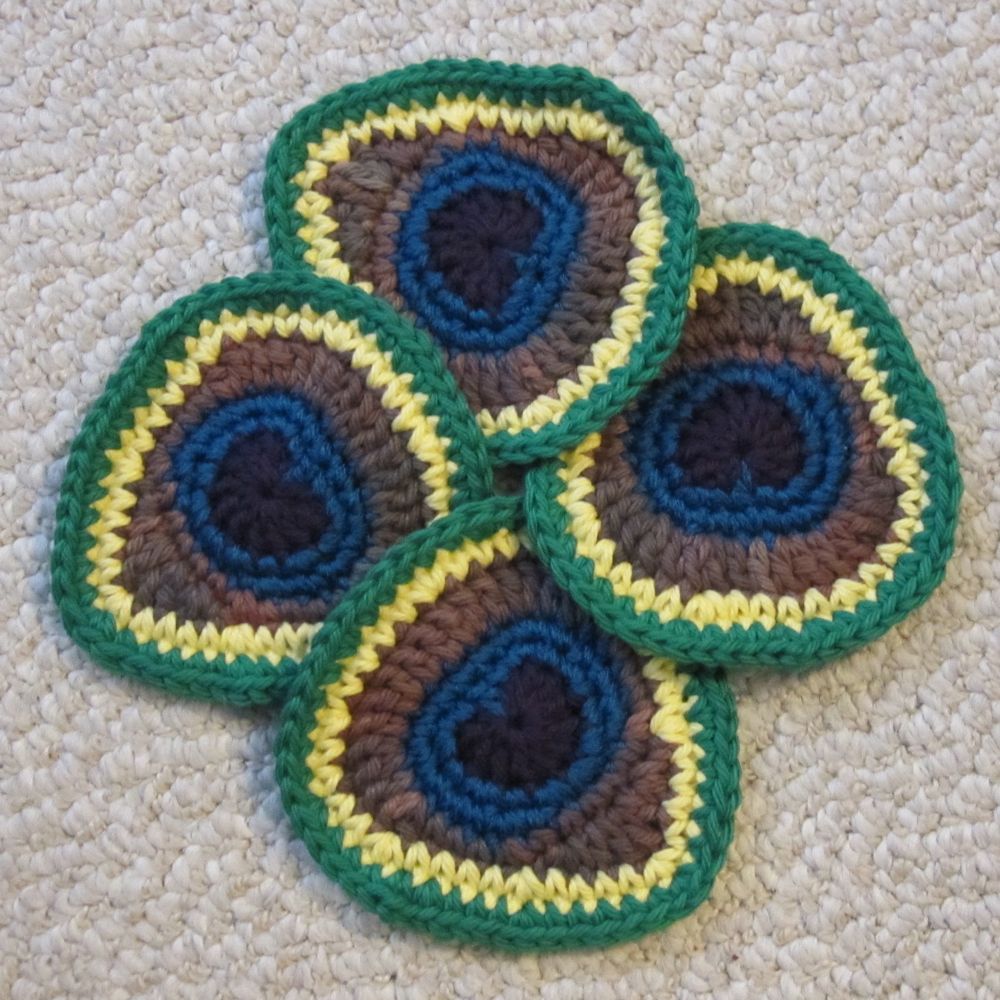
Next I made the ill-fated peacock attempt, which was inspired by the sea shell potholder pattern. While I was pondering where to go with that, I decided not to make the jewel heptagonal potholder, partially because it seemed like it might be awfully thick in the center, and partially because I couldn’t settle on colors.

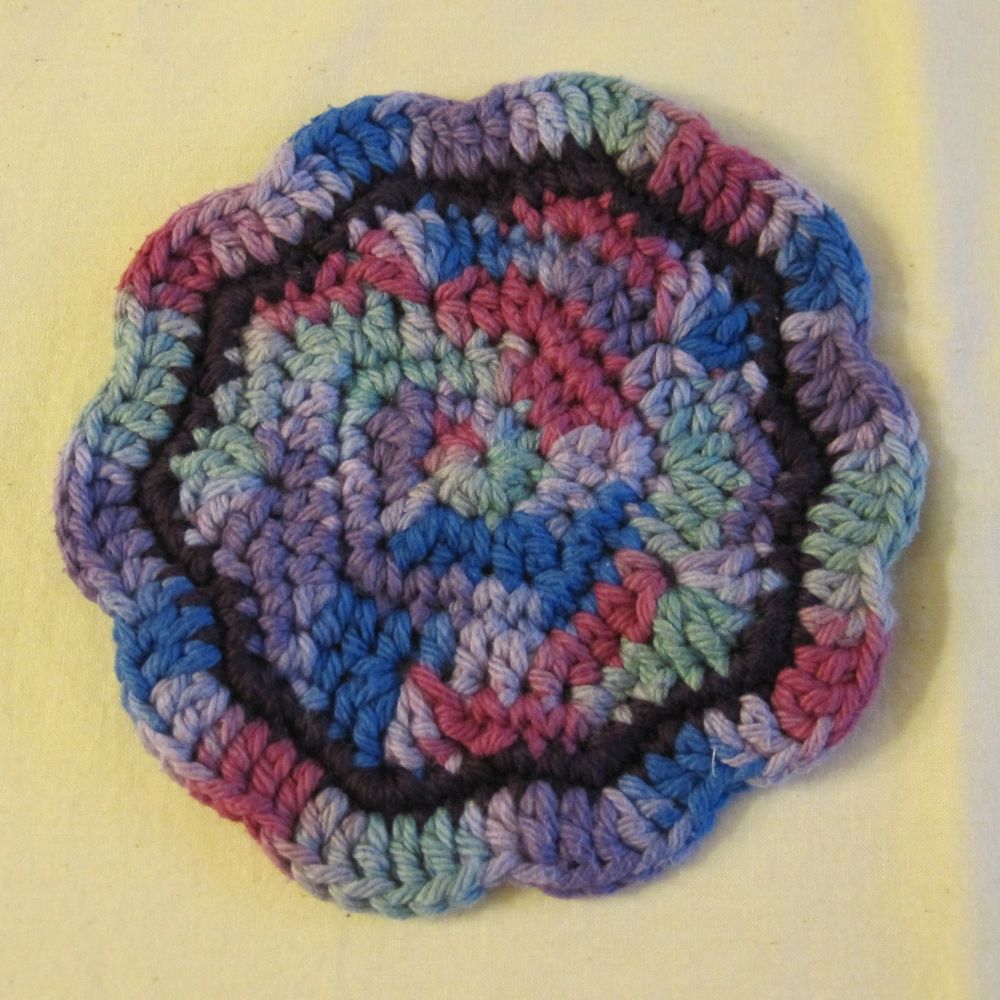
Instead, I freehanded a potholder that started out pentagonal and ended up as a ten-petaled flower.

pentagon flower

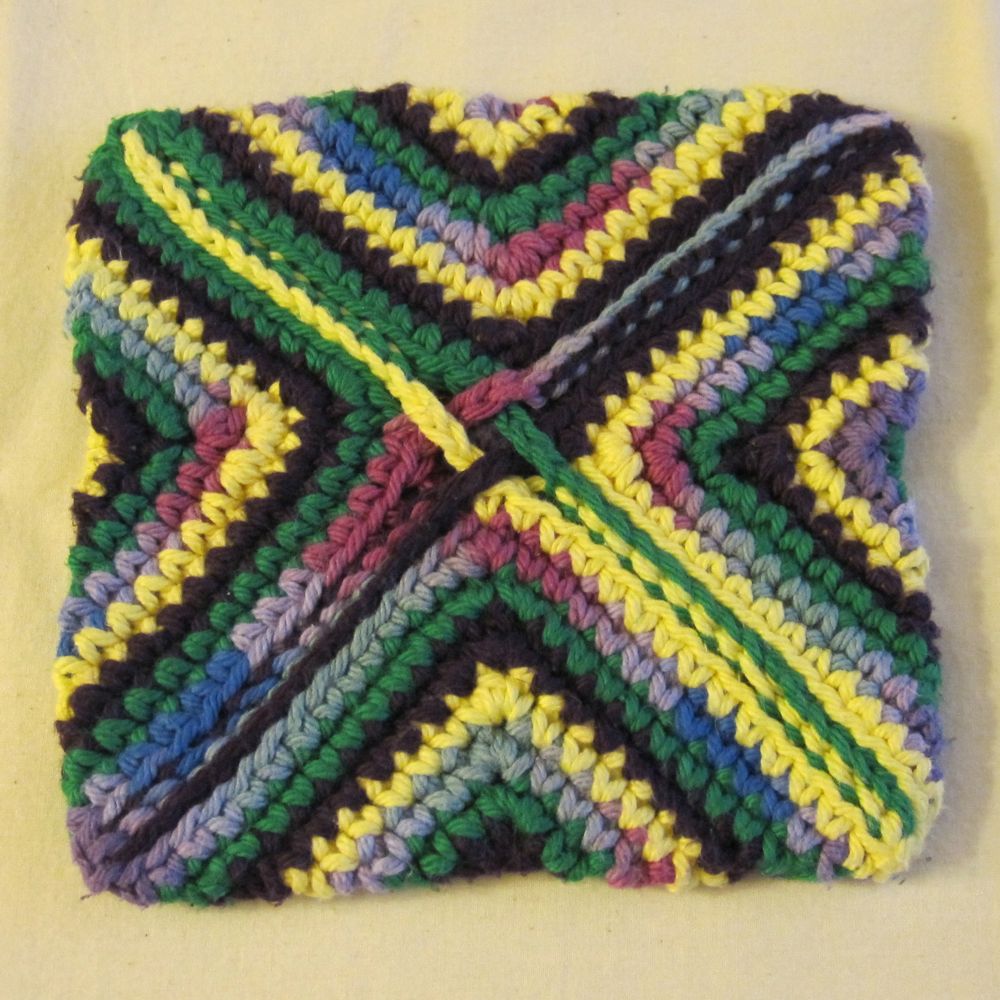
After that I decided to table the peacock idea and freehanded a second potholder. This one started out as a disk, 7 sc in the first round and an additional 7 sc per round until I got to 28, and then became a square by concentrating the increases in the corners. I intended to add each new color with a ch 2, hdc, sc in the first stitch, but halfway through I realized I was actually doing ch 2, dc, sc in the same stitch. Oh well. The next color put an sc in the ch and then 2sc in the dc, and after that I just spiraled around, going as far as I could with each color when it was innermost before going to the next, and putting 3sc in each corner. I made a very large square, finished each color at the corner where it had started, and folded the corners to the center back. I added one more sc, catching a loop from the other side of the potholder, ch 3, and sl st down the opposite line from where each color ended. To get the chains in the center to each be over one other and under one other, I worked around in a circle and with the last one I passed the ch 3 under the appropriate other ch and pulled through the yarn needed to complete the sl st line.

spiral potholder spiral potholder

Potholders are a good project – you can do them in one or two sittings, and they’re a nice manageable way to try out interesting stitches and patterns. Highly recommended.

Peacock badges

My mother asked for crocheted potholders for Christmas, and I thought since she likes bright colors (especially teal) that I would see about making her something peacock-ish. Well, I developed a pattern, which I like, but the result is leaving me cold. Since they are supposed to be for potholders I don’t want to use acrylic, and natural fibers are hard to find in sufficiently vivid colors. Anyway, I’m going to put up the pictures of the two arrangements I considered for the potholders and ask for suggestions. Perhaps if they were used individually as coasters it wouldn’t matter if some of the yarn was acrylic (actually, the blue yarn is 75% acrylic, 25% wool; the rest of them are 100% cotton), though you’d still want most of it to be natural, for absorbance.

Anyway, without further ado…

configuration 1 configuration 2

Edit: Since I posted the pattern in a comment, I thought I would post a cleaned-up version here that abides by my pattern conventions. I noted that the coasters tend to cup a little at the edge, and adding a few extra sc in the outermost round might be a good idea.

Second Edit (Oct 2013): I don’t know what happened here (except that I never intended this to be a shared pattern and was therefore not careful), and have fixed the myriad pattern errors that became apparent to me on re-reading. I’ve also created a name-your-price pdf version for the store, which includes photos of round by round progress and where to attach the new yarns. If you like this pattern, would you consider supporting me with a dollar or more via that pdf?

Other notes:
Recall that my pattern conventions include using 2sc for “sc twice in next st” and sc 5 for “sc once in each of next 5 sts.”
The top teardrop that belongs to a stitch is slightly to its right for a right-hander, and slightly to its left for a left-hander.
“Bottom” means when the coaster is oriented so the purple round forms a heart.
The sl st at the end of any non-purple round may be replaced with a needle join.
My notes say I made these with an F hook (3.75mm), but nowadays I would need an E hook (3.5mm), if not smaller, to have this tension.

Purple:
Form magic ring, ch 2; dc 10 in ring, ch 2, sl st into ring.
Cut yarn and pull end through last st; pass cut end through magic ring to back of piece.
Tighten ring most of the way but leave space for another stitch.

Teal 1:
Make sl kn and place on hk.
Insert hk into 7th purple dc, sl st, and ch 1.
Starting in the same st, *sc, 2sc* twice, sc into first ch of final purple ch-2, dc into magic ring, sc into second ch of starting purple ch-2, *2sc, sc* twice, 2sc twice.
Keep yarn attached!

As soon as you have made the dc you can finish tightening the magic ring and FO the purple yarn; I would do so before beginning the bronze yarn.

Teal 2:
Partial round (3 sts of Teal 1 will be unused).
Sl st into starting teal ch.
Starting in next st, 2sc, sc 2, 2sc, 2sc, sc 5, 2sc, 2sc, sc 2, 2sc, sl st.
Cut yarn and FO.
Between dc, sc, and sl st, you should have 26 sts around.

Bronze 1:
Place sl kn on hk; sl st to attach in last teal sc.
Starting in final teal sl st, sc 5, 2sc, [hdc, dc] in next st, *dc, 2dc* twice, dc 2, *2dc, dc* twice, [dc, hdc] in next st, sc 4.
Final sc will be in same st as joining sl st.
Keep yarn attached!

Bronze 2:
Partial round.
Starting in first bronze sc (sk the joining sl st), sl st, 2sc, [hdc, dc] in next st, [dc, hdc] in next st, 2sc, sl st.
Cut yarn and FO.
Counting the sl st, you should have 37 sts around.

Yellow:
Place sl kn on hk; sl st to attach in bronze st just to the right of the bottommost point of the bronze rnd (to the left if you are left-handed).
Ch 1.
Starting in same st, sc, 2sc, sc 2, *2sc, sc 4* six times, 2sc, sc 2. Sl st in first sc; cut yarn and FO.
You should have 45 sts around.

Green:
Place sl kn on hk; sl st to join in the center of any straight side [if you want specificity, start counting with the bottommost yellow st and join in the 9th st in the direction you work (left for righties, right for lefties)].
Ch 1.
Starting in the same st, *sc 4, 2sc, sc 2, 2sc, sc 2, 2sc, sc 4* three times.
Sl st and FO.

Quilted potholder tutorial

The description of the construction of potholders ended up rather long. The outline: make 7″x7″ fabric faces, quilt them to 7″x7″ pieces of fleece, zigzag the two halves together, stitch extra wide double-fold bias tape around the edge, attach a loop of bias tape, and hand-sew the free edge of the bias tape down. The instructions will be for a pair of potholders.

Some related posts: Potholder examples 1, potholder examples 2, Embroidery for Edge Finishing (good choices for sewing down the binding).

Making faces:
The simplest way to make the fabric faces is to find a fabric you like and cut four 7″x7″ squares. There are a huge number of variations, though: you could stitch (heat safe) ribbon along a plain piece of fabric, or applique other fabric onto it, or employ any quilting technique. The two sets of potholders I made most recently were patchwork and confetti piecing.

For patchwork, I was rather imprecise: I have several 7″x7″ squares of paper, and I folded one in rough thirds diagonally, using a ruler to make sure the folds were parallel, and cut fabric with a(n unmeasured) 1/4″ seam allowance along the folded edge or edges. I had four kinds of fabric so I cut one inside third and two outside thirds of each, matched them up so no two faces had the same combination of fabrics, and sewed them together with a 1/4″ allowance. Then I pressed the seams open.

patchwork pieces patchwork faces

Confetti piecing may take longer but requires no measuring. You need more fabric for it than the total surface area of the finished faces, but you can also add more later if you discover you didn’t cut enough. I usually cut five to six faces’ worth of material for the four I am making. The different pieces should be sewn together with a 1/4″ seam allowance, but not necessarily squarely. You may lay one diagonally across the other, sew along the diagonal, and trim off the excess beyond the seam allowance. That excess may then be lined up with some other part of the material and sewn on. Press the seam allowance open after every seam, to minimize bulk. You may also cut a straight line across the material and stitch the halves together in a different orientation. Repeat until there is some region that looks like a good potholder face, cut out a 7″x7″ square, and sew the remainders together again as before (I think of this as “rolling out the scraps”). You can see why this takes a lot of material: lots of seam allowance, and little pointy bits sticking out unusably from the edges.

starting confetti pieces back of confetti piecing

cutting a face
Try to continue the straight line of the template all the way across the fabric, to make using the leftover fabric easier.

rolling out the scraps
“Rolling out the scraps.”

confetti faces

Construction:
I use fleece remnants for my padding. Any color is fine, so long as you line thinner/paler fabrics with muslin or white cotton to keep the fleece color from showing through. Cut four 7″x7″ squares and pin your fabric faces to them. Stitch around the edge at about 1/4″ and quilt them down the center in some way. My butterfly potholders had a stitched triangle somewhere in the middle, my patchwork potholders are stitched along the two seams, and my confetti-pieced potholders are stitched along some assortment of seam lines.

If the faces have an upper corner, align them so those match when you pair the halves up. Zigzag around the edges of the potholders. You could also straight stitch, but zigzagging keeps the edge from puffing unattractively under your bias tape and makes straight stitch unnecessary.

pinned for quilting
I cut a 14″x14″ square of fleece and pinned all four faces at once. I don’t think I recommend that, since it is still advisable to stitch around the edges of each face.

ready for binding

Edge binding:
Each pair of potholders uses about two yards of binding, or 2/3 of a package. You want extra wide double fold bias tape. Unfold it and pin one raw edge along the edge of the potholder (if the tape is folded unevenly, use the narrower half), curving around the corners. This takes a fair number of pins. Make sure you start a bit away from a corner so you don’t have to join the cut ends on a curve; to make the join, fold the right-hand raw edge (with the edge of the potholder facing away from you) in on itself and overlap the left-hand raw edge over it. See the pictures below: you want the exposed tape ends to point toward you when you sew the seam on your machine.

pinned for machine sewing

pinning the overlap
You want your raw edges downstream.

Stitch in the fold line all around the potholder. I often have to walk the machine with the handwheel around the corner curves, and even with that I sometimes have to redo one or two. Afterward, trim the potholder corners to match the curve of the bias tape, and zigzag around the edge again. Cut a 5″ to 5 1/4″ length of bias tape to be the hanging loop. If you have a desired top corner, make sure you pin the loop to it. Fold the bias tape in half so the open edge faces out (see picture) and pin to the opposite side of the potholder from the edging. I usually pin the edging down so it can’t get caught in the stitching. Sew the loop on in a straight line close to the corner edging stitch. Trim any bits that stick out past the edge and zigzag the loop ends down.

pinning the loop

Fold the edging over to the loop side and pin down. At the join, unfold the original bias tape folds so that the outer layer of tape is completely wrapped around the inner layer. You may need to change the original fold on the inner layer, making the strip a little narrower, in order to get a smooth line.

pinning the last edge

There will be a separate post with my thoughts on choice of embroidery stitch for the loose end of the binding [edit: here it is!], but whatever stitch I use I proceed in the same way: start at the near edge of the loop and stitch the binding down underneath it. Proceed around the potholder until you reach the near end of the loop again. Pin the loop up, stitch across the base, and then stitch up the far side of the loop, around, and back to where you started (this is why the open edge of the bias tape should be outward: your stitches will seal it off).

I also wash the potholders in a mesh laundry bag and give them a press before wrapping them. As long as your embroidery is sturdy, there should be no problem machine-washing the finished project.

finished confetti potholders finished patchwork potholders