Weavers: Relaxation, Invitation, Ornamentation

I’m in an art exhibit for the first time ever! [This is more a function of me getting in gear than anything else, but it’s exciting nonetheless.] A set of three mixed-media fiber art pieces, with sewing, embroidery, weaving, and gluing.

"relaxation" art embroidery "invitation" art embroidery "ornamentation" art embroidery

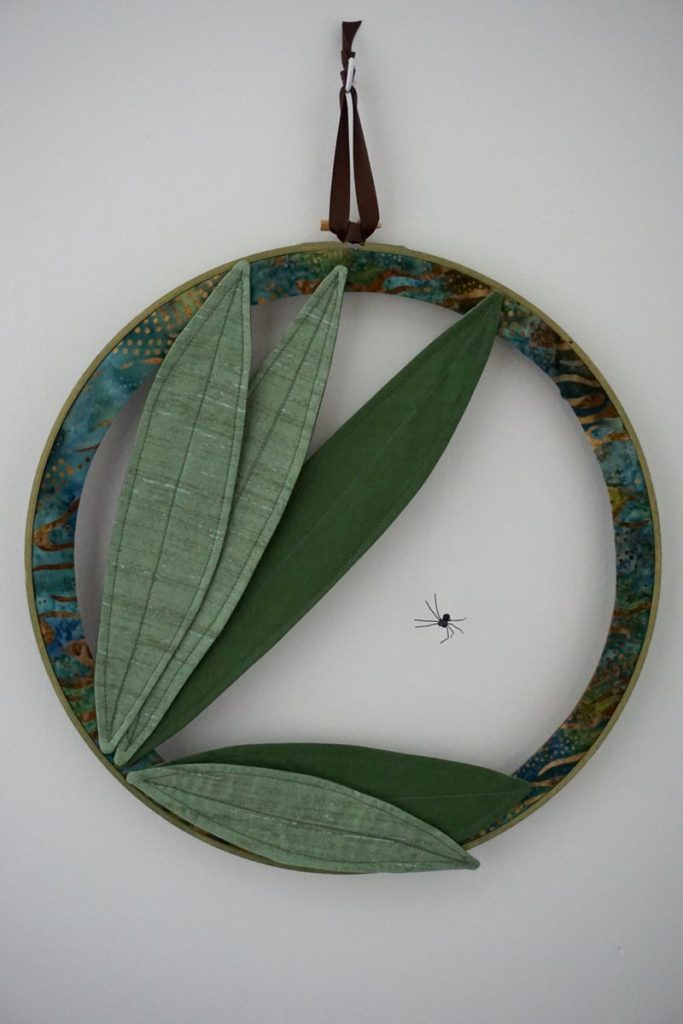
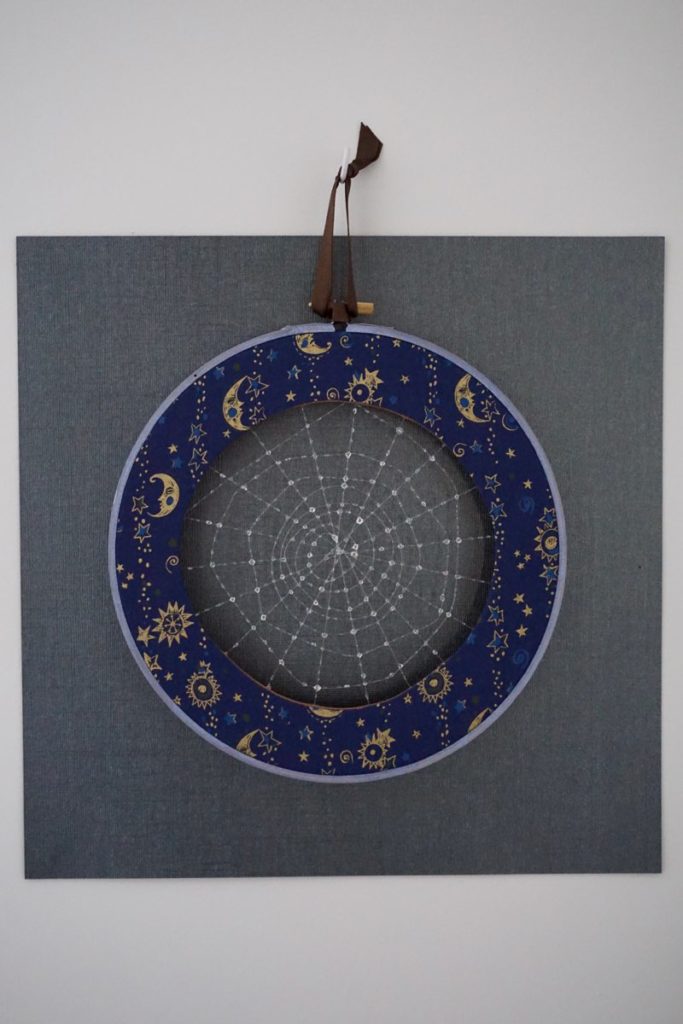
From left to right, these are Relaxation, Invitation, Ornamentation. Click to embiggen; the next larger size would have made them taller than my browser window, and I find that super annoying on other sites.

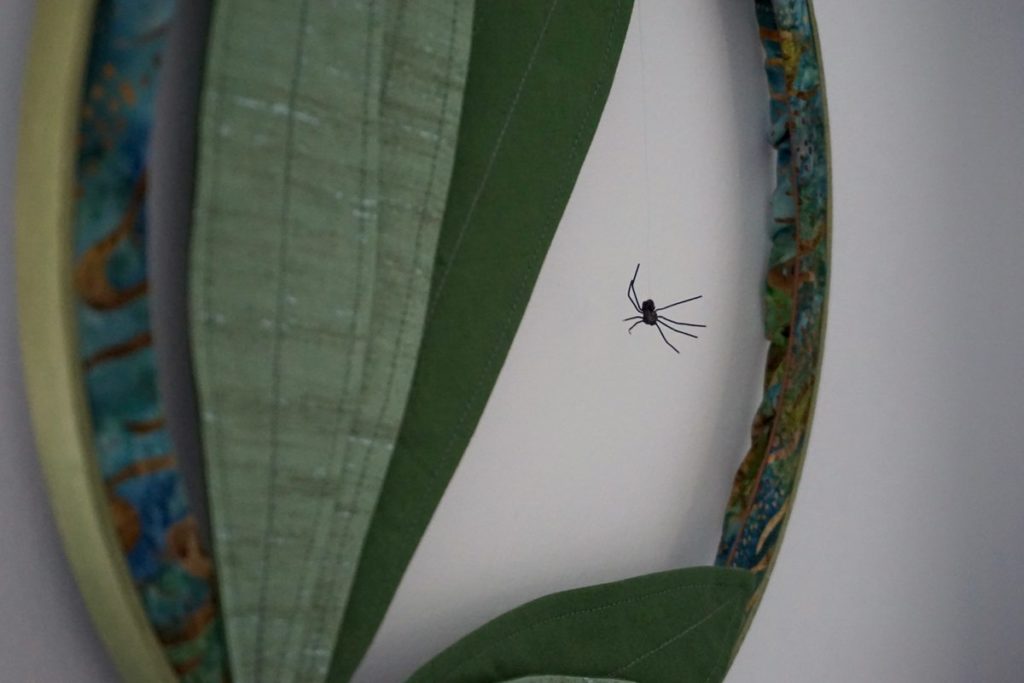
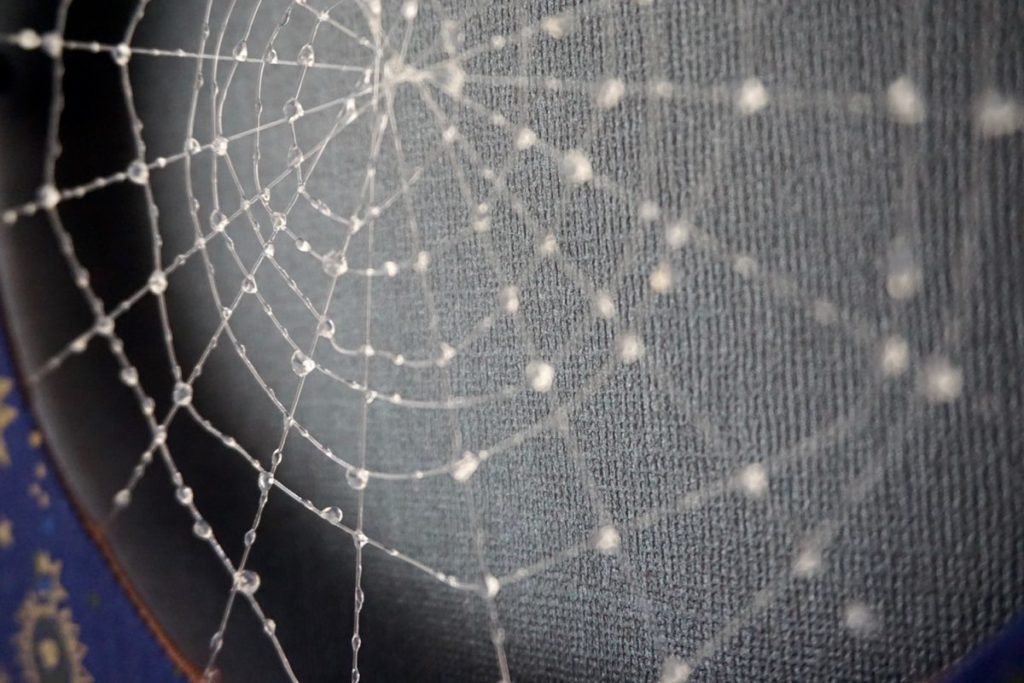
My hubby took some fantastic closeups of them that I’ll share two of:

"relaxation" embroidery detail "ornamentation" embroidery detail

These will be on display at the Upper Valley Food Co-op in White River Junction, VT, as part of their Earth Day art show. I believe they are up for three weeks starting today, and there’s a reception 4-6 PM today.

A bit on the making: The hoops are 12″, 10″, and 8″ wooden embroidery hoops painted with acrylics; two are over 12″ scrapbook paper. Each has a two-layer fabric “frame” perhaps with other fabric elements and a hanging ribbon that originated on a candy package. The webs are nylon filament sold for beading and the dewdrops are Mod Podge Dimensional Magic, a material I’d been looking for an excuse to buy and try.

The smaller spider is thread and wire (and a loop of filament leading to the hanging thread), held in place with friction and Fray-Check. The bigger one is wire and beads made rigid partially via Jewel-It embellishment glue. The wire lettering is also held in place by Jewel-It. I used steam (was going to say an iron, but that implies touching) to “block” the nylon, which shrinks it a bit but also helps it take the shape it’s pinned to when heated. That was especially important for the hanging spider, who doesn’t weigh enough to straighten the nylon itself!

A fibrous self-portrait

Over on Aquilino Arts, we planned to lend some personality to our site by creating an artistic version of a photograph of ourselves. As the crafter of the group, my medium was fiber. I’m quite pleased with how it came out.

photo of fiber self-portrait

The photo it represents actually came from this blog, from the post discussing the creation of the hat I’m wearing in it. Here it is for direct comparison.

original self-portrait photo

We did not end up using this for the team page as originally intended; the idea sort of fizzled out. I wanted to show it off somewhere, though, and in case you’re curious, I have for you some material lists and process photos.

Visible components:

  • Fabric
    • satin (sky, glasses)
    • fleece (white part of jacket)
    • home dec type (dark green trees, gray part of jacket)
    • netting (overlay for gravel)
    • cotton and/or cotton-poly (everything else)
  • Sewing thread
  • Bulky acrylic yarn (hat)
  • Fabric paint (lips and teeth)
  • Blanket binding (frame)

Invisible components:

  • Flannel (to pad up my nose-cheek-chin region just a tad, though I think it ended up being irrelevant)
  • Heavyweight nonwoven interfacing (face/head, line of trees on left, glasses, two full-size backings)
  • Fusible web (glasses, mouth)
  • Tacky glue (glasses)
  • Fray-Check (glasses)

The first two photos are the back view of the piece that formed my head and neck, and a partially laid out background. I used the head piece to help align the background pieces.

photo of back of head/neck piece photo of partially completed background with head/neck piece laid on top

Next, a shot I call The Invisible Bozo, and a taste of the oddness of cutting up three or four copies of your face to do a project.

photo of completed background with head, hair, glasses, and jacket photo of in-process hat

The back, before and after I covered it with a second layer of interfacing and with calico.

photo of finished back without decorative cover photo of fully finished back with decorative fabric layer and binding

Finally, a shot of the finished item lit from the right instead of the left. It really shows how much dimensionality the piece has.

photo of finished piece lit from right instead of left

This isn’t a project I would have done without someone telling me “hey, you should to do this,” but it was an interesting challenge. I don’t know what I’ll do with it now, but my rationale for backing and binding it was that if I was going to put as much time into something as I did into this (I didn’t keep track, but 10 hours give or take) then I was going to finish it properly.

Blackwork-appropriate embroidery alphabet

Remember the blackwork map of my local area that I spent so much time designing and stitching last year? I’ve added to it.

annotated blackwork map

Title, compass rose, and attribution. Since I did the vast majority of the work last year I used that date. And since I am me, I designed the alphabet myself, all the letters in upper- and lowercase, and digits although I ultimately liked the look of the Roman numerals better.

Since blackwork was popular over a long stretch of time I had a lot of options for an era-appropriate script. I found a website called Medieval Writing with lots of examples of scripts and was able to observe my lowercase options pretty thoroughly. I decided to create a blend of 15th-16th century English chancery hand and 15th-16th century French and Italian humanistic minuscule, with an eye to legibility for modern readers. Well, it turned out more to be based on those scripts in the way that TV movies are based on true stories, but I think it has the right flavor. I made the uppercase and numbers by looking at assorted typefaces and online calligraphy lessons, and the ampersand right out of my head. My favorites are the old-looking a, dramatic d, and potbellied U.

I have for you a blackwork alphabet PDF that includes the laid-out text for the map (aside from my name, which I didn’t think would be of much use). I thought it would be useful as an example of kerning the letters even if you wanted to use this for a different project.

blackwork map drying

After stitching, I washed the map and hung it from a deck chair out back, before I remembered I needed to block it on the ironing board with six or seven hundred pins. Next stop: the frame shop. I’ve never had any of my embroidery framed, so this will be an adventure.