At work I am the Google Analytics Evangelist, and as part of that I put together a training program for my coworkers. I wanted to gamify the program with some form of achievement badge, hopefully making it easier for people who want to learn in theory to motivate making the time in practice.
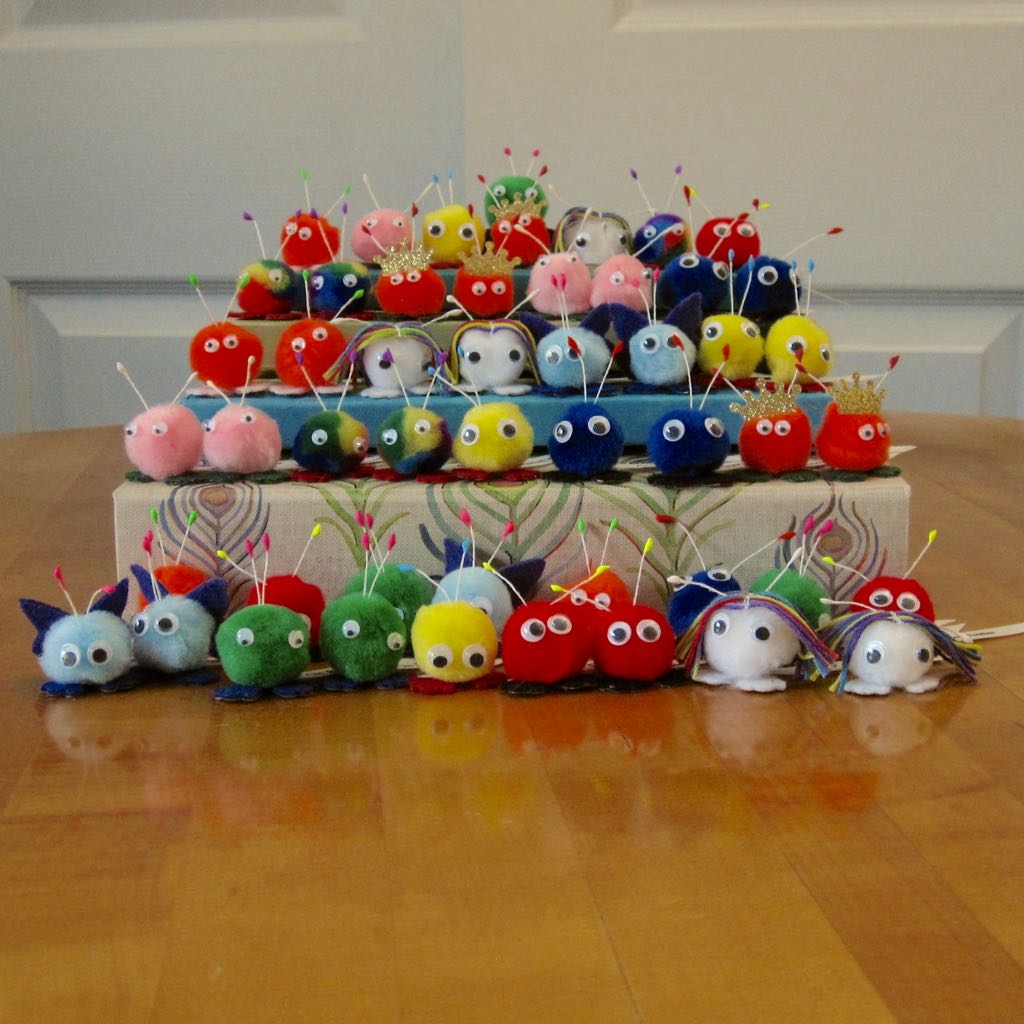
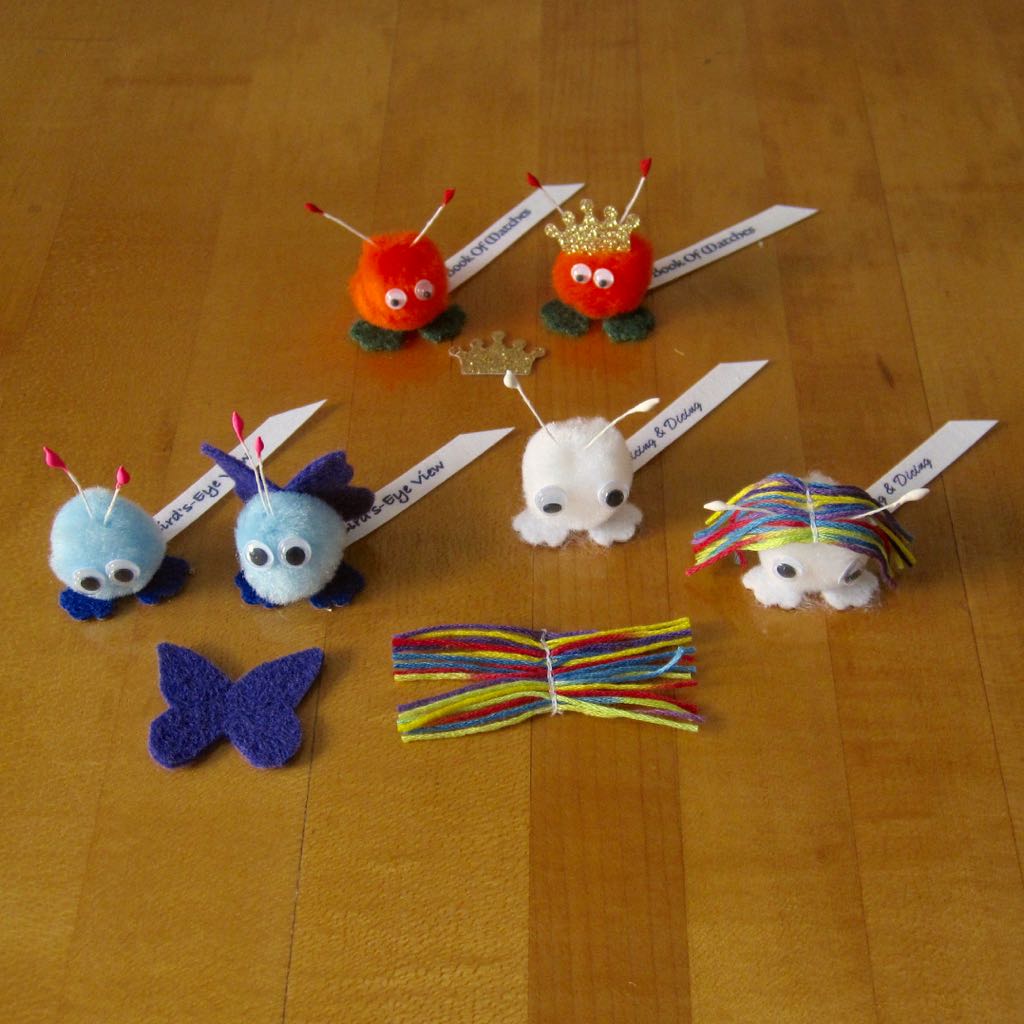
When I was a kid we got weeples as fundraising incentive prizes: small puffballs with eyes, feet, antennae, ribbons with messages on them, and sometimes other accessories. When I remembered those, I knew I’d found the perfect achievement badge.
So I made them!
…but how do you make your own weeples?
Puffballs and eyes are obvious, and I had learned sometime prior that artificial flower stamens were commonly used for antennae. The rest needed some research and development.
This got to be a very long post. More details than you likely require follow, behind a cut.
Feet and Proportions
The feet of commercial weeples are stickers, so I thought sticker felt would be the best material for mine. Hand-cutting for the quantity of feet I needed was not going to happen, though, so enter a big fancy paper punch: Fiskars In Bloom Squeeze Punch (Extra Large). The plastic handles are not equal to the task of punching out sticker felt, but if you dismantle it you can use the actual punch, which is metal, as a die. Just add a hammer and something underneath you can smack an irregular metal object into.
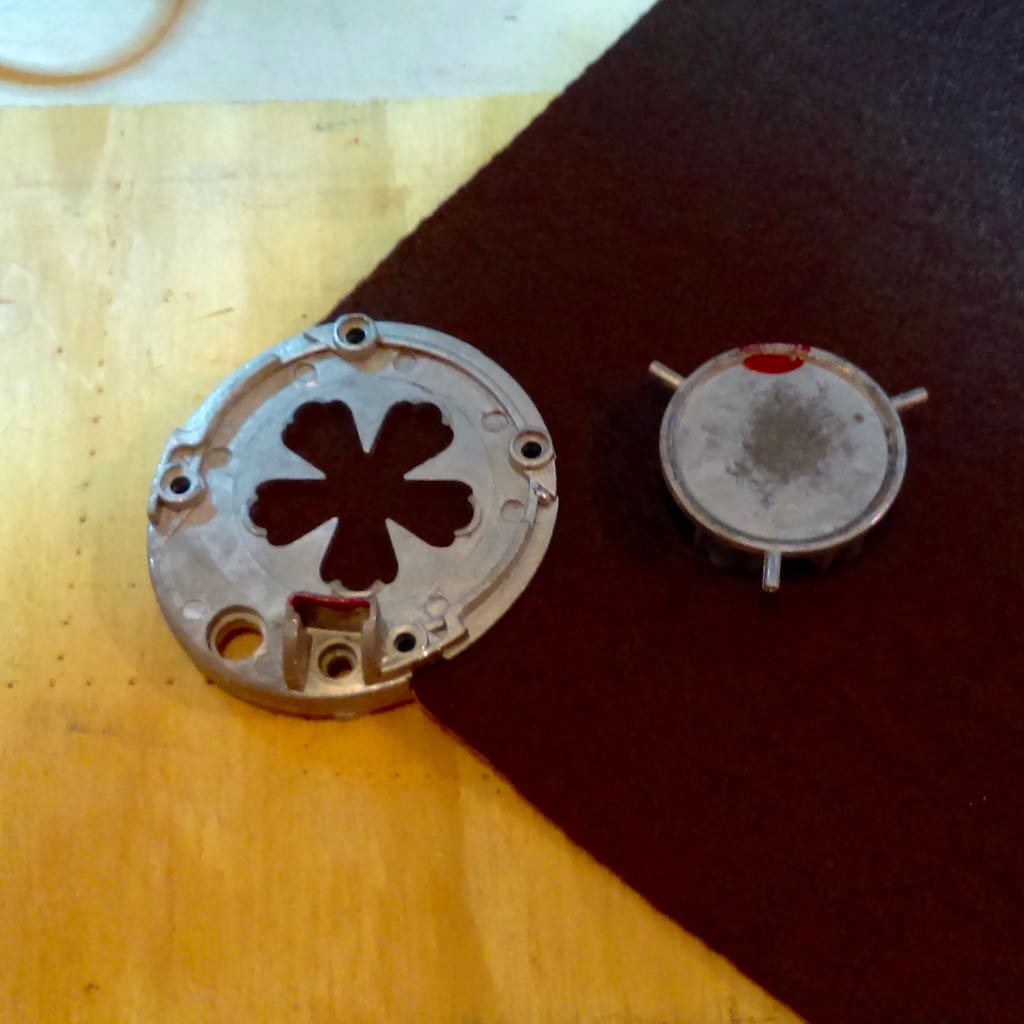
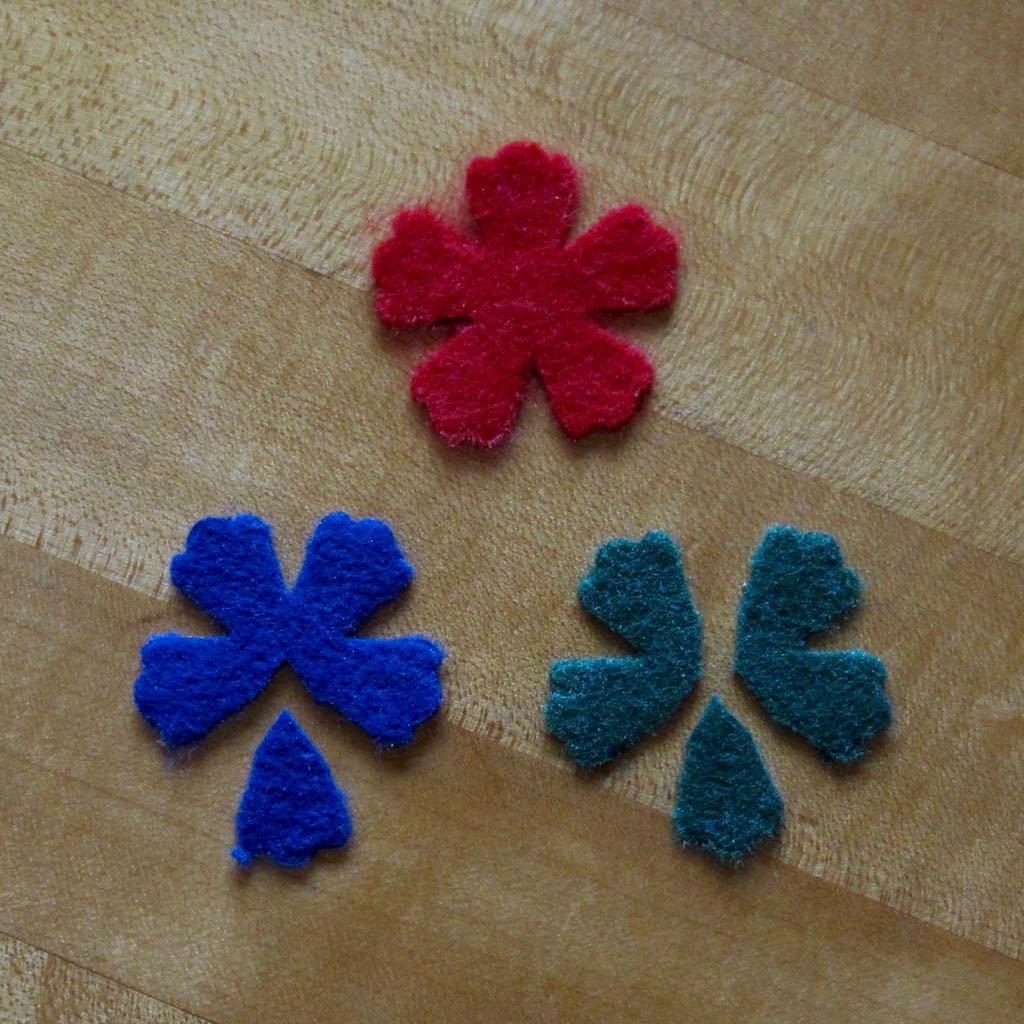
Each flower makes two pairs of feet. Pick the worst petal and cut it out, then cut the remainder in half.
The punch seems to be getting dull with use, though it is still usable; on some of the colors of felt the cut is very shaggy. I tried sharpening it by punching aluminum foil, following a recommendation I found online, and it didn’t seem to make a difference. It was heavy duty aluminum foil, and I may try again with regular, but I don’t have high hopes. As of this writing I’ve punched enough feet for over 120 weeples, however, so I won’t be too upset if I have to replace the punch eventually.
My five colors of sticker felt are each less than half used, as well. They are stiff sticker felt – I tried the softer kind and it didn’t cut cleanly, just stretched, partially cut, and gummed up the punch. Pipe cleaners are great for cleaning out punches, incidentally.
The feet seemed too small for a 1.5″ pom pom, so I switched my operation to 1″ pom poms. The 1″-across measurement is a fantasy, but they look proportional and still accommodate the two smallest sizes of googly eyes available. I bought the googly eyes and sticker felt at my brick and mortar Jo-Ann Fabrics, the flower stamens on Amazon, and the pom poms on CreateForLess.com. I found a recommendation online for Aleene’s Fast Grab Tacky Glue, specifically for gluing pom poms, and it has worked well. I haven’t done a comparison with other adhesives, but after holding the join in place for a little while I haven’t had any problems with pieces tipping or sliding.
Ribbons and Assembly
I had found multiple blog posts online that talked about using printable iron-ons with ribbon, though all the printable iron-ons I found specified they were only compatible with cotton fabric. I tried anyway, and it did not work for me at all – between throwing away ribbons that didn’t come out and the fussiness of the ones that did, it seemed like doing the work of 10 ribbons for every 1 that came out.
Next I looked into custom-printed ribbon, but the only source for 3/8″ ribbon (since no one printed on 1/4″) offered only one font and cost $15 per roll. I would need a new roll for each badge, bringing the total to $150 (plus shipping). Nope.
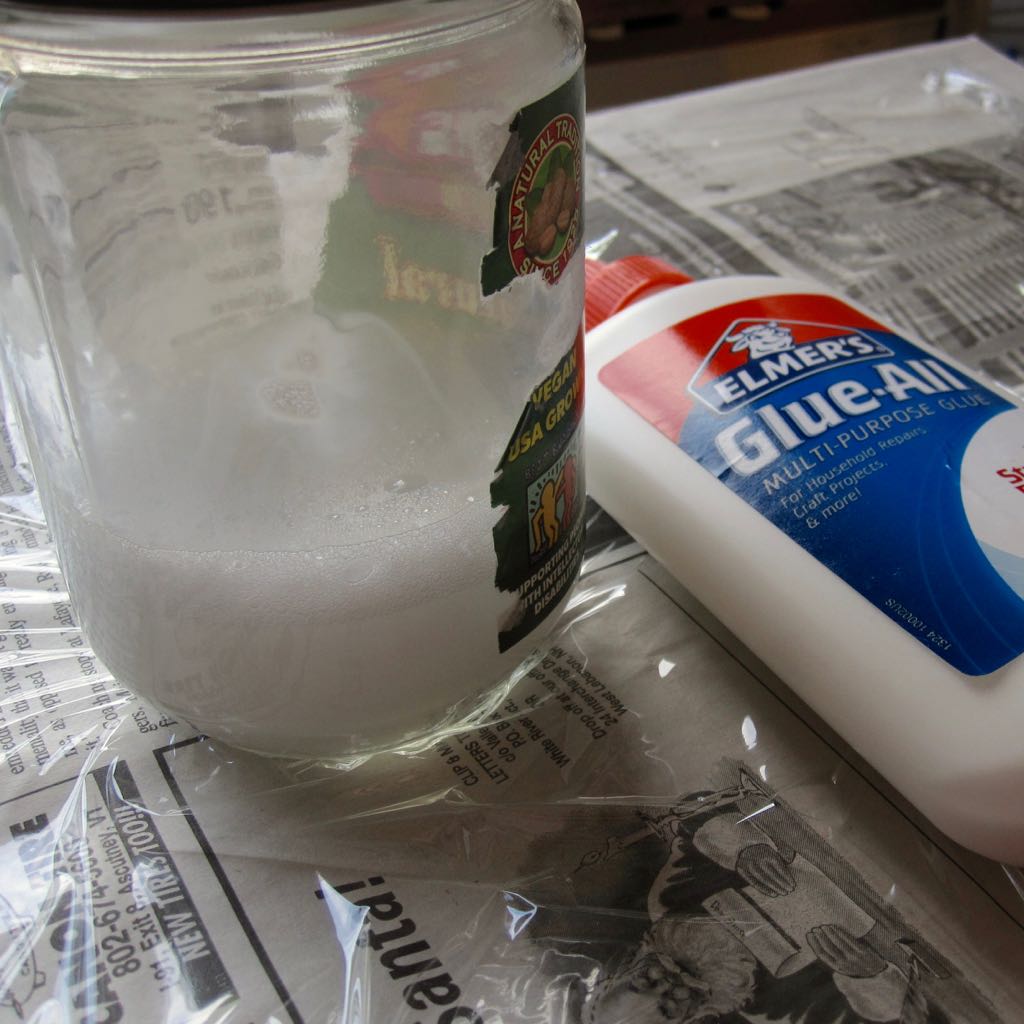
Instead, I got printable fabric, specifically June Tailor Sew-In Colorfast Fabric Sheets. After doing the colorfast treatment, I blotted on dilute white glue with a foam brush to keep the fabric from fraying when I cut it into ribbons. I didn’t measure my glue and water, but the mixture was definitely white, while also less opaque than skim milk.
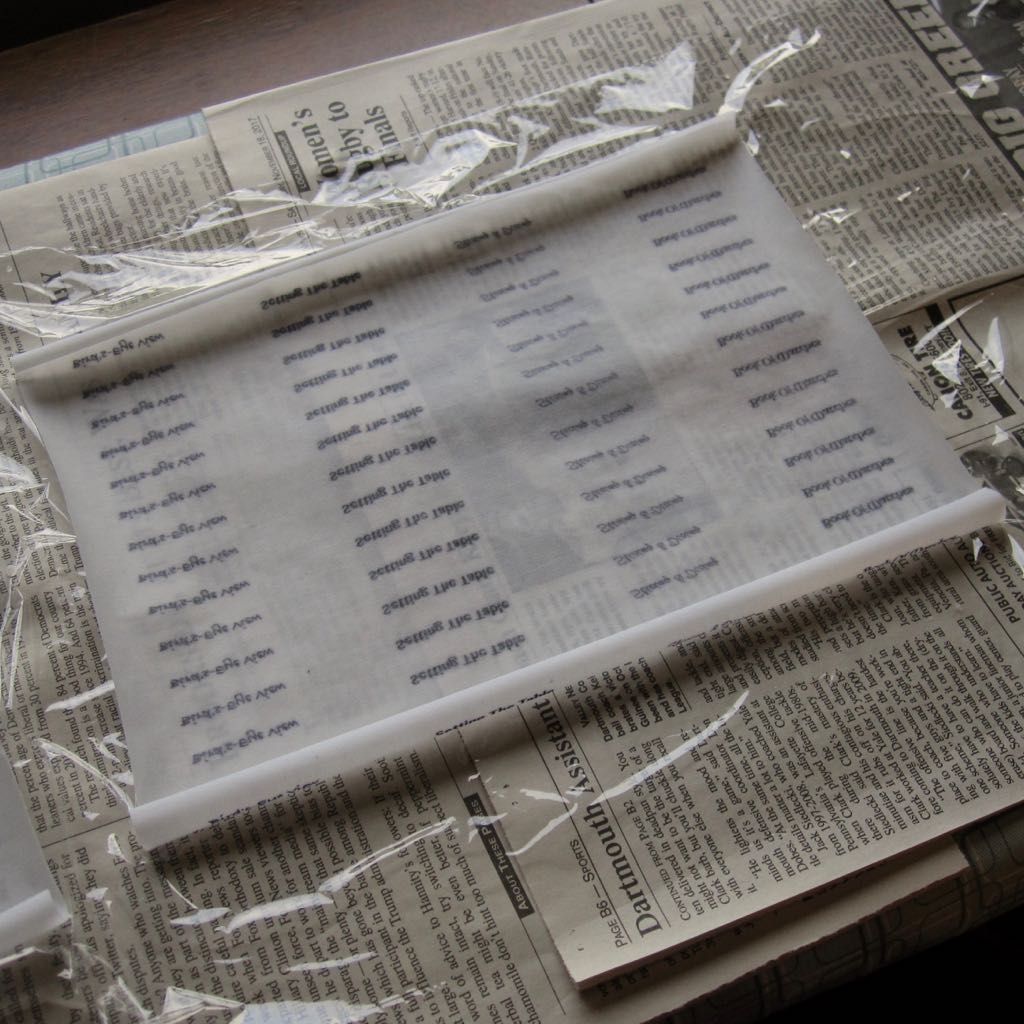
I let the fabric dry flat, rotary-cut it into strips between 1/4″ and 3/8″ wide (closer to the latter), and then cut each end off at an angle and cut between each set of words, roughly halfway, at an angle. The fabric was flexible but solid, seeming in no danger of fraying; it may have been safe even without glue, but I wanted these to be very handling-proof.
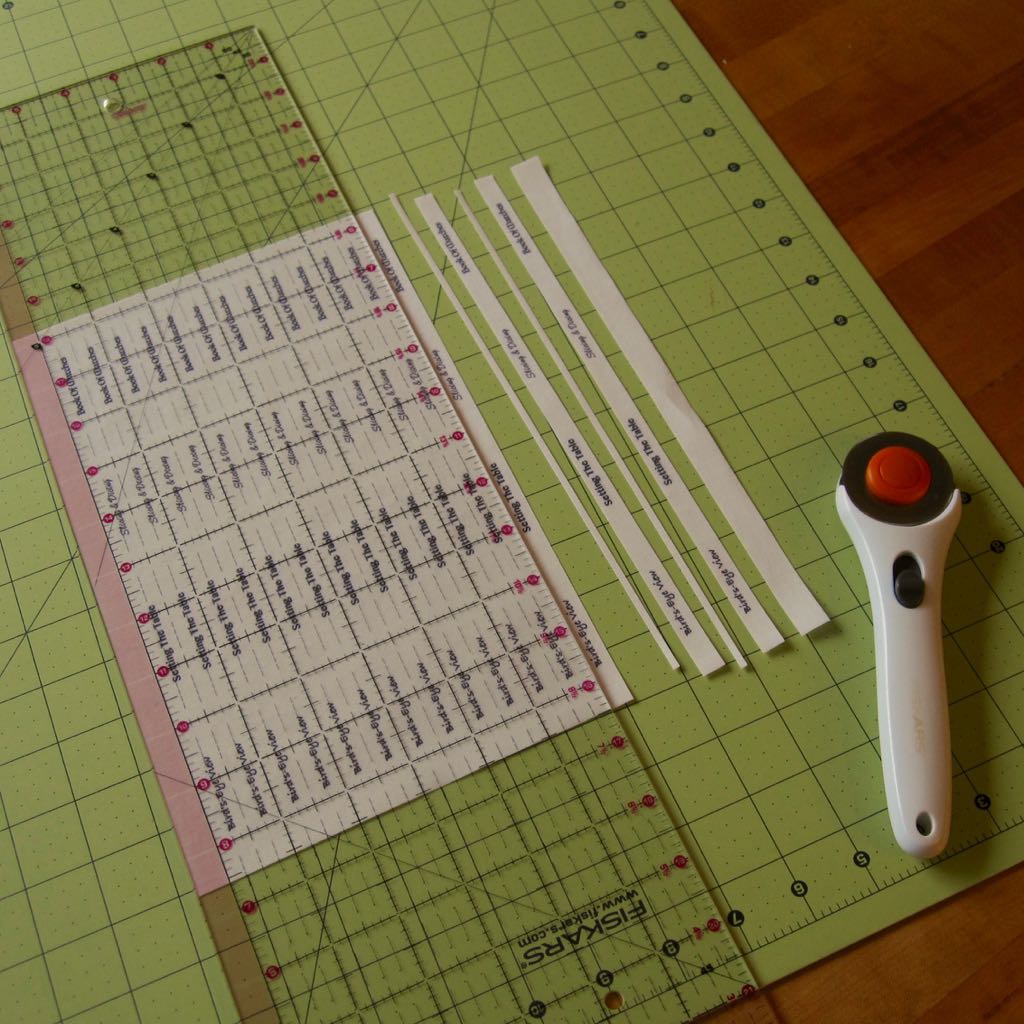
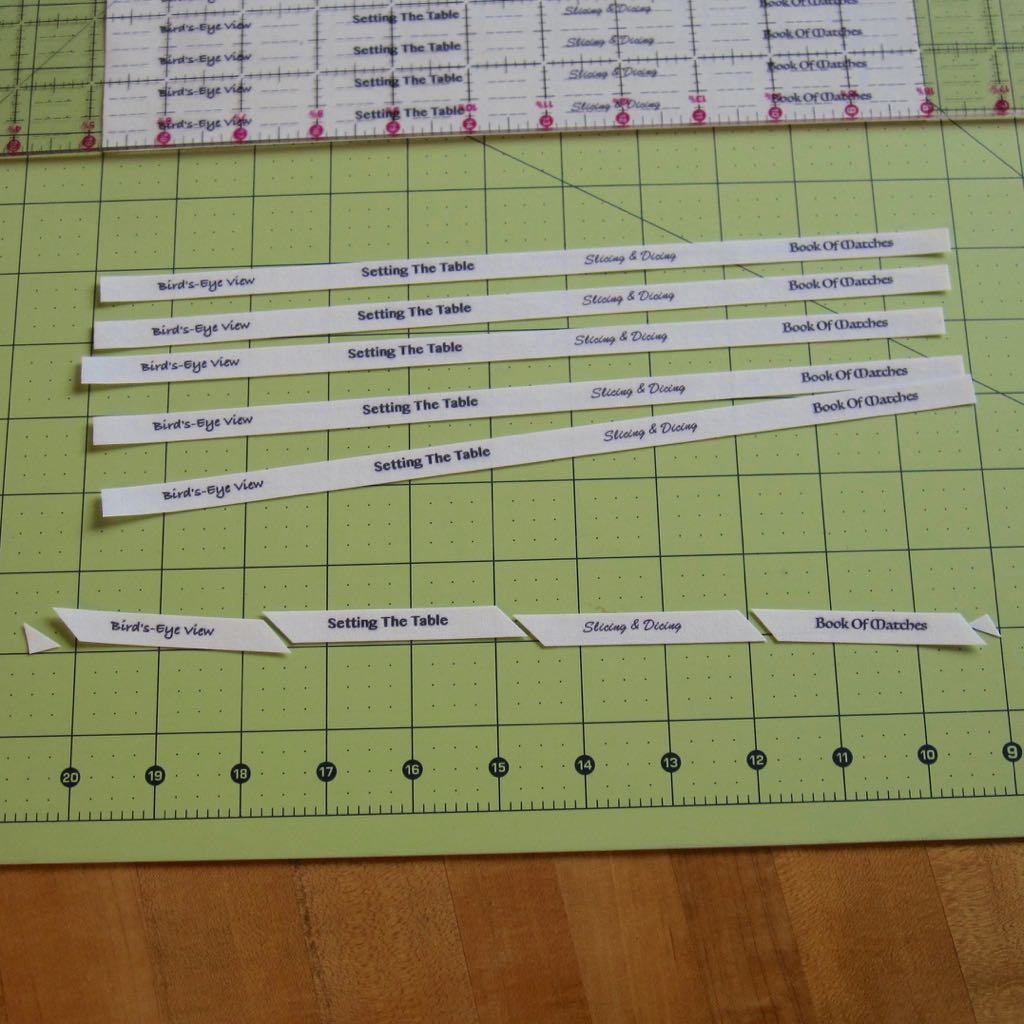
Incidentally, to lay out my printing I used Scribus, creating a landscape-oriented letter-sized page split into 4 columns with no side margins. Each column was 2.75″ wide, and I centered the text within them. That created a de facto margin against the short sides of the paper, which was also the tail of the ribbon that hides under the weeple body or trails off after the message. If you wanted longer messages I’d recommend laying out your text so you can have the text close to the tail of the ribbon, keeping the total length near 3″.
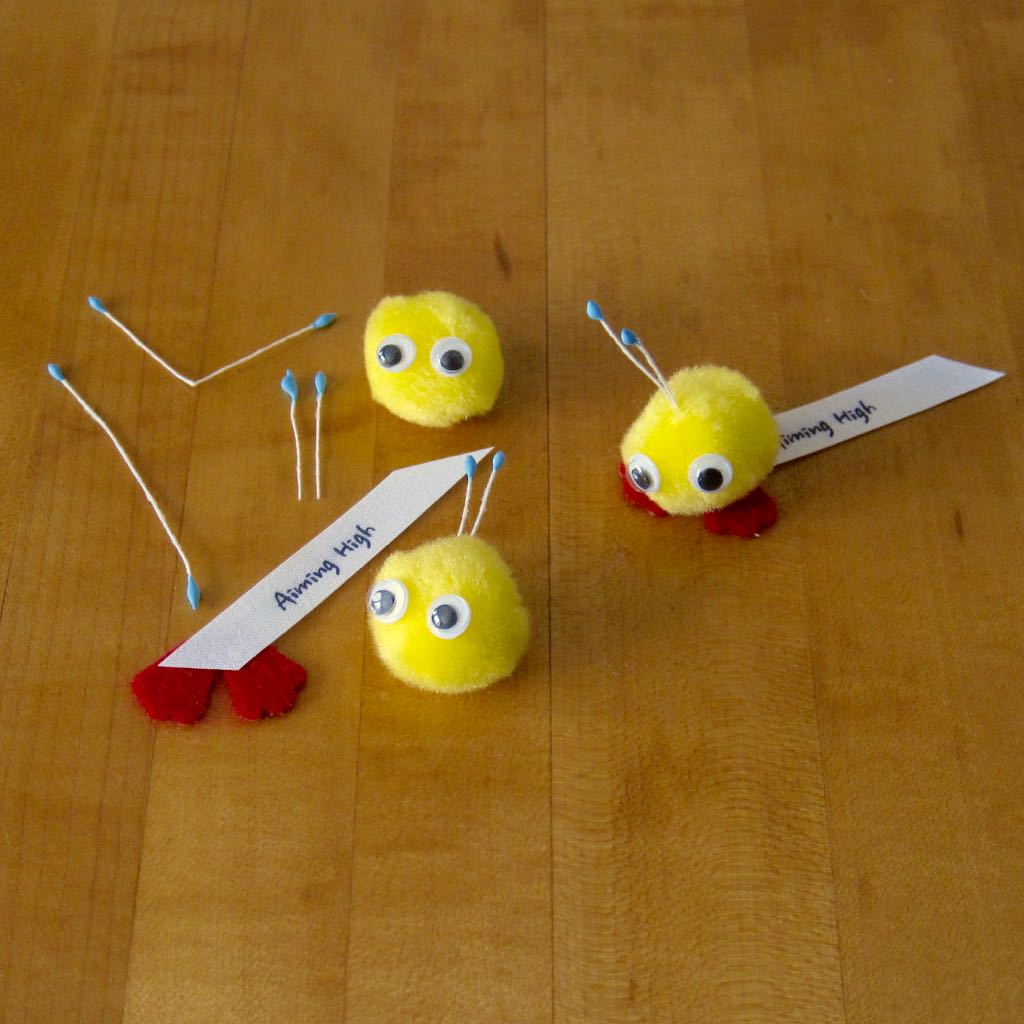
At this point I had the materials for your basic weeple. Assembly is shown above: glue ribbon to feet and eyes to pom pom; next fold, trim, and glue antennae to pom pom; finally glue pom pom to feet. I found that order made it easier to get the eyes and antennae positioned how I wanted them. Mass-production makes this easier by building in time for the glue to dry after each step!
Accessories
For the first six badges, basic weeples were great. For the last four, I wanted to do something even more special. Accessories? My searches for tiny hats came up dry and I couldn’t figure out a way to make them, especially not in mass quantities.
My sister visited a sort of craft thrift store and found small craft wings, and in the ensuing text conversation I typoed that as “wigs” – two ideas right there!
After some looking online I had a few other ideas: earphones (paper, but how to cut?), sunglasses (paper, find a punch?), and clown hat (paper cone with tiny pom pom on top). I thought I’d do wizard hats (cone of appropriate paper), but that seemed likely to be finicky, and meanwhile I found some variegated pom poms that would be special and much less work. I settled on the remaining “special” weeple having a crown, which I figured could be a flat paper punch out of sparkly paper.
And indeed, I punched a bunch of crowns out of sparkly gold paper. Nothing to say about that.
The wings turned out to be the hard accessory. The purchased wings were too big, so I thought I could punch some. I stiffened felt with a dilute glue bath (as for the ribbons, but more soaked), and then a second time because after the first time it wasn’t stiff enough to get into the butterfly paper punch. I got some partial cuts out of the punch and thought perhaps it needed to be turned into a die to use with a hammer, like the flower punch. Wrong answer! That made it worse; part of the felt would just stretch and “smear,” and it become very difficult to remove from the punch.
Ultimately I traced the best of the first round of butterflies and hand-cut the rest. Since I didn’t need nearly as many as feet, that was fine, but if I hadn’t already destroyed the paper punch I’d have switched to construction paper for the wings.
The wigs were variegated embroidery floss held together by a sewn “part.” I unrolled two skeins of different colorways, put them together and doubled them three times, for a total of sixteen strands. To make sewing feasible, I cut strips of light paper to put underneath, marking every 2 1/2 inches for my seams and using a short stitch. I cut the floss and paper together and only trimmed the wigs later if on the weeple they looked really uneven.
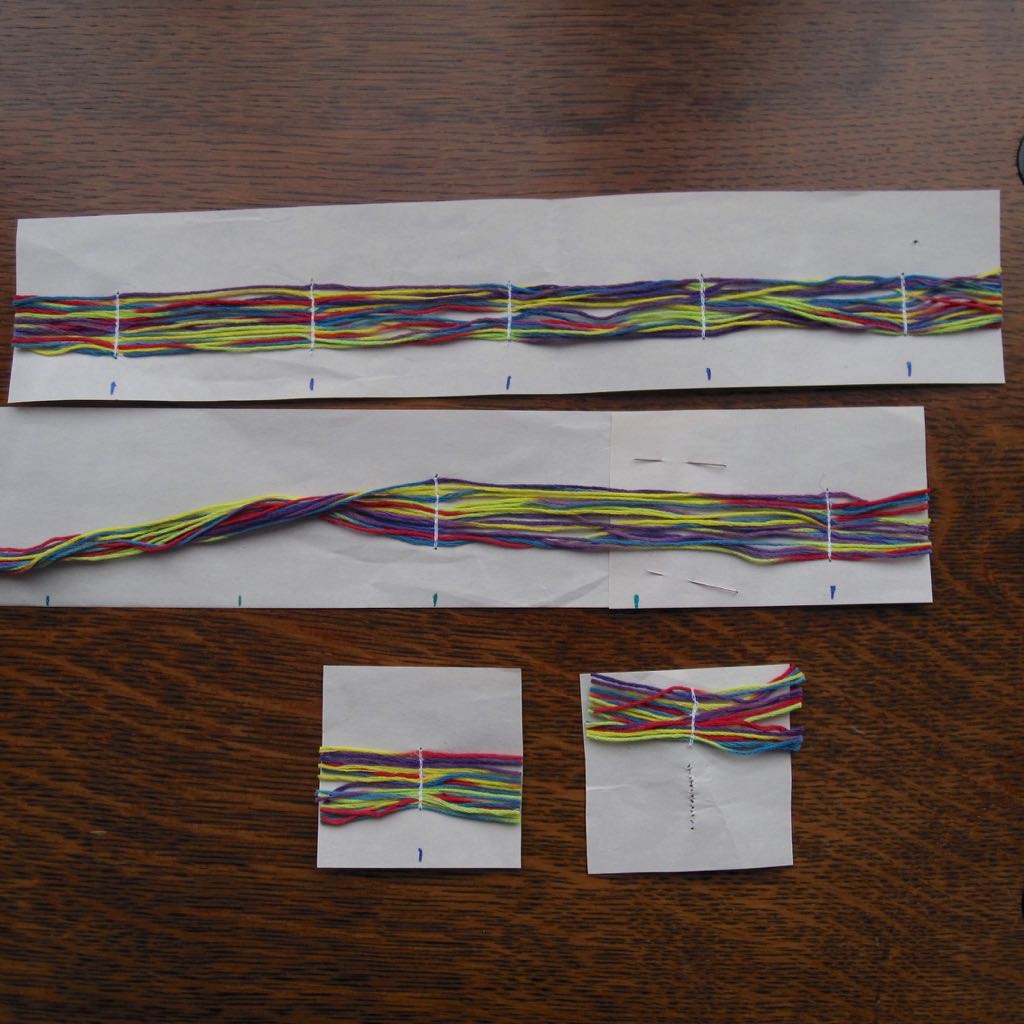
My paper was not as long as the embroidery floss so I had to add a second piece. To avoid sewing through two layers of paper, I lined up the markings at each strip’s end and pinned, then sewed the next seam over before trimming one side of the paper and sewing the skipped seam.
After the wig glue was thoroughly dry, I used a wet foam brush to try to “comb” the wigs, or at least encourage them to hang downward instead of sticking out.
Here’s the ultimate materials list:
- stiff sticker felt (not the flexible kind)
- big flower paper punch, dismantled, plus hammer
- scissors (I used my paper scissors for everything)
- printable colorfast fabric
- page layout program, inkjet printer
- white glue
- rotary cutter and mat
- 1-inch pom poms
- glue-on googly eyes in the two smallest available sizes
- artificial flower stamens
- Aleene’s Fast Grab Tacky Glue
And for accessories:
- wings: butterfly paper punch, construction paper or cardstock to punch, or felt to trace on and cut by hand
- wigs: variegated embroidery floss, lightweight paper, sewing machine and thread
- crowns: crown paper punch, sparkly cardstock
This was an adventure, to say the least, in both R&D and production. I have a dozen each of the first 3 prize weeples and 5 each of the remaining 7, plus one designated “prototype” of each so I can remember the color combinations and eye size/spacing. Now to see whether they’re as motivating as I hope they will be!