Nonorientable crochet

Do you want a yarn Möbius strip? Of course you do – who doesn’t?

mobius with ants
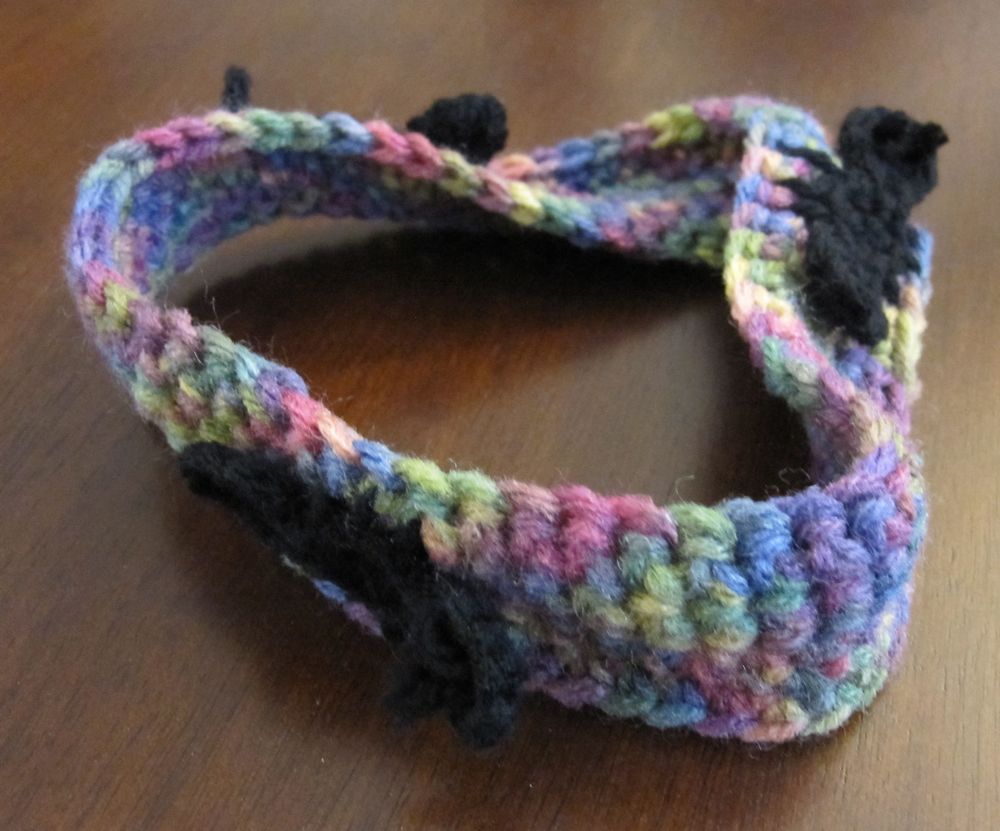
Every Möbius strip needs ants.

One of the crochet techniques I have yet to master is working in the round when the beginning is an open hole instead of a magic circle or a chain that is worked on both sides. I can’t connect the ends of the starting chain to my satisfaction; there is always a big wonky bump at the join.

However, some experimentation has led me to the following discovery: it is easy to make a crochet Möbius strip that requires no sewing. This is hardly news, as the internet will tell you, but I think my instructions are easier, or at least more specific, than the ones I’ve seen online.

Crochet Möbius Strip: Make a chain as long as you want. There will be a natural way for the chain to come off the hook to the left with the back bumps facing up and the front teardrops facing down. With the back bumps facing up the whole length of the chain, bring the slipknot end toward you and to the hook to make the chain into a loop. Insert the hook from outside the loop to inside the loop through the back bump closest to the slipknot, and slip stitch to join the ends.

starting the strip
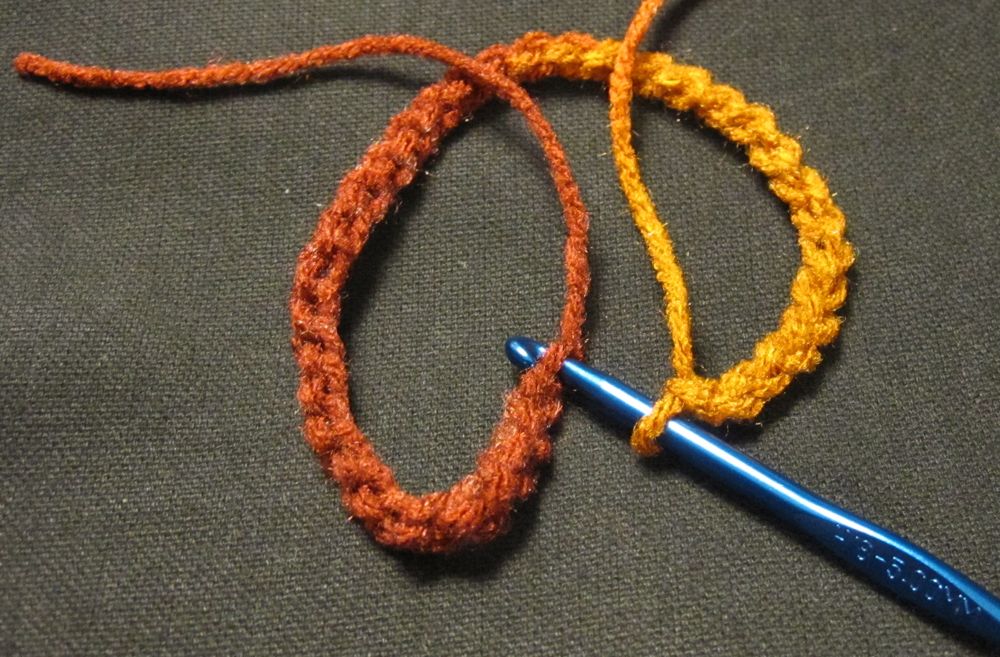
The back bumps go around the top when it’s set down like this.

Now, crochet around, using the back bumps, until you get back to the slipknot. Crochet into your initial slip stitch. It should be natural to make your next stitch in the front teardrop of the chain closest to the slipknot. Now the next time you get back to your slipknot it should be natural to crochet into the first stitch you made after slip-knotting the chain into a loop. Keep going until the Möbius strip is as wide as you want, making sure when you end, the rows are aligned on each side of the slipknot.

I found that my yarn tail was a useful indicator – if it faced toward me after I had put crochets on each side of the starting chain, then I needed to finish with it facing toward me.

Of course, this method makes the Möbius strip curl a bit into an S cross-section, since stitch rows tend to lean forward or back. I tried to change direction for the last row, but as you can see I ended up with a little nub at the turning (bottom center):

compact mobius strip

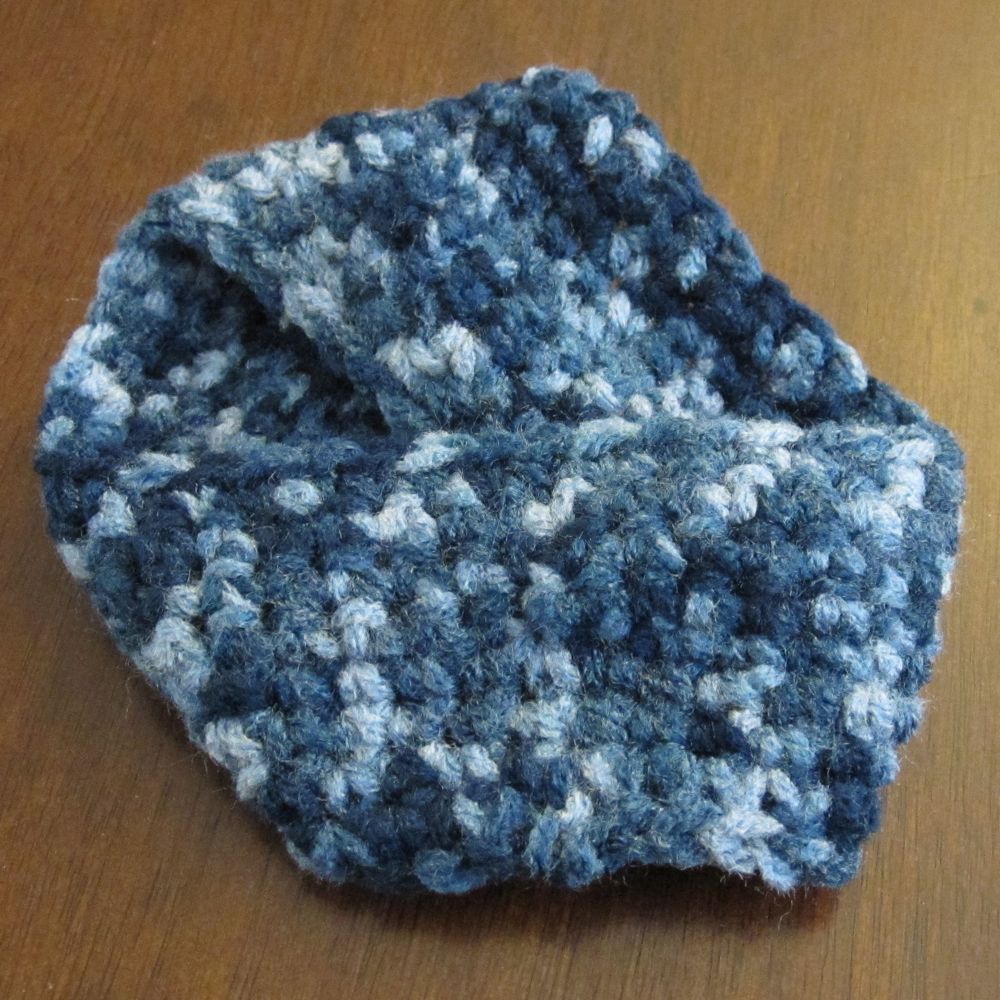
I tried a second time but didn’t come up with a solution that satisfied me.

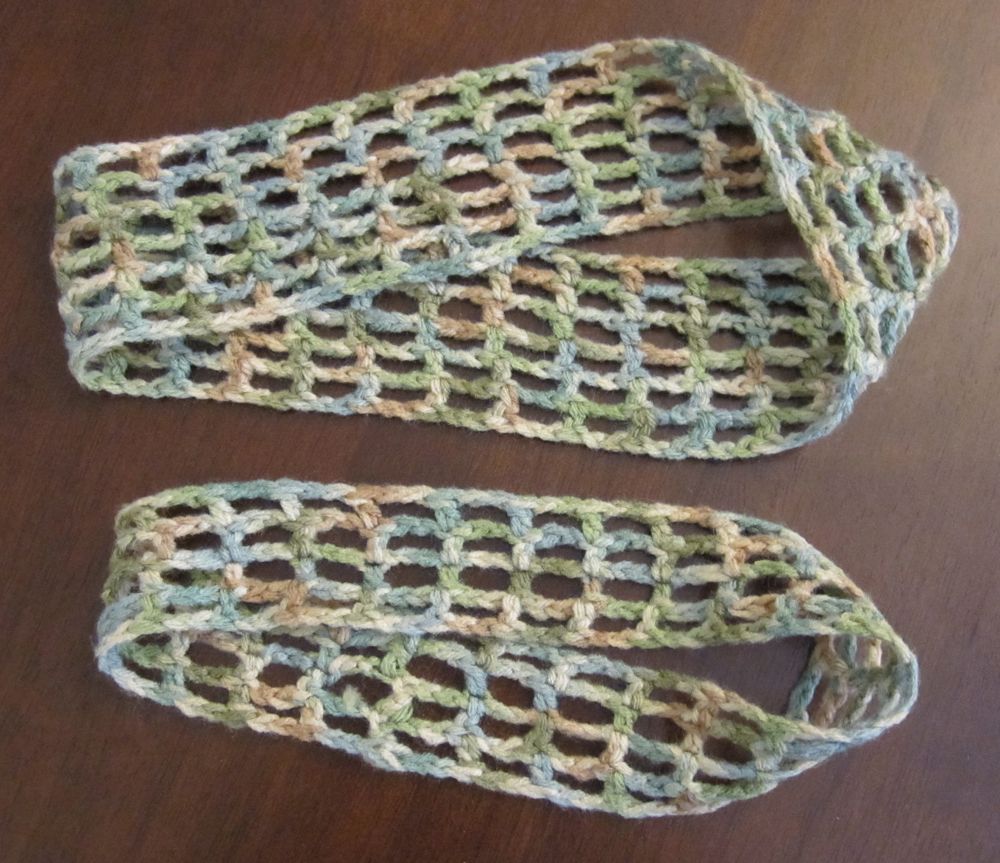
Mesh Crochet Möbius Strip: Looking at the Escher picture made me think of crocheted mesh, so I tried that as well (see the crochet abbreviations). For this you must chain a multiple of 3 – it is better here to use the same size hook throughout. Slip stitch to join as described above, and chain 5. Skip two chains and dc into the next, in the back bump. (ch 2, sk 2 sts, dc in back bump) until you get back to your slip knot. This is a bit wobblier than sc, so make sure it is not twisted, ch 2 and do the next dc into the front teardrop of the first ch you made – it seems like you’re skipping 3 sts, but the joining slip stitch and initial chain are really the same stitch. (ch 2, sk 2 sts, dc in front teardrop) around, until you get to the ch 5. Ch 2 and sl st into the middle ch of the ch 5.

Now, *turn if desired, ch 5, (sk 2 sts, dc, ch 2) around (i.e., twice around initial chain), sl st in middle ch of ch 5; repeat from * until the Möbius strip is as wide as you like.

I washed these to see if the mesh would even itself out a little; the ch-5 squares and the squares on the starting chain didn’t really match the others. Of course, they crumpled up.

crumpled mobius strips

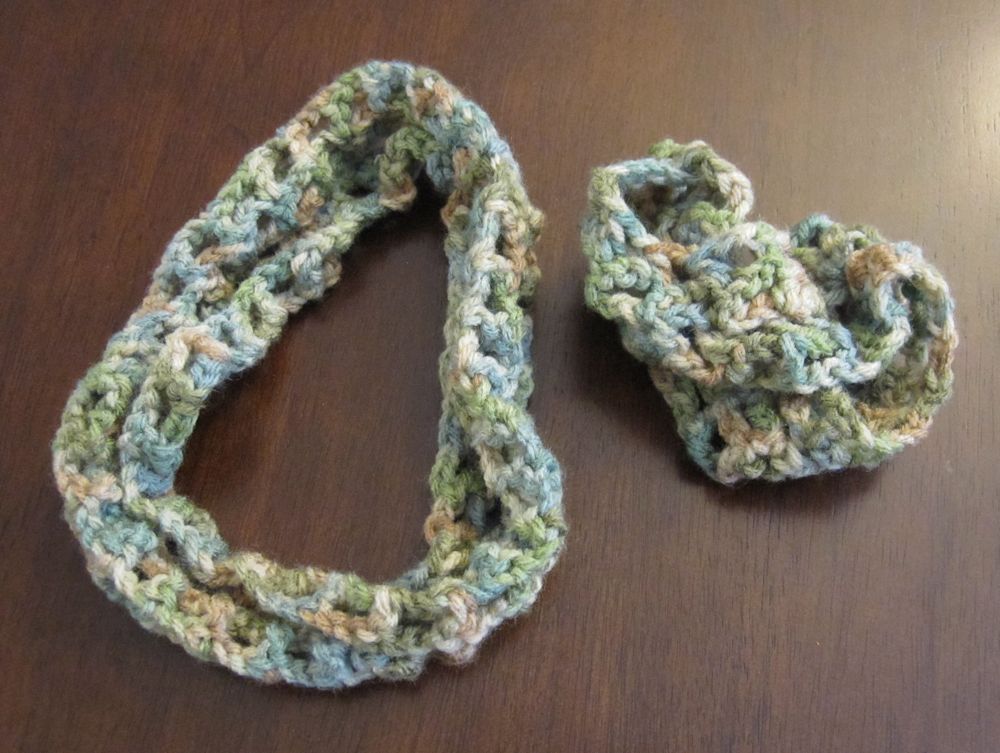
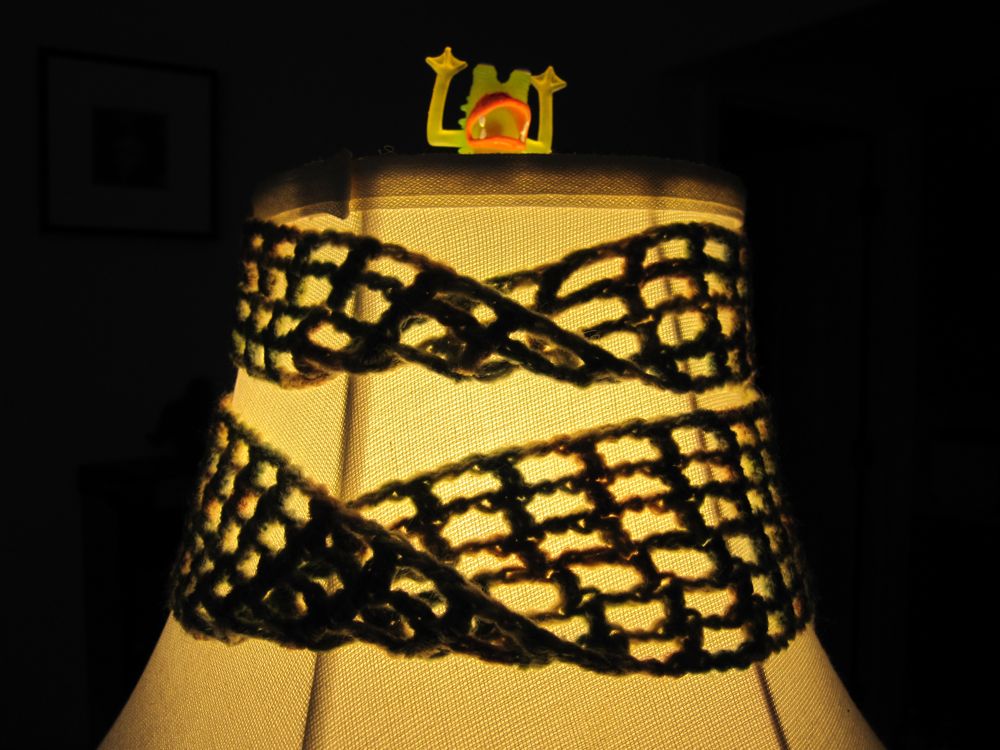
Q. How does one block a Möbius strip? A. With an iron. They smoothed out nicely. And are very decorative on my lampshade.

ironed mobius strips lampshade mobius strips

Flowers and cupcakes

May’s Amigurumi Army mission was flowers. Actually, the week from Apr 28 to May 4 in Iron Craft was also flowers, but I did not complete anything in time. I had a sad half-done daylily on my end table for half the month.

Finally I decided to go for it, finished the daylily, and made a flower that I intended to be a carnation but which may have ended up more like a small rose.

rose and daylily

Patterns! Note that both flowers involve stopping or turning in the middle of a row. Abbreviations are explained here.

Rose or Carnation:  
In any plausible color. (which with dyed carnations is pretty much any color)
– ch 37
– sc in second ch from hk, (ch 2, sc) five times, sc 30, ch 2, turn
– hdc 18, sc 12, ch 3, turn
– sc, (ch 3, sc) eleven times, sc, (ch 4, hdc) seventeen times
– ch 1, sc down side edge, FO.
– Roll up starting with narrow end.

rose before rolling

Daylily:  
make 5 in orange, yellow, or desired color.
– ch 10, sl st in second ch from hk, sc, hdc, sc 5, sl st
– ch 1; on opp side of starting ch: sl st, sc 3, sl st
– FO. Sew together overlapping each petal on the previous. To match real daylilies, the first petal should be completely on the top and the last one completely on the bottom.

lily sewn but unstemmed

After sewing the flowers together I wrapped the loose floss ends around pipe cleaners and wound them with florist’s tape.

flowers from back

Meanwhile, I joined another monthly crochet challenge group on Ravelry, and their May theme was food. I had previously made a lemon and an apple, but my food crochet was pretty limited. I couldn’t think of what to do, until I realized I’d never made a cupcake, which seems to be the canonical crochet foodstuff. I freehanded one over the course of two days. Afterward I discovered I couldn’t find any pins with plastic ball ends (nor the tomato pincushion I think they were in…) to be sprinkles. I did, however, know where my leaf-ended pins were, so I made another rose to top the cupcake. The one I made sure to sew so the bottom was a flat disc, not too tight, and then fluffed out the petals a bit more.

cupcake on plate

cupcake in tin

close-up of flower

First Friday

I hope you have art galleries to go to! Last month, I was at Boston Logan airport looking at their two George Rhoads rolling ball sculptures. By the time this appears I will be at the Upper Valley Food Co-op‘s First Friday open house celebrating their 35th anniversary. The Sew-Op is having an open house in conjunction with it and we’re hoping to lure people in to not only take classes, but attend open sewing hours and be teachers, teacher’s aides, or open hours monitors.

Once again, if you don’t have a gallery to go to, I’ve tried to provide a (sorely inadequate) substitute in the form of artistic links.

I have been pondering my upcoming Summer of Embroidery. I signed on to teach a beginning embroidery class in the fall, and am going to stitch a sampler this summer as part of the preparation for that. Expect a number of entries with bits of that as I finish. I have another project I’ll be writing about soon, and have been inspired to try to put an image from a dream into solid form via thread painting and ribbon embroidery.

When I was looking up the examples above, this beautiful tree came up under thread painting. It’s not that, but it is fiber art of the best kind.

Now that I’ve had a chance to process my photos, here’s a great picture of Burly Hot-Pants at the wedding:

centerpiece

As for coming attractions…. well, I’ve been trying to make a summer hat for myself for a while now. I keep posting pictures various places in the hope that announcing the plan will induce me to actually complete it. I am midway through the design process, but not at all done. Here’s one more announcement!

makings of summer hat

Instead of a second preview, I’d like to take a poll. My first “real” crochet pattern will hopefully be finished and posted soon; which of the following would you most like to see a crochet version of?

Blemmye Sea Monk Canvey Island monster