Regal tang keychain

Today is my dad’s birthday. Happy birthday, Dad!

But this post has nothing to do with him. I have a couple of friends who have adopted “Just keep swimming” as a mantra, and that inspired me to make a small plush regal tang (also called a blue tang, but that name is used for multiple species) for a keychain.

After looking at Google Images for a while, and then through my fabric stash, I went to the store, made a couple of versions, and ended up with this:

regal tang

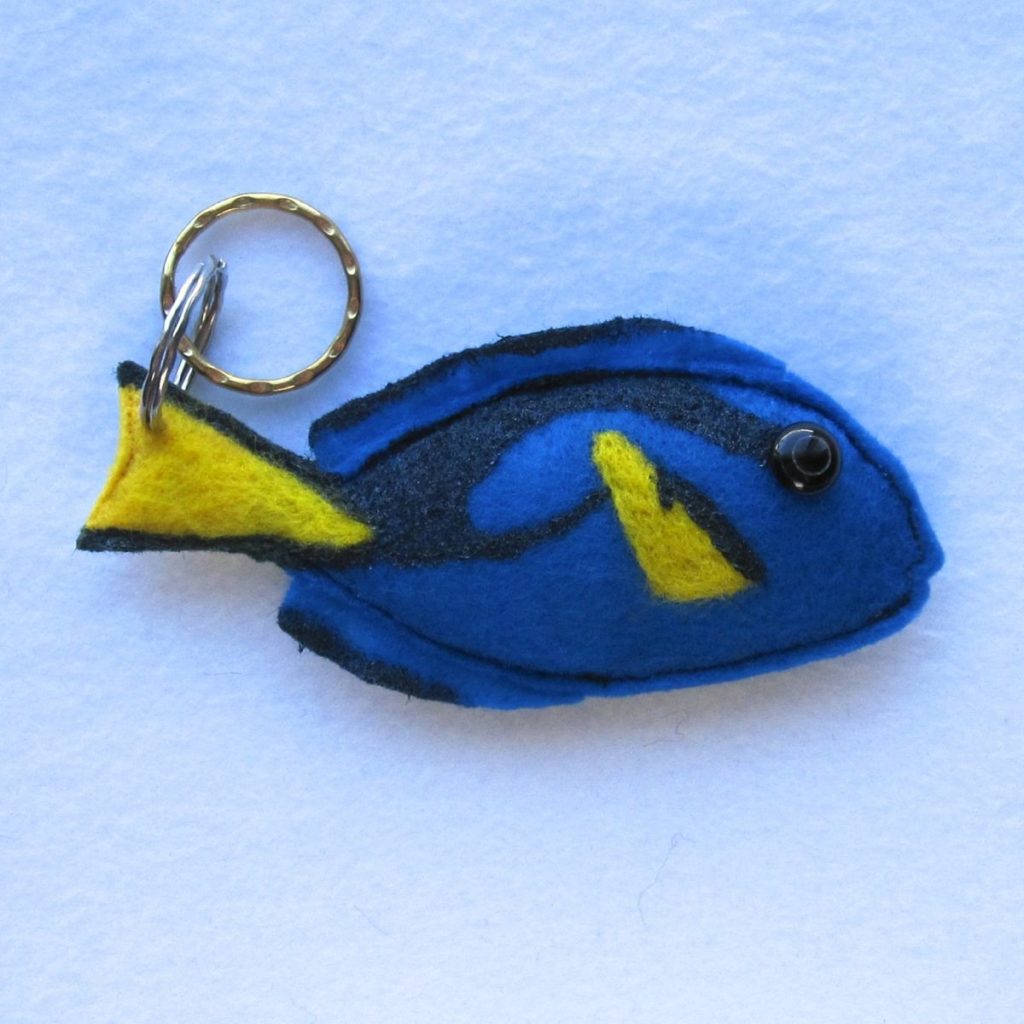
An amalgam of craft techniques are represented. Although the felt is acrylic, I needle-felted the tail and fins onto the body, with some extra wool on top. The eyes are shank buttons pushed through a small slit in the body felt, with a second button on the inside of each to keep them from pulling out again. I had to hand-sew the region nearest the eye, but the rest of the perimeter was sewn by machine. After trimming my seam allowance –perhaps past the best point– I painted the navy blue details and dripped some Fray-Check on the stitching that wasn’t painted. I opened a small hole for the keyring with a large needle.

It’s pretty substantial for a keychain, but it could be hung up elsewhere too.

Ice cream and stained glass

Needle felting has become my go-to craft when I want instant gratification (instant craftification?). It’s low pressure and quick. I know eventually I’ll start working on larger scale and/or more detailed pieces and they won’t be done in a sitting or two, but right now I’m just experimenting. Today’s experiment #1 started with rolling some coarse wool into a cylinder and testing out the process of making an indentation around it by needling repeatedly on a line. It grew from there.

NF ice cream

Partly because I was having trouble making a flat piece with nothing under it, and partly because I am curious to experiment with nuno felting ideas, my next project was to needle felt colorful wool onto a piece of unbleached cotton muslin. I decided to add black wool in between, since I love stained glass, and after a trip to White River Yarns to acquire some, I immediately sat down and had this:

NF stained glass - front NF stained glass - back

I love how fuzzy the back is, but I’ll be applying some wet felting techniques to make it both more secure and thinner overall. I wish I had taken a picture before I added the leading so you could see the huge difference in appearance.

Next steps in needle felting

On the occasion of my mother-in-law’s birthday I took the plunge into needle felting with the llama fleece she gave me for Christmas. Using a small cookie cutter as a mold, this was the result:

leaf front leaf back

The stem is one-third of a length of cord (the cord I used for Stumpy’s belt when he was dressed as an Assyrian king); the rest is llama fleece. I am fairly pleased although it is a bit shaggy (and I even gave it a haircut). I acquired a three-needle pen but the needles were a bit fine for catching the smooth, slippery llama fibers, so then I got a set of heavier needles and made this little guy:

penguin 1 penguin 2

I started out trying to make a teddy bear, which is why he’s dark brown, but I couldn’t get the shape right so I changed direction. His eyes are coarse sheep’s wool, which was much easier to work with than the llama fleece, but the llama was easier on this one than the previous one. I think I’m getting the hang of the necessary manipulations.

After looking at an online preview of The Complete Photo Guide to Felting, I’m going to try to smooth the penguin-creature a little. She suggests four approaches: felting densely, applying the needle almost parallel to the surface, wet-felting by hand (dip your fingertips in warm water and rub the surface of the item until the loose strands are felted in), and giving the creature a haircut or a shave (with an actual safety razor). I think the middle two options are my best bet, especially as I already tried the haircut option. You’ll see him again in a while!