Crochet Gladiator: Working in Rounds

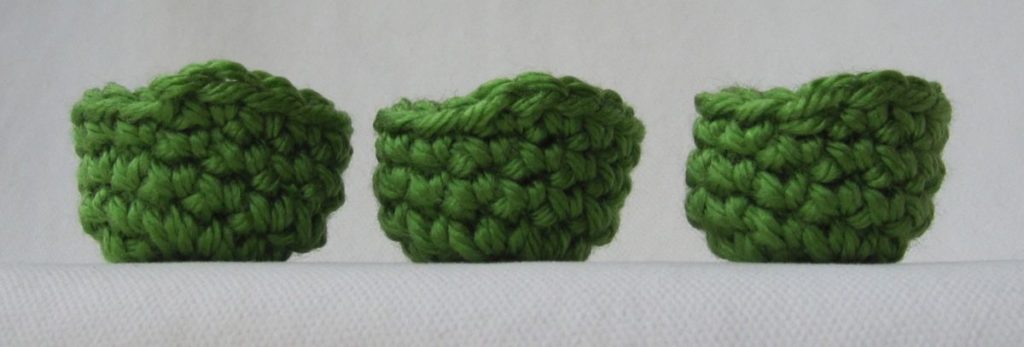
There are a few ways to crochet in the round, and variations on those ways. I have a baker’s dozen of contenders for you, fighting it out to see who is the champion. I hope you like orange, because they’re all in the same orange yarn – though I have some kicky backgrounds for you, to break up the monotony.

round samples together

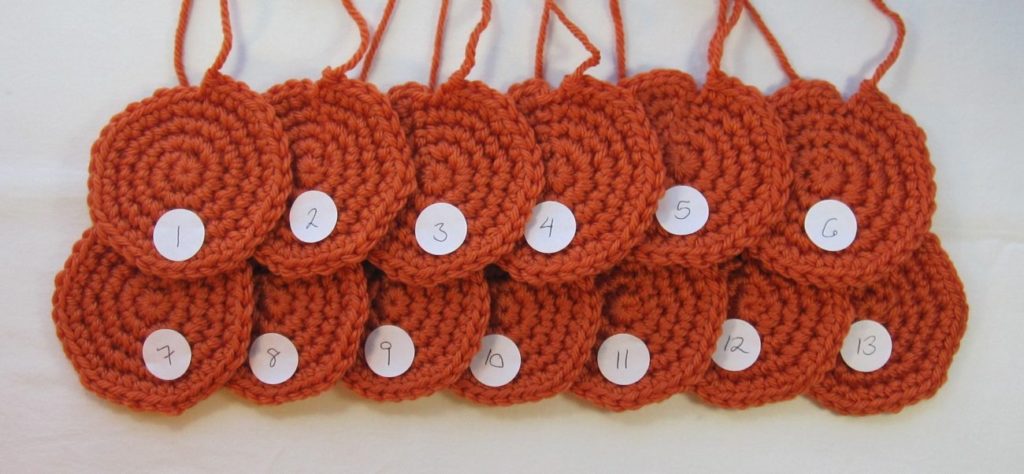
We have essentially five techniques: spiral, stepped spiral, standard joined rounds (plus 6 variations), progressive joined rounds (plus 1 variation), and unjoined rounds (plus 1 variation). These are all cases without turning between rounds. I want to acknowledge Crochet Spot, Cre8tion Crochet, and Crochet Ever After for giving or inspiring many of these variations.

The samples are numbered by the order in which I stitched them, which is not quite the order in which they appear in the categories. I didn’t want to change the labels when I reorganized because it seemed likely I might mix some up.

Here’s the punch line: use spiral crochet for patterns that call for it. For patterns calling for you to join with a slip stitch in the first stitch of the round, chain 1, and then begin the next round in the same stitch you slip stitched into, make a slight variation: after slip stitching, hold the yarn against the hook with your thumb and pull upward to tighten the slip stitch (method 9 below). Make everything else at standard tension.

To compare, I looked at ease of stitching, seam line, biasing of stitches, the back side, and whether the end of a round aligned vertically with the beginning. The punch line is that when you can use a spiral, do. If there are features that have to be lined up, you may have to use a spiral, because it biases slightly backward (each round starts slightly earlier than the previous one), and there is no other technique that does so. There are techniques that bias forward, by starting each round in the second stitch of the previous; I call most of those “progressive.” They are interchangeable with each other but not with the spiral or techniques with no bias. Most of the techniques below do not bias either direction; they are all based on standard joined rounds. The gory details are after the jump.

Continue reading Crochet Gladiator: Working in Rounds

Securing and hiding yarn ends

A lot of posts recently, I know – I’m on a mission. Don’t expect four a week all the time, though. 🙂

We amigurumi makers have a big advantage when it comes to hiding our yarn tails: a side of the crochet that will never show. We never have to have that little fuzzy cut yarn end in our stitches, waiting to peek out. Here’s how I hide it. (The red yarn was joined at the last stitch purely for visibility; it reality it would be orange like the rest.)

before drawstring first line of securing

Above: After stitching whatever drawstring method you prefer for closing the final hole in your piece, put the needle down through the opening and out the side of the piece to tighten the drawstring. This prevents your final round from being pulled outward to form a nub. Run the needle through some stitches around the side and back out again. Don’t tighten too much or the piece will compress! [1]

second line of securing hiding yarn tail

Above: Make a U-turn with the yarn, stitching under the intervening strands enough to make sure the base of the U isn’t lying on top of your crochet stitching. Run it through another line of stitches. Finally, put it back into the piece at the spot where it emerges from the stitches, and run it entirely inside and out again a ways away. Clip the yarn close to the stitching and massage the piece if necessary to get the tail to disappear inside.

After the cut: using this technique in embroidering and fine-tuning pieces. Continue reading Securing and hiding yarn ends

All about the needle join

SS/NJ comparison

The invisible join, which I call the needle join after Serendipity Crochet, is an alternative to slip stitching at the end of a round. I first encountered it on futuregirl’s blog; it’s fairly novel to a lot of crocheters, but it does seem to be a time-worn technique for finishing granny squares and similar items. What I want to add to the conversation is about using the needle join versus the slip stitch to smooth the edge of a crochet piece made in a spiral with single crochet. First let’s review how to close a round of double crochet with a needle join (or you can jump past).

Verbally: finish your last stitch, cut the yarn, and pull it through the stitch as usual. Thread it onto a needle and insert the needle into the first “real” stitch (not the turning chain) the way you would insert your hook to crochet into that stitch. Pull through and then insert the needle down through the top of the last stitch of the round. Tighten the teardrop to match the rest of the stitches (sometimes this requires pulling on parts of the yarn with your fingers) and secure the yarn as usual.

Visually:

choosing loops for join needle join in progress

Above left: top of turning chain and first “real” stitch marked; the latter (left-hand marker) is what you want to stitch into, as shown above right. Below left: back view of the second step of the needle join: stitching back into the last stitch made. Below right: the finished ring.

needle join back view joined ring

Now to compare this with slip stitch for single crochet made in a spiral. The main drawback of spiral crochet is the fact that the end of a round is a full stitch up from the beginning, so pieces with open edges have a significant height jog. Slip stitches are often used to mitigate it, and needle join suggested as an alternative. I have a tweak to the needle join option [spoiler: make a needle join in the second stitch of the last round.] – let’s look.

1. Slip stitch into next stitch (leftmost sample of top picture).

slip stitch 1 slip stitch 2 slip stitch 3

Pro: quick and easy.

Con: teardrop of stitch wants to roll to the front of the work; single strand emerging from top disrupts interlocked teardrop edge; can be problematic if you need a particular stitch count.

Best for: edges that will be invisible, such as those sewn onto another piece of crochet.

2. Needle join in next stitch (middle sample of top picture).

NJ in next st 1 NJ in next st 2 NJ in next st 3

Pro: cleaner than slip stitch.

Con: extra work; makes a steep ramp between the round ends; can be problematic if you need a particular stitch count.

Best for: not much, IMHO.

3. Needle join in the stitch after next (rightmost sample in top picture).

NJ in second st 1 NJ in second st 2

Only two pictures this time because the edge-on view is essentially identical to the previous needle join.

Pro: cleaner than slip stitch; makes a gentle slope between the levels of the round ends; doesn’t add to the stitch count.

Con: extra work.

Best for: exposed round ends, such as on a disk or cup. I believe this gives the smoothest possible edge to spiral crochet.