Single Crochet Shaping 3: polygons

If you want to crochet a smooth disk, you should stagger the increases round to round. If they stack up on top of each other they tend to make corners. If you want something with corners, though, can you figure out how to make it without pure trial and error? In particular, if you want to make regular polygons of various numbers of sides, how do you figure out how to increase?

crochet polygons from three sides to eight

Being who I am, I began with geometry. A disk takes 6 or 7 increases around because when you increase the radius of a circle by 1 unit (i.e. by one round) the perimeter increases by 2π units, 6.28ish. We have to fudge a little, of course, since an sc doesn’t add exactly the same amount to circumference as to radius and we can only increase by whole stitches, but it works out; we are able to make disks.

For a polygon, there are two distances that could play the role of the circle’s radius: center to corner (radius), and center to edge midpoint (apothem). We have formulas that tell you how much the perimeter increases when the radius or apothem increases by 1, depending only on the kind of polygon you’re expanding.

Shockingly, I’ve decided not to go into the algebra here; you can read all about it Math Open Reference. My previous knowledge says you need 8 extra stitches for a square, and that number should be larger for fewer sides and smaller for more sides (you need more stitches to get around pointier corners). Those both matched the apothem calculation and not the radius calculation.

polygon extra stitches per round from apothem formula
triangle 10.4
square 8
pentagon 7.3
hexagon 6.9
heptagon 6.7
octagon 6.6

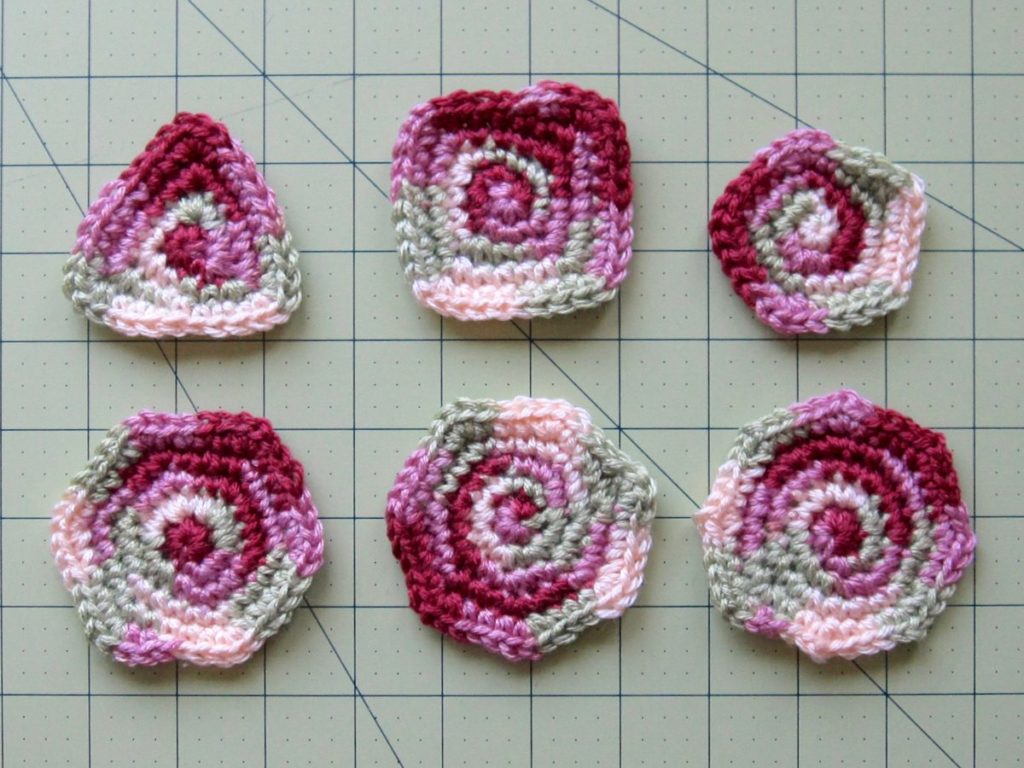
The apothem numbers leave a lot to be worked out: how to round, what to do when the increases aren’t a multiple of the number of sides, and whether an octagon could even be made when it called for fewer increases per round than corners. I made all six polygons more or less successfully, but they broke out into half easier, half harder.

the easier three polygons to make: triangle, square, heptagon

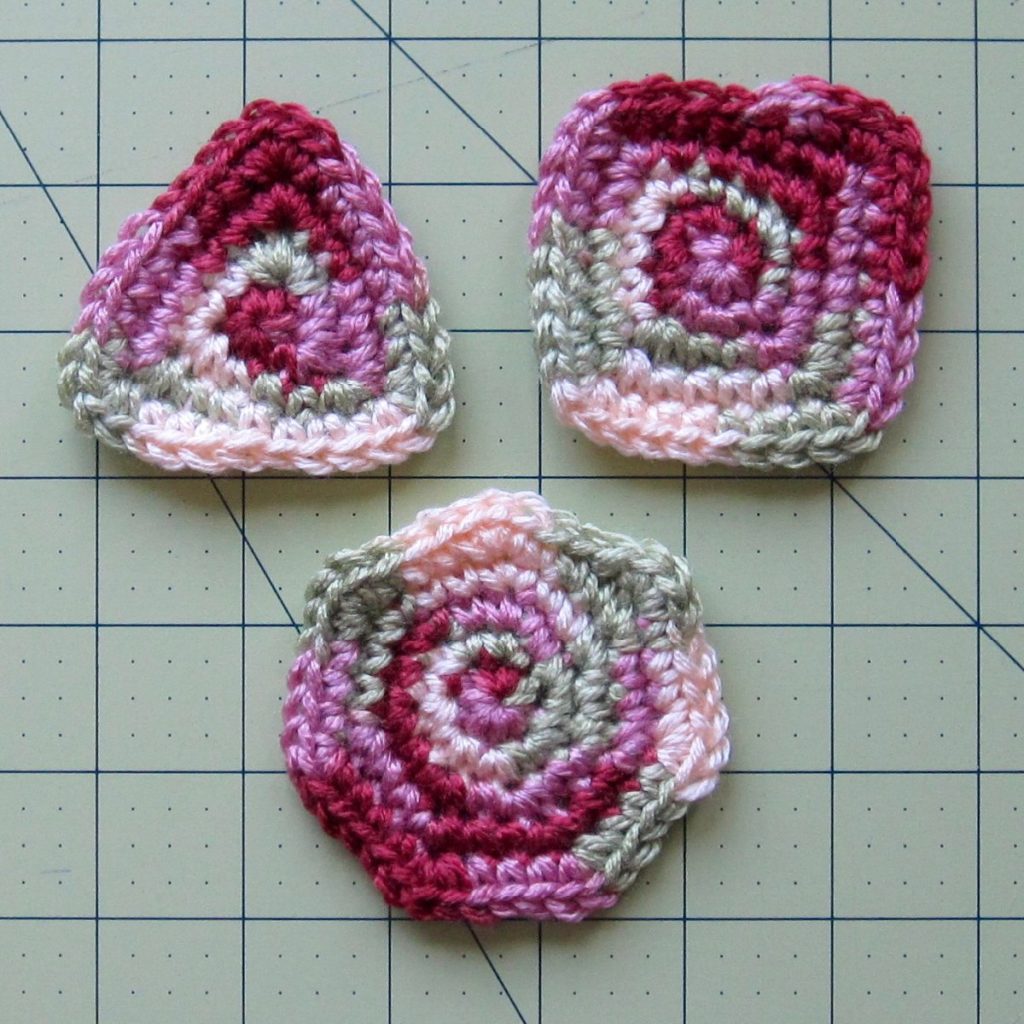
The easy polygons were the triangle, square, and heptagon.

Triangle: This didn’t go how I expected – I thought I would need to round up to 12 extra stitches per round, but I actually dropped down to 9. I started with 6 sc in a magic ring, and every corner got 4sc. Increases made into previous increases went into the third of the four sc.

Square: As I said, I already knew to put 3sc into the corners to make a square. I started with 6 sc, increased around, and then started making concentrated increases for corners. Increases made into previous increases were made into the middle sc.

Heptagon: Since for me, seven increases is appropriate for making a flat disk, the heptagon was straightforward. YMMV. I started with seven stitches, increased around, and then increased in the second stitch of each previous increase. To improve the point of the corners, in the last round I made 3sc into the second stitch of every previous round increase.

the three more complicated polygons: pentagon, hexagon, octagon

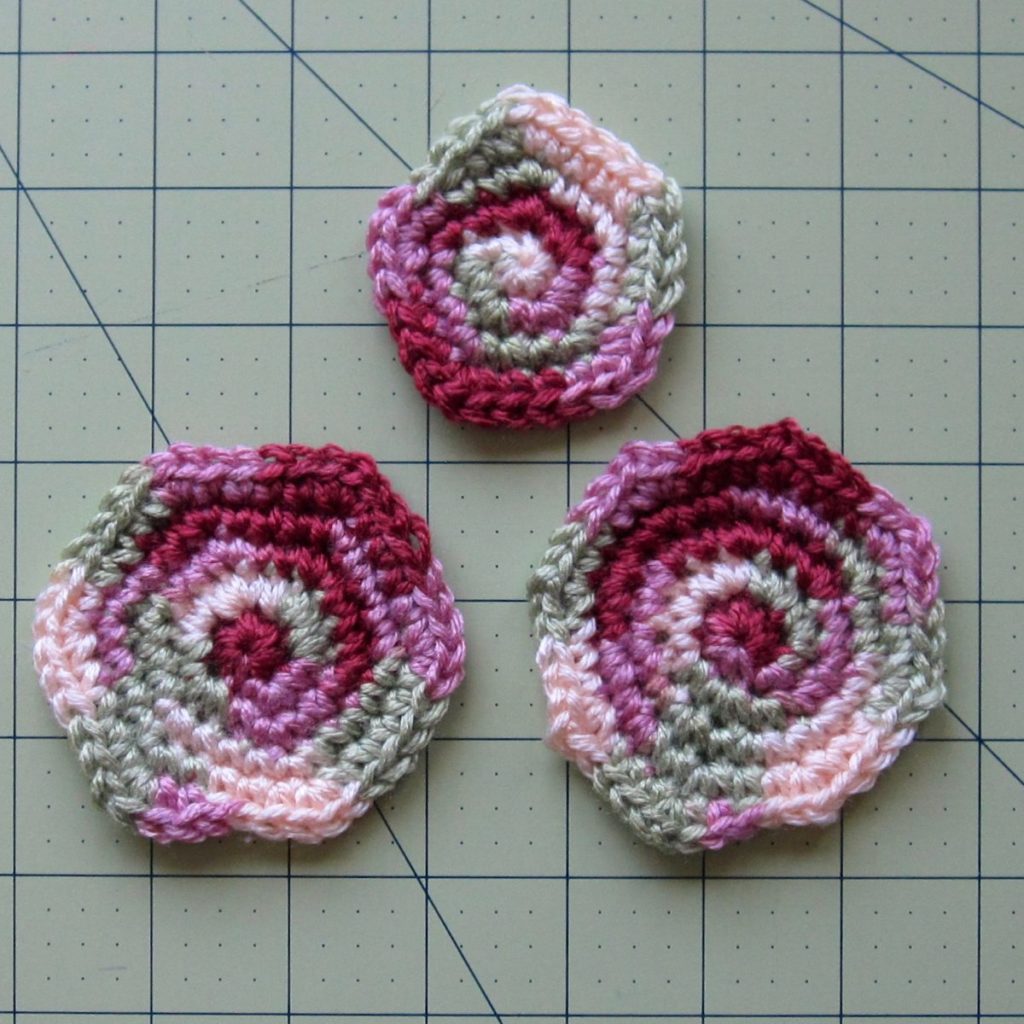
Pentagon, hexagon, and octagon were more difficult, but they did work reasonably well.

Pentagon: The pentagon formula called for 7.3 new stitches per round. Since five 2sc increases would add 5 and five 3sc increases would add 10, I alternated between them: start with 5 sc in a magic ring and make 3sc into each of them. Next round, put 2sc into the center of each 3sc increase; round after that, put 3sc into the second of each 2sc increase. Continue alternating, ending on a 3sc round. I did attempt mixing 2sc and 3sc increases within individual rounds, but it was a mess to keep the side lengths equal.

Hexagon: Like the pentagon, I used a combination of 2sc and 3sc increase rounds. The hexagon’s apothem number was lower and the number of increases per round higher (6 or 12) so I made two 2sc increase rounds for every one 3sc increase round. It perhaps would be even better to make three 2sc rounds per 3sc round, but I worried about maintaining the flatness of the piece. Start with 6 sc in a magic ring, make 3sc into each of them, and then make two rounds of 2sc increasing and one of 3sc. Put your increases into the second stitch of a 2sc predecessor or the middle stitch of a 3sc predecessor, and for best results end on a 3sc round.

Octagon: How can one even make an octagon if even one increase per corner leads to too many stitches around for the piece to stay flat? I suspect the best answer is to make a disk large enough to naturally hit a multiple of 8 stitches around and then do something like (sc, hdc, sc) in each corner on the last round. I wanted to try to stick to the size and methods of the other polygons (though I didn’t quite) and ended up with this: 7 sc in a magic ring; 2sc around; *2sc, sc* around. You’re at 21 stitches. Make a big jump to 32: *2sc, sc* 10 times, 2sc. Last round: sc 2, *(sc, ch, sc), sc 3* 7 times, (sc, ch, sc), sc. The chain in the middle of the last round’s increases gives it a little bit more point without adding even more extra bulk than we already have.

There you have it: all the polygons from 8 sides down rendered in crochet, for your freeform delight. I did these all in spirals and ended with a needle join in the second stitch; the ultimate perimeter would be smoother if you worked in joined rounds.

Easy Circle Patterns

I generally find it (relatively) easy to construct patterns for sewing that are rectangular, trapezoidal, triangular, etc – anything consisting of not too many straight sides. For the longest time circular patterns (that couldn’t be traced from lids or bowls) were labor-intensive, though. Knowing that a circle is defined as the set of points equidistant from a given point (that is, a radius away from the circle’s center), I could use a ruler, draw an X to mark the center, and make a bunch of marks all the way around that I would then connect by hand to make as smooth a circle as I could.

However. There is a far easier way if you own a paper trimmer. Start with a sheet of paper (or taped-together sheets of paper) big enough to accommodate your circle, and fold into quarters. The picture below is a sheet of letter paper from which I will cut a circle 8″ across.

photo of paper folded in quarters lying on guillotine-style paper trimmer photo of folded paper about to be trimmed to 4" along edge

The second picture above shows the first cut. The corner where the two folds meet will be the center of the circle; I’ve placed it 4″ from the blade to cut my paper down into a 4″ square. After that I’ll start cutting off corners that show up between the two folded edges, as shown below.

photo of folded paper square about to be trimmed to 4" down center photo of eventual paper circle after six cuts at different angles

The second picture above is after six cuts, and it’s already looking pretty good. I didn’t keep count but I would estimate it took 20 or so cuts to make the finished circle, shown folded and unfolded below. Larger circles take more cuts.

photo of quartered paper circle after maybe 20 cuts - finished photo of unfolded paper circle - finished

You could obsess over the smoothness of your circle and even take scissors to it after the paper trimmer has reached its limit, but the one shown is plenty smooth for the purpose of a sewing pattern – the roundness of my seam would not be improved by additional trimming.

Limitations: with my paper trimmer I could make circles 1.5″ across (the metal strip is 3/4″ wide) or anything 2″ across or bigger (the markings start at 1″), but it’s not so easy until about 3″ across. However, for smaller circles there’s usually something I can trace, or at worst, the ruler method doesn’t take as long. Though circles up to 23″ across are possible, the early stages of large circles are difficult because your paper will likely be wider than the opening for the blade. I recommend folding your paper a third time, into a not-quite-triangle. That extra fold can lead to inaccurate cutting, so trim away excess paper as though you were making a slightly larger circle. Three cuts (two sides and the center) should be plenty to remove the paper that’s in your way, so you can unfold to quarters and proceed with the circle making.

Flexing

Four years in the making…..

photo of a flexagon face photo of a flexagon face

In 2012 I cut out triangles of paper to glue together into a dodecahexaflexagon (documented in a post about a smaller flexagon). I also found instructions: scanned typed instructions from David Pleacher, and instructions incorporating triangle orientation from Kathryn Huxtable.

A dodecahexaflexagon is a 12-faced (the dodeca-, as you will know if you’ve read The Phantom Tollbooth, or been a long-time reader of this blog), 6-sided (hexa-) flexagon; each face is made from 6 equilateral triangles. I had cut each face from a different scrapbook paper, and I had small squares of white paper to serve as hinges.

In the summer of 2014 I dug out the paper pieces and started gluing them together. I glued one side of the strip together in an evening, but didn’t get back to the other side until now. The second side was quite easy, since on side 1 the faces were scattered around and on side two they were much more orderly.

photo of in-progress flexagon strip, one side glued together photo of flexagon midway through folding process

There was some confusion in the folding and a length of time before I found all 12 faces. I didn’t know the trick! To flex, you’ll pinch the hexagon so that three of the lines between triangles are outward corners and three are inward corners (see photo below). Which edges are inward and which outward will change which face you see next (in some cases you’ll only be able to flex in one configuration). To see all of them, you can simply pinch out the same corner over and over again, only rotating to a neighboring corner if it is impossible to flex the first one. I found hanging on to the same pair of faces with one hand, doing the rest of the work with the other, was the best way to enact that. It is awkwardly thick and I’m glad I spaced the triangles apart a bit with the paper squares.

photo of flexagon mid-flex

Each face is connected to at least two additional faces. I haven’t explored thoroughly enough to know whether I found the full set of options, but I made a little map and had each face connected to 2, 4, or 6 others, with complicated interconnection. This lines up with a diagram on Kathryn Huxtable’s general flexagon page, where I also learned about the “pinch one corner repeatedly” method of finding all the faces.

Want more flexagons? Harold McIntosh has an interesting read about the history and theory of flexagons, and Vi Hart’s videos and more (the first of which inspired my flexagon crafting) are all on a hexaflexagon page of puzzles.com. Woolly Thoughts, a bastion of mathematics-inspired crafting, has a page of crochet and knit flexagon cushions.