Posts Tagged ‘craft countdown’

Denim coaster

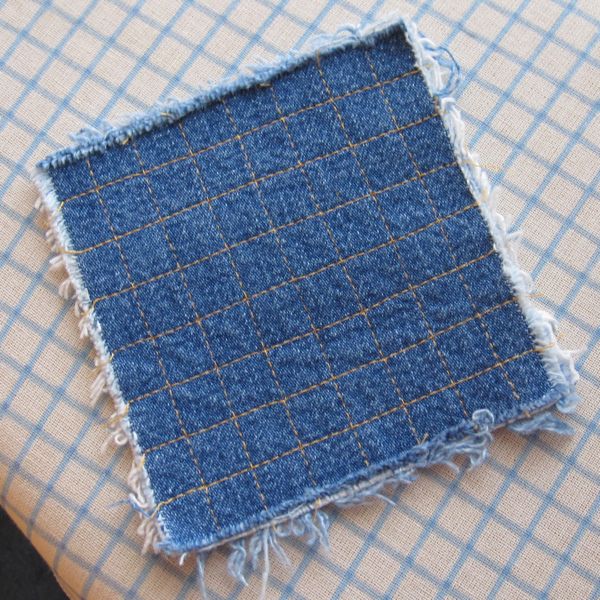
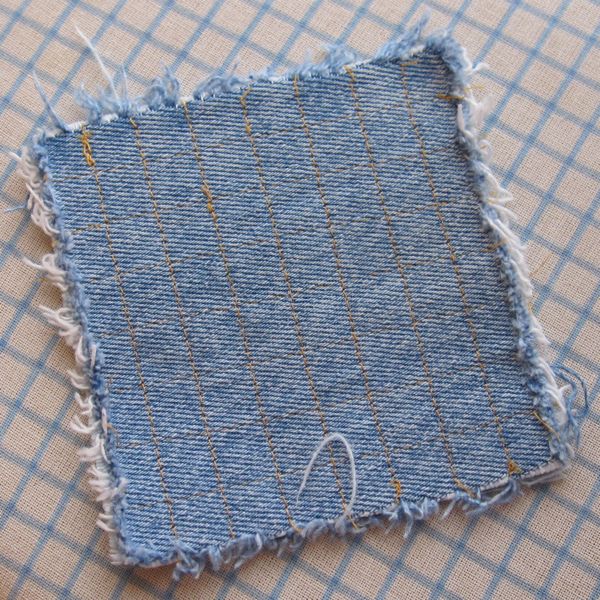
At last! The final Craft Countdown post, and the final post of February. Project #10 was a denim coaster, with light wash on one side and dark on the other. I cut a 4″ square piece of each and stitched across with “jeans gold” thread at half inch intervals.

dark side light side

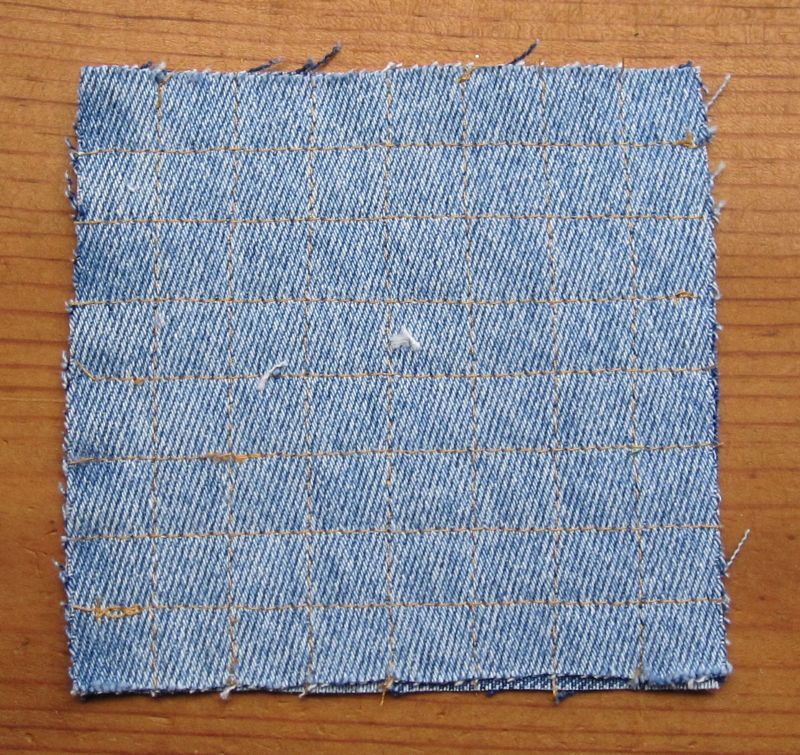
Now, I didn’t backstitch at all, I just cut the thread at the edge of the fabric. My thought was that it would fray with use and washing, giving a cut-offs look, but the quantity of stitching would ensure it would still hold together. And it did! (thus far.) Of course I pressed it before photographing it, but throwing it in the wash (unprotected by a mesh bag or similar) had exactly the effect I hoped for.

dark side light side


Homemade iron-on patches

Craft Countdown #9 was robot iron-ons. It was getting close to 11:30 and I was worried about running out of ideas, so I started rooting through my fabric drawers. The top one holds flannel-ish material and denim, and I pulled out a small remnant of robot fabric. I loved this fabric, but there is so little of it, the options for using it are limited. I had thought about making iron-on patches out of it, but hadn’t gotten around to it.

What I had on hand for fusible web in sheet form was Wonder Under, so that is what I used.

materials

I cut pieces, lined them up with the pictures, and ironed them down. Of course, it being 11:30, I did two dumb things: I started ironing one on upside-down, necessitating a later cleaning of the iron, and I peeled the paper off before cutting them instead of leaving it as a protective backing. They’re still cute.

robots!

Now I just have to figure out what to do with them. I have made these before, out of other fabrics that had nice little pictures, but they languish in a drawer for the most part.

too many iron-ons

Of course, making the business card case and the memo pad holder gave me a use for some of my commercial iron-ons, so maybe these will see use in such projects as well.


Spray of flowers

We have come to Craft Countdown #7, the only one for which I bought new materials. My half bath has an absurd amount of shelf space that I really do not have any need for. It is also painted a shade of periwinkle that I believe was engineered in the laboratory to coordinate with as few other colors as possible. I decided to go with green and yellow as accent colors, which work okay, and a mild frog theme. There are four cubbies on each side of the mirror, and one was empty; it had held a large bar of soap that is now in use. I wanted something a little livelier than the other cubbies’ contents.

left side right side

I dropped by the dollar store while running errands in the afternoon, and found some nice looking yellow roses that I picked up. When I got home and cut them apart, I discovered I could move the leaves, so I pushed them all up right below the blossoms. I bent the stems around so the flowers would stand at varying heights, and wired them together.

materials from top

Then I found some (accidentally perfectly) coordinating ribbon from my stash and wound a length around the bottom to hide the tangle of stems. Initially I had it pinned together, but the ribbon was actually iron-on, so later I went back and pressed it so it would stick to itself and stay wound.

base middle

It serves its intended purpose!

in place


Gecko memo

Inspired by Craft Countdown #3, the business card case, I made a memo pad case for #8. I was also inspired by the fact that I had a big gecko iron-on that didn’t fit on the business card case.

I had bought some memo pads before the holidays, in case any small children needed entertaining with coloring and stickers, so I made the case to fit them: about a half inch wider, and probably somewhat more than a half inch taller, times two.

closed up open

The pocket is a piece of stiff white fabric with each edge folded in a half inch, and the open edge tucked under again (so it is folded down by 1/4″ twice). I stitched very close to the raw edges on the sides and bottom to keep the seam allowance fabric from scrunching when the memo pad was inserted.

undone but closed totally undone

The cover was a little flimsy, since it was just thin felt, so later on I decided to add a small pocket to it mostly to stiffen it up. I then had a bunch of uneven stitch lines, so I thought I needed either more stitching, or less. Since less would have been difficult, I went around with a zigzag. I like the result.

new pocket fixed stitches


Trio of bookmarks

Craft Countdown #5 was bookmarks. A few years ago I bought a pack of plain bookmark-sized cardstock to make bookmarks for friends as Christmas gifts. That was still bumming around my stash so I thought for variety in the Countdown I would make some bookmarks.

some stuff

It helps in endeavors like this to have an obscenely large sticker collection.

o the humanity

To be fair, that file also holds greeting cards.

Unfortunately, the eyelets I bought in the scrapbooking section of a store were incompatible with the pliers I bought in the sewing section of the same store! I had to shimmy a few smashed eyelets off the pin of the pliers with another pair of pliers before I gave up. And now I should sort them out of my bin of eyelets so I don’t have this experience again.

But without further ado, the finished bookmarks:

without tassel with tassel

And, a Happy Birthday to my Aunt Liz!


Business dinosaurs

This is #3 from the Craft Countdown.

Sometime early in 2010, after calendars went on deep sale, I bought the 2010 Sewing Calendar from Accord Publishing. It was an odd beast; it looks like it should be a page-a-day, but each page has three to four days on it (weekends share a third of a page). Still, that makes 104 sewing projects, of which I had yet to make any before New Year’s Eve.

As I flipped through, the felt business card case caught my eye. I have been unable to find it online – the website of the person it’s attributed to, Lauren Brandy, is now all about painting – but there are a great many tutorials available, several of which are similar.

calendar and page

I thought about embellishing mine with buttons, but was dissatisfied with my selection. However, I had a number of iron-on appliques bought before I realized I just don’t make things that appliques go on, and they came out to play. A button did as well; I changed the closure from velcro to a button and elastic loop.

outside view close-up close-up

Originally I planned to have a shot of the open, empty case, saying I just needed business cards to go in it, but between then and now my lovely sister made me some!

inside view


Century post!

Today is my 100th post on this blog. That includes the little nothing posts, of course, but I’m still going to count it. A little trip down memory lane: Post 10 was about amigurumi two peas in a pod, post 25 was about mending tears, post 50 was an early sketchbook update, and post 75 was the notice that my regular post, about science fiction embroidery, would be up later than usual. All of this unless I miscounted, of course.

Today I’ll share with you Craft Countdown item #6. It occurs to me this one was also not completely from scratch, as I had made the tracing and transferred it to wash-away embroidery paper prior to New Year’s Eve.

Lowly Worm!

If you don’t know who that is, get thee to a library or book store and look up Richard Scarry, who owns the copyright. I couldn’t relocate the specific source of this particular Lowly Worm image, unfortunately, and the colors I’d written down didn’t really make sense to me, so I used a mishmash of the colors from the books I did have accessible. This was easily the most time-consuming of the ten projects, but well worth it.


Paint card notepads

Onward to Craft Countdown #4. I’ve been enamored of this idea since I found the tutorial for it on Whimsy Love a long time ago. The idea is to make little matchbook-like notepads out of paint color cards. My paint cards were all boring colors I’d actually considered using for decor, so I used different heavy paper instead: two cards from the Pilates Body Kit (not ones with exercises on them) and one former notebook cover. You need some things:

materials

The paper trimmer isn’t essential, but it would not have been possible for me to do this as one of my ten-by-midnight crafts without it. The sturdy stapler is definitely a must. I trimmed the notebook cover to remove a strip of black material that had formed the spine, and the opposite side to eliminate the rounded corners so it would be symmetric. To fold the covers, I scored the paper with a mechanical pencil – with the lead out on the bottom (3/4″) fold, and with the lead retracted to fold the top down. As recommended, I used 20 sheets of paper per notepad, cut 1/4″ smaller than the covers in each direction, and centered. That was about right – too much more and stapling would have been very difficult.

I didn’t worry much about getting my staples symmetric, but I definitely felt two would be necessary for notepads this size. Since the one notepad had a large stretch of plain blue, I applied some additional decoration.

front view back view

looking inside


Ulu knife sheath

I’ve shown my Ulu knife on here before. It’s fun but it is hard to store. For Christmas I asked for an Ulu knife sheath, but my mother decided to spend her Christmas budget on other things, so I got this:

ulu sheath kit

My father was still amusedly shaking his head at the whole thing, but he was conscripted to help. Mother included a tracing of an Ulu knife in the kit, so I cut that out, traced it onto the leather, and added a seam allowance to the curved edges. Dad cut the pieces out for me with a utility knife and lent me his leather punch. I used one of the purse straps to make a strap for holding the blade in.

The purse instructions said to use saddle stitch for most everything, which is just double running stitch (Holbein) simultaneously with both ends of the same thread. I followed those instructions and then sewed the strap on afterward. To make the open edge (necessary to get the knife in and out) look the same I did a double running stitch on each side individually.

leather punch sewn up

At this point I had to pause until I got home to my actual knife. I wanted the strap to hold it in snugly, so I didn’t want to guess on positioning the closure. Retroactively (by an hour or two) it became Craft Countdown #1. I determined where to cut the strap and epoxied black velcro to each side.

with velcro

It fits really well. Now I can stash it in a drawer!

how it fits all sealed away


Stately soap and a countdown

On New Year’s Eve, I was going to go to a First Night event, but the friend I would have been staying over with was kind of lukewarm on the idea (she was not completely healthy), and I had just gotten back the day before from my long holiday trip, so I wasn’t so up for going out anyway. I decided to stay home and craft in the New Year. At some point in the afternoon I had the idea to complete ten projects by midnight, like the last ten seconds’ countdown. I didn’t expect to do everything from scratch, though as it turned out I did all but #1 from scratch. Also, except for the flowers used in #7, I didn’t buy anything new for the projects. Here’s the Craft Countdown list:

1. Ulu knife sheath
2. Vermont soap
3. Business card holder
4. Trio of “paint card notepads”
5. Trio of bookmarks
6. Lowly Worm
7. Flower decoration
8. Memo pad case
9. Robot iron-ons
10. Denim coaster

Since work will be busy through March and I’d like to avoid a replay of the baby sloth episode (though baby sloths are well worth the bandwidth), I’ll post individual entries for each of these, spread out with other entries. Today, item #2!

I stopped in a La Quinta on my drive back from the Midwest to New England, and they had lovely orange-scented soap. The only problems with it were that it was small, as one would expect, and also kind of hard. No problem; I’ve solved that before. This time, in addition to water, I drizzled in some orange-scented bath gel (I like citrus scented bath products). And then I decided to get fancy with the shaping, and dug out a cookie cutter. I am ridiculously tickled by the result:

top view angle view

As before, I diced up the soap fairly fine but not perfectly (it was two La Quinta bars), threw it in a bowl with water and bath gel, and microwaved it to melt/dissolve it. I was a little subtler with the heating this time, doing shorter stints, and I think that helped. Then I put the cookie cutter on waxed paper and used a rubber spatula to scoop and press the soap into it. I left it for several hours to cool and solidify, and then was able to press it out by hand.