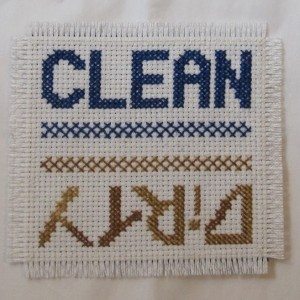
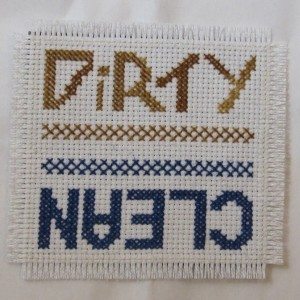
Now that I have a second person in the house, dishes get done by someone who is not me (this is a wonderful thing). Because of that, it became a Good Idea for the dishwasher to indicate whether the contents are clean or dirty. Being me, I designed such an indicator from scratch. It’s a cross-stitch square to be applied to a piece of self-adhesive magnet sheet.
This one isn’t actually ours, it’s one I made for a friend, which is why it looks pristine. The pattern is available as a pdf download. Colors are not included; I used unlabeled floss left over from other projects, and neither of them appears to be DMC (according to my color card).
If you want to make one that looks like the one above, you’ll need a crisp dark blue floss and one that variegates between tan and sand color. Don’t worry about matching up the colors in the variegated side; sudden changes, stitches that are half one color and half another, and pools of one or the other extreme color add to the “dirty” vibe. I used 2 strands on 14 count Aida; you might decide the fuller look of 3 strands would be better.
After stitching the middle, I used a single strand of white floss to secure the edging inside the fringe (which had yet to be cut) with a neat whipstitch. I secured each end of each strand in the colored floss of the interior, came out one square away from the image, and went back down two squares outward of that. Repeat in the next square over, so the back of the work shows gently slanted stitches. At the corners, five stitches share an inner corner.
For extra security (our magnet is showing most of its wear in the fringe region), I backstitched across the middle of the whipstitches all the way around and out to the edge of the whipstitch (i.e., the 2nd and 4th whipstitches sharing an inner corner actually share two inner corners, because a second stitch goes from their outer end to the corner of the backstitch line). This thread was also secured in the colored stitching.
To make it easier to remove the magnet from the dishwasher without pulling the fringe out, I wanted to bevel the magnet with my utility knife. However, I realized it was far too thin for that, so I beveled it by rubbing the outer edges on sandpaper. After wiping off the dust, I peeled off the paper backing and pressed it onto the back of the stitching.
Finally, for extra extra security, I taped off the fabric outside the white stitching with masking tape and brushed a thin layer of Mod Podge on the interior. After that dried, I peeled off the tape, trimmed the fabric to 3 rows outside the white stitching, and pulled out the crosswise threads of the fabric outside the white stitching to make fringe.
