Archive for January, 2012

Gecko memo

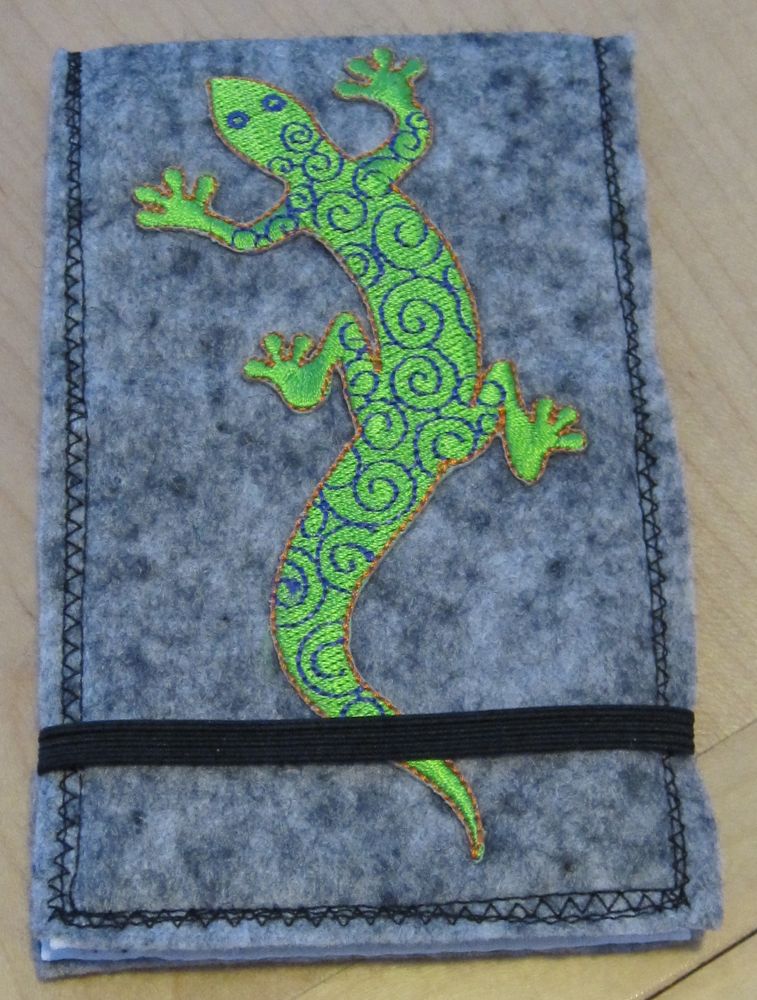
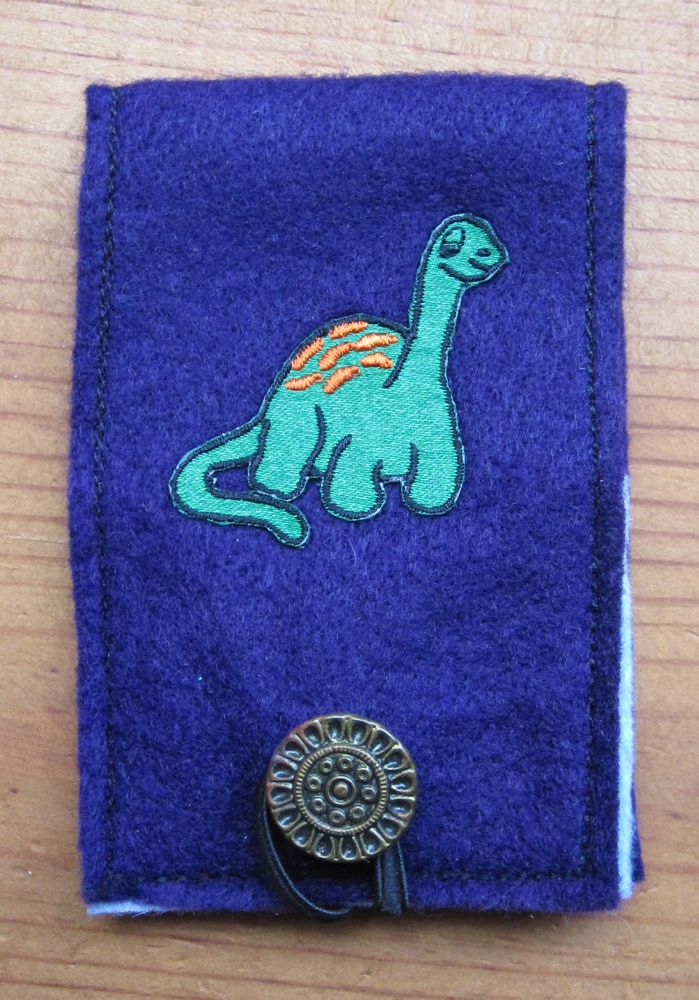
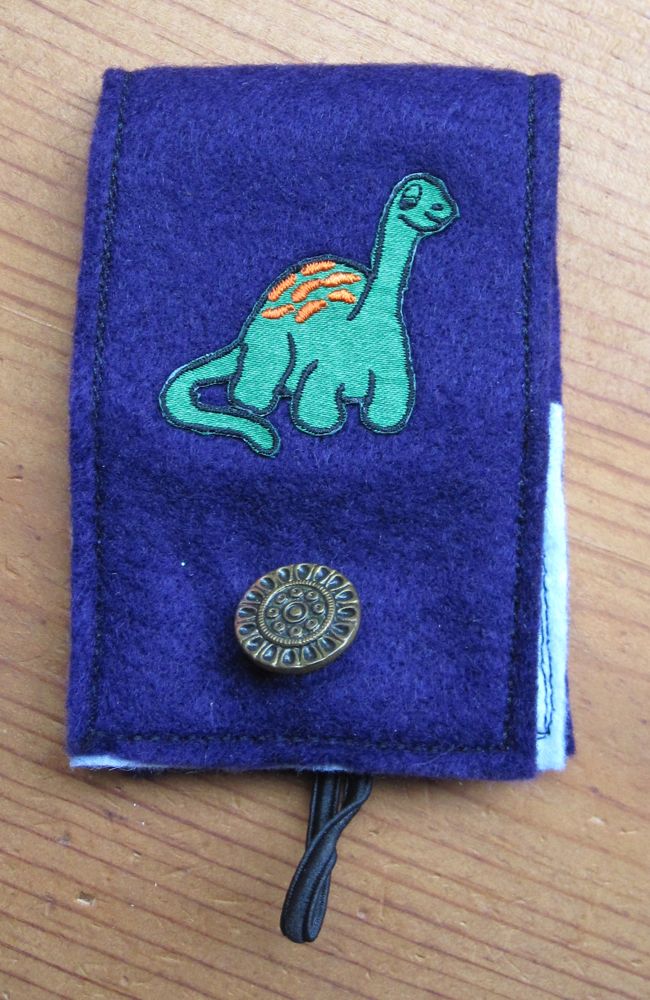
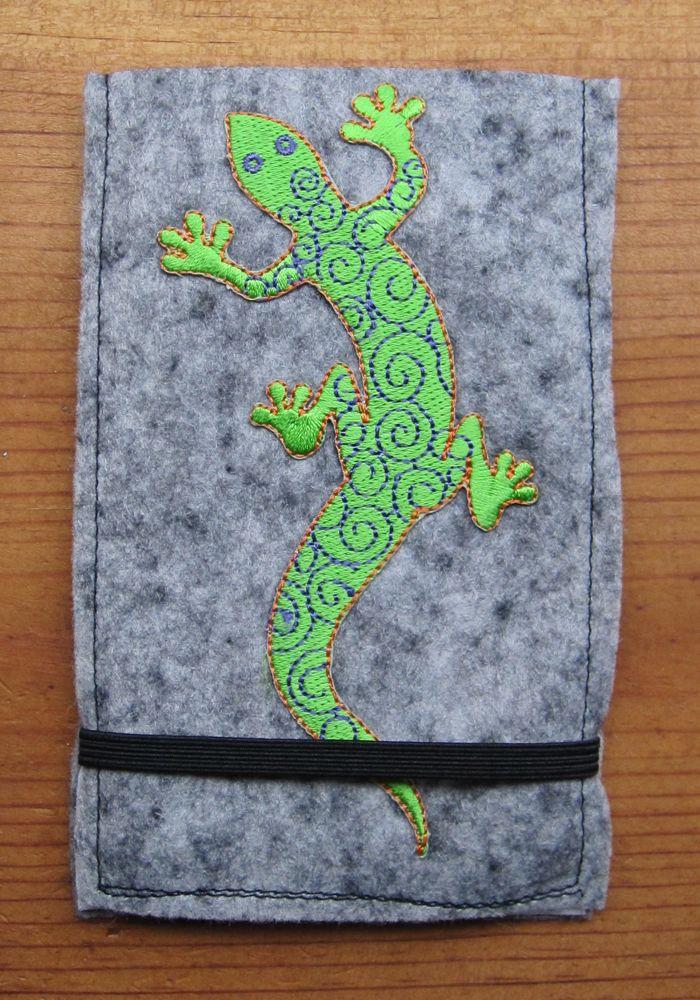
Inspired by Craft Countdown #3, the business card case, I made a memo pad case for #8. I was also inspired by the fact that I had a big gecko iron-on that didn’t fit on the business card case.

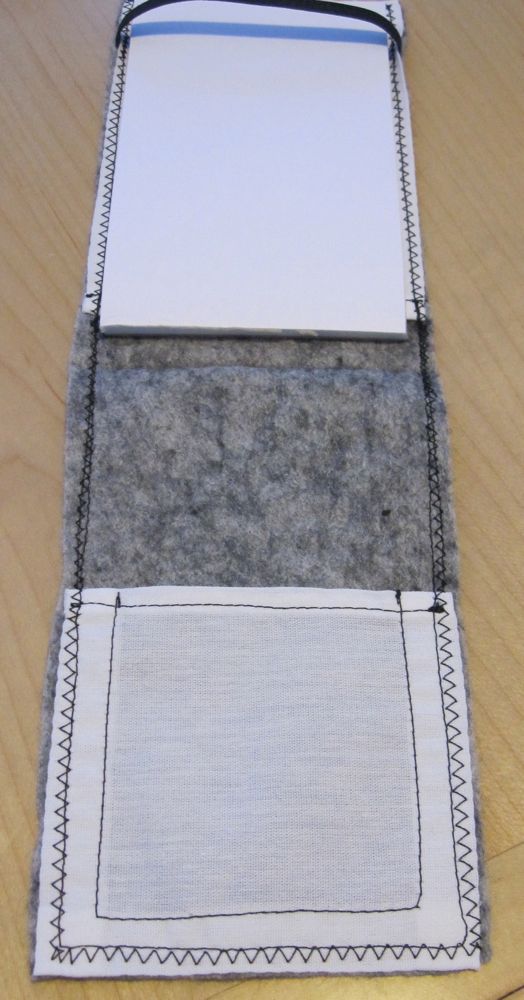
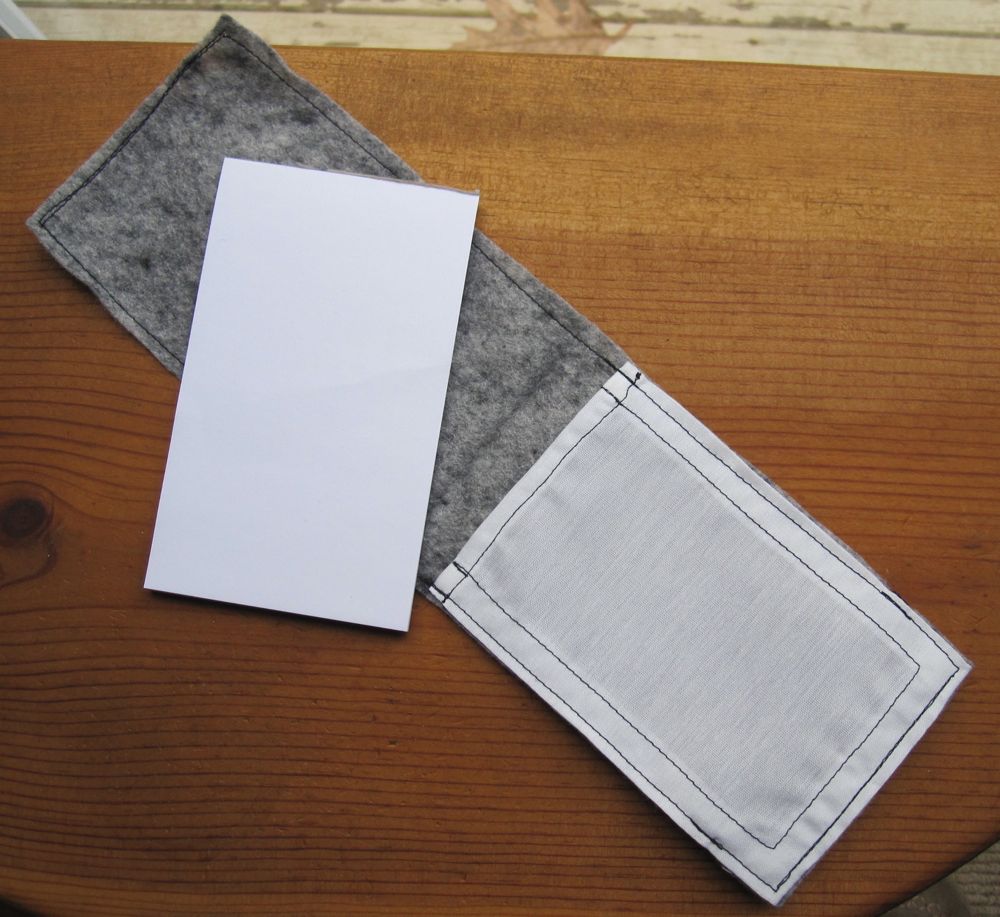
I had bought some memo pads before the holidays, in case any small children needed entertaining with coloring and stickers, so I made the case to fit them: about a half inch wider, and probably somewhat more than a half inch taller, times two.

closed up open

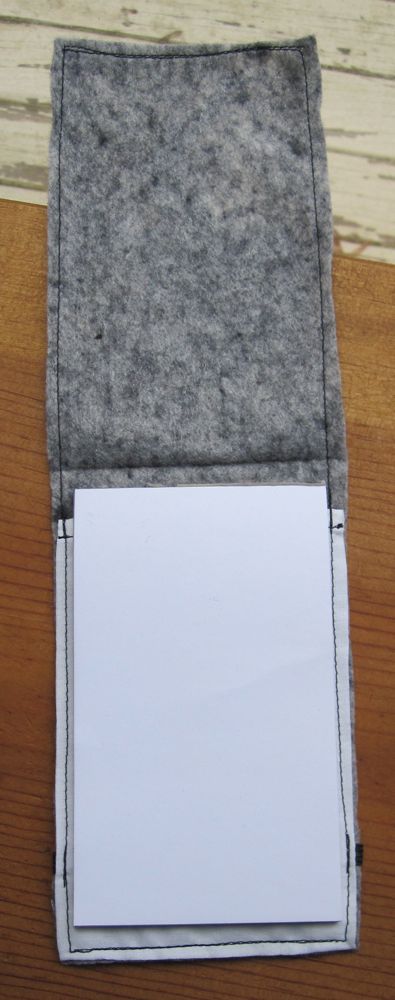
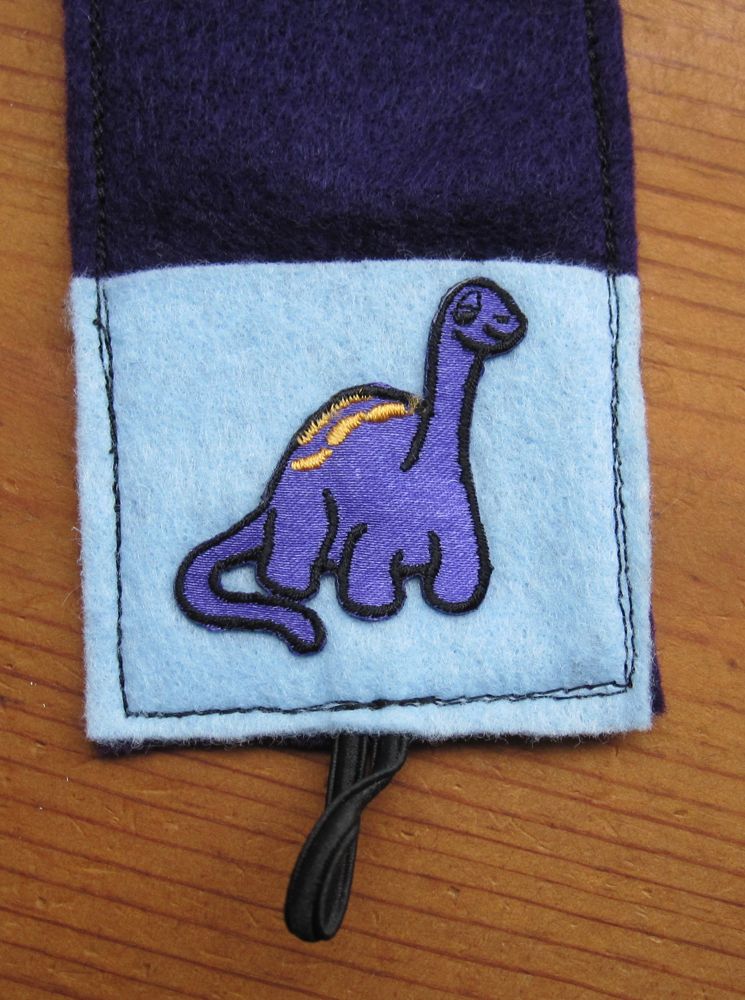
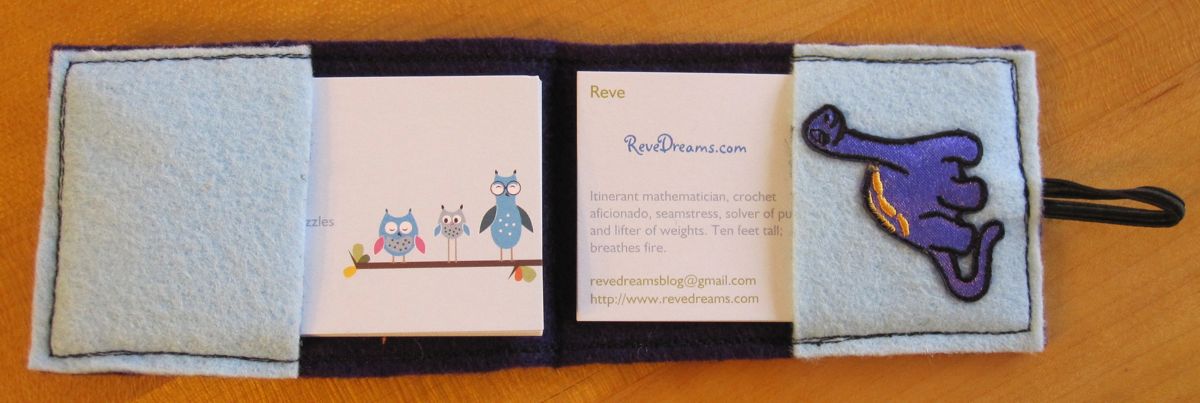
The pocket is a piece of stiff white fabric with each edge folded in a half inch, and the open edge tucked under again (so it is folded down by 1/4″ twice). I stitched very close to the raw edges on the sides and bottom to keep the seam allowance fabric from scrunching when the memo pad was inserted.

undone but closed totally undone

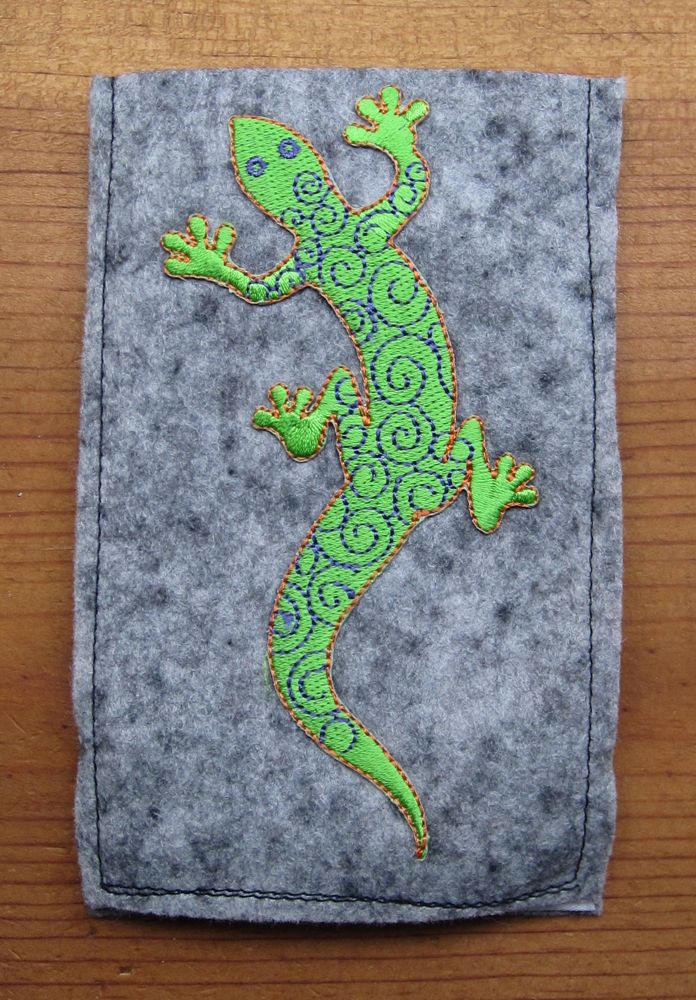
The cover was a little flimsy, since it was just thin felt, so later on I decided to add a small pocket to it mostly to stiffen it up. I then had a bunch of uneven stitch lines, so I thought I needed either more stitching, or less. Since less would have been difficult, I went around with a zigzag. I like the result.

new pocket fixed stitches


Trio of bookmarks

Craft Countdown #5 was bookmarks. A few years ago I bought a pack of plain bookmark-sized cardstock to make bookmarks for friends as Christmas gifts. That was still bumming around my stash so I thought for variety in the Countdown I would make some bookmarks.

some stuff

It helps in endeavors like this to have an obscenely large sticker collection.

o the humanity

To be fair, that file also holds greeting cards.

Unfortunately, the eyelets I bought in the scrapbooking section of a store were incompatible with the pliers I bought in the sewing section of the same store! I had to shimmy a few smashed eyelets off the pin of the pliers with another pair of pliers before I gave up. And now I should sort them out of my bin of eyelets so I don’t have this experience again.

But without further ado, the finished bookmarks:

without tassel with tassel

And, a Happy Birthday to my Aunt Liz!


Business dinosaurs

This is #3 from the Craft Countdown.

Sometime early in 2010, after calendars went on deep sale, I bought the 2010 Sewing Calendar from Accord Publishing. It was an odd beast; it looks like it should be a page-a-day, but each page has three to four days on it (weekends share a third of a page). Still, that makes 104 sewing projects, of which I had yet to make any before New Year’s Eve.

As I flipped through, the felt business card case caught my eye. I have been unable to find it online – the website of the person it’s attributed to, Lauren Brandy, is now all about painting – but there are a great many tutorials available, several of which are similar.

calendar and page

I thought about embellishing mine with buttons, but was dissatisfied with my selection. However, I had a number of iron-on appliques bought before I realized I just don’t make things that appliques go on, and they came out to play. A button did as well; I changed the closure from velcro to a button and elastic loop.

outside view close-up close-up

Originally I planned to have a shot of the open, empty case, saying I just needed business cards to go in it, but between then and now my lovely sister made me some!

inside view


Century post!

Today is my 100th post on this blog. That includes the little nothing posts, of course, but I’m still going to count it. A little trip down memory lane: Post 10 was about amigurumi two peas in a pod, post 25 was about mending tears, post 50 was an early sketchbook update, and post 75 was the notice that my regular post, about science fiction embroidery, would be up later than usual. All of this unless I miscounted, of course.

Today I’ll share with you Craft Countdown item #6. It occurs to me this one was also not completely from scratch, as I had made the tracing and transferred it to wash-away embroidery paper prior to New Year’s Eve.

Lowly Worm!

If you don’t know who that is, get thee to a library or book store and look up Richard Scarry, who owns the copyright. I couldn’t relocate the specific source of this particular Lowly Worm image, unfortunately, and the colors I’d written down didn’t really make sense to me, so I used a mishmash of the colors from the books I did have accessible. This was easily the most time-consuming of the ten projects, but well worth it.


Paint card notepads

Onward to Craft Countdown #4. I’ve been enamored of this idea since I found the tutorial for it on Whimsy Love a long time ago. The idea is to make little matchbook-like notepads out of paint color cards. My paint cards were all boring colors I’d actually considered using for decor, so I used different heavy paper instead: two cards from the Pilates Body Kit (not ones with exercises on them) and one former notebook cover. You need some things:

materials

The paper trimmer isn’t essential, but it would not have been possible for me to do this as one of my ten-by-midnight crafts without it. The sturdy stapler is definitely a must. I trimmed the notebook cover to remove a strip of black material that had formed the spine, and the opposite side to eliminate the rounded corners so it would be symmetric. To fold the covers, I scored the paper with a mechanical pencil – with the lead out on the bottom (3/4″) fold, and with the lead retracted to fold the top down. As recommended, I used 20 sheets of paper per notepad, cut 1/4″ smaller than the covers in each direction, and centered. That was about right – too much more and stapling would have been very difficult.

I didn’t worry much about getting my staples symmetric, but I definitely felt two would be necessary for notepads this size. Since the one notepad had a large stretch of plain blue, I applied some additional decoration.

front view back view

looking inside


Sculpture report

I had my first sculpture class Monday night. The description said we would spend the first class making little idea sculptures, and the remaining three working on one larger sculpture. So far, that is accurate! I spent my time making five small pieces, and I still have no idea what I will start work on next week.

The first piece was a sort of mask, which I essentially made just as a doodle. The teacher had suggested, if we did not have an idea in mind, that we just lump clay together and mold it with no particular goal, and that similarly to how clouds will resolve themselves into shapes when one looks at them long enough, we might start to see little figures to draw out. Our “inner gargoyle,” he said. This is not my inner gargoyle, but I like it.

carnival mask

Second I started working on one of the few ideas I’d had prior to class: a winged toad with a satisfied grin. It did not turn out as planned. It turned out better than planned.

toad dragon toad dragon

I was starting to run dry of ideas, and the next thing I made started out as a tall ghostly creature with arms. I briefly thought about making a Hattifattener, but ended up with a horse-like dragon.

horse dragon

The teacher was speaking to a woman next to me about her sculpture and mentioned something about owls. I was inspired to make an owl, odd as he might be.

goofy owl

Here is another view of the four pieces so far.

the story so far

Finally, there was about an hour left in class, and I had a big lump of clay and no more ideas. I started pushing it around, and after going through a Mahna Mahna backup singer type piece, I produced this:

whatever this is I'm really not sure

Incidentally, the only real gargoyle I made is the last piece – technically, a gargoyle is a waterspout, eliminating runoff damage to masonry by shooting water away from the building. If it’s not a waterspout, but it’s on the building, it’s a grotesque.


Ulu knife sheath

I’ve shown my Ulu knife on here before. It’s fun but it is hard to store. For Christmas I asked for an Ulu knife sheath, but my mother decided to spend her Christmas budget on other things, so I got this:

ulu sheath kit

My father was still amusedly shaking his head at the whole thing, but he was conscripted to help. Mother included a tracing of an Ulu knife in the kit, so I cut that out, traced it onto the leather, and added a seam allowance to the curved edges. Dad cut the pieces out for me with a utility knife and lent me his leather punch. I used one of the purse straps to make a strap for holding the blade in.

The purse instructions said to use saddle stitch for most everything, which is just double running stitch (Holbein) simultaneously with both ends of the same thread. I followed those instructions and then sewed the strap on afterward. To make the open edge (necessary to get the knife in and out) look the same I did a double running stitch on each side individually.

leather punch sewn up

At this point I had to pause until I got home to my actual knife. I wanted the strap to hold it in snugly, so I didn’t want to guess on positioning the closure. Retroactively (by an hour or two) it became Craft Countdown #1. I determined where to cut the strap and epoxied black velcro to each side.

with velcro

It fits really well. Now I can stash it in a drawer!

how it fits all sealed away


First Friday

Happy New Year, everyone! It is a time to think of fresh beginnings. I am anticipating big changes this year; the end of the year is going to look a lot different from the beginning. For now, though, I am thinking of crafty resolutions.

It is important to express your creative side, to tend to your mental garden. Here are some ways I plan to do that for myself this year:

  1. Design a new crochet pattern every month, on average.
  2. Try a craft I’ve never done before. Possibilities include soapmaking (the right way), candlemaking, quilling, wood carving, macrame, needle felting, Chinese knotting, tatting, and throwing pottery on the wheel.
  3. Finish two more pieces for my Children’s Book Quilt.
  4. Make my summer hat, before it is in season.
  5. Finish my Fibonacci-themed wall quilt pattern.
  6. Make a clothing pattern template for myself, following the directions in How To Make Sewing Patterns.
  7. Take better and more creative pictures of my finished projects. This is complicated by the fact that I live in northern New England, where (especially in the winter, but to some extent in the summer) natural light is in short supply even during the day.

I’m also taking a four-session sculpture class starting Monday. I did a semester of sculpture in college and am looking forward to getting my hands in the clay again. How are you going to tend your creative plot?

Oh, and as for my First Friday plans, I have but three words: Christmas tree bonfire.

Upcoming: You may be wondering what happened to the sketchbook updates I promised… well, I lost my sketchbook. Perhaps if I’d had time to clean as much as I’d wanted before leaving for the holidays it would have shown up, but now I’m pretty sure I don’t have time to finish it even if I find it tonight. So that’s sad and kind of a dumb reason to miss out, but there it is. Instead, we have the rest of the New Year’s Eve fun, some candy animals, a hat, and sculpture class reports – which should actually take us well into February.

I leave you with a beautiful Christmas gift from my sister:

hugs and stumpy

We’ll take a cup o’ kindness yet, for auld lang syne!


Quarterly Noms

I haven’t had a lot of time to cook, between being very busy with work and then traveling for the holidays, so I was concerned about this installment of Quarterly Noms. However, it occurred to me that I do a number of things because of not having time, to try to still eat well despite that. Here are some.

When I do have time, I try to stock the freezer with things I can take for lunch and have for dinner. I don’t just use them straight through (I wouldn’t want to have the same thing so many times in a row anyway), but they are an excellent supplement and last a couple of months. This time around I made some standby favorites: spinach chicken pie and stuffed bread, both with turkey frozen after Thanksgiving. The name “spinach chicken pie” is a bit misleading, since the recipe also heavily features tomato and potato, the former in the filling along with onion, tarragon, garlic, and cheese. I modified the original recipe, from a forgotten magazine many years ago, so the crust is now frozen spinach and sweet potatoes, instead of the original wilted fresh spinach and baking potatoes. I found the fresh spinach completely disintegrated, making the dough a sort of green Play-Doh-like substance which was hard to work with and not incredibly appetizing. The frozen spinach seems to hold together better, giving an appealing mottled look in which you can still tell the components. The crust also includes egg, salt, and flour. I use an extra-deep pie pan for this, and often still have overflow – sweet potatoes are bigger than regular potatoes, and I also throw in more spinach than is called for.

components done

The recipe titled “stuffed whole wheat bread” gives no clue whatsoever to its contents, which are ground turkey, pesto, fennel, onion, chive and onion cream cheese, bread crumbs, and spinach. It is absolutely delicious hot or cold. I was going to buy whole wheat pizza dough to make calzone-sized versions, but decided to be ambitious and make my own bread. I used a combination of barley flour and King Arthur Flour’s white whole wheat, a finely milled whole wheat flour that is basically just as healthy as wheat flour without needing the special accommodations. The barley flour is because when I got some bad cholesterol numbers – despite being a pretty good weight, exercising regularly, and eating lots of vegetables and not much dairy fat or white flour – I did research on how one can lower cholesterol, hoping perhaps I could tweak my diet and see some improvement. Barley extract has apparently been shown to do very good things for cholesterol. It is not commercially available, or at least it wasn’t when I was checking, but since then I have tried to increase the regularity with which I eat barley. This was my first experiment with barley flour. I used my grad school officemate’s bread recipe, which relies on you knowing what bread dough should feel like when it has the right amount of flour in it, but is otherwise easy and good. The bread is stuffed between the first and second rises if there are two, and between the second and third if there are three.

Of course, I made an error. Barley has WAY LESS gluten than wheat, though it is not gluten-free, and so using half barley flour severely caps the amount the dough can rise and makes it fragile – it breaks apart like aerated cookie dough instead of stretching. I should have used all barley flour in the spinach chicken pie, where that wouldn’t have mattered, and significantly less in this. However, it worked okay; it was just a bit harder to manage and calzones were out of the question.

components complete

As a final note, one of my primary weapons for healthy eating when work is busy is making salads ahead. On Sundays I make salads for the week’s lunches, chopping and mixing and distributing into five containers. This allows me to have a decent variety of vegetables in my salads, save time by doing everything at once, and (most importantly) make sure they are there and easy to eat. To prevent Thursday and Friday’s salads from having that “off” smell, I put a single folded paper towel in the top of each container, which absorbs excess water and keeps the salad fresh for the needed length of time.

set-up salads!

I also dress my salads with plain balsamic vinegar, which I keep in a travel toiletry bottle in my desk. You could use any dressing that doesn’t need refrigeration – a friend likes to dress her salads with soy sauce and olive oil, which would certainly work.

arty vinegar shot

Happy healthy eating!


Stately soap and a countdown

On New Year’s Eve, I was going to go to a First Night event, but the friend I would have been staying over with was kind of lukewarm on the idea (she was not completely healthy), and I had just gotten back the day before from my long holiday trip, so I wasn’t so up for going out anyway. I decided to stay home and craft in the New Year. At some point in the afternoon I had the idea to complete ten projects by midnight, like the last ten seconds’ countdown. I didn’t expect to do everything from scratch, though as it turned out I did all but #1 from scratch. Also, except for the flowers used in #7, I didn’t buy anything new for the projects. Here’s the Craft Countdown list:

1. Ulu knife sheath
2. Vermont soap
3. Business card holder
4. Trio of “paint card notepads”
5. Trio of bookmarks
6. Lowly Worm
7. Flower decoration
8. Memo pad case
9. Robot iron-ons
10. Denim coaster

Since work will be busy through March and I’d like to avoid a replay of the baby sloth episode (though baby sloths are well worth the bandwidth), I’ll post individual entries for each of these, spread out with other entries. Today, item #2!

I stopped in a La Quinta on my drive back from the Midwest to New England, and they had lovely orange-scented soap. The only problems with it were that it was small, as one would expect, and also kind of hard. No problem; I’ve solved that before. This time, in addition to water, I drizzled in some orange-scented bath gel (I like citrus scented bath products). And then I decided to get fancy with the shaping, and dug out a cookie cutter. I am ridiculously tickled by the result:

top view angle view

As before, I diced up the soap fairly fine but not perfectly (it was two La Quinta bars), threw it in a bowl with water and bath gel, and microwaved it to melt/dissolve it. I was a little subtler with the heating this time, doing shorter stints, and I think that helped. Then I put the cookie cutter on waxed paper and used a rubber spatula to scoop and press the soap into it. I left it for several hours to cool and solidify, and then was able to press it out by hand.